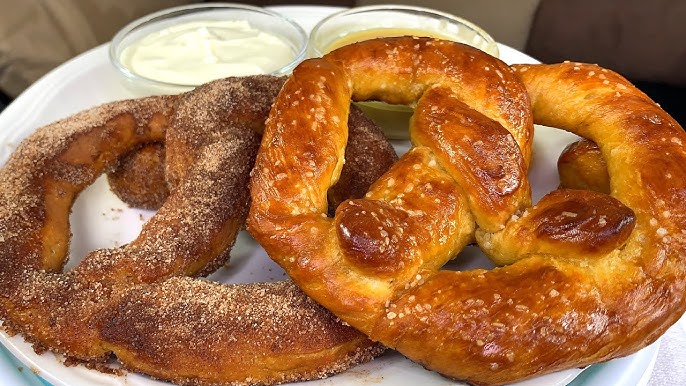
Auntie Anne’s Pretzel Recipe: There’s something utterly irresistible about the warm, buttery aroma that hits you the moment you step into an Auntie Anne’s store. Whether it’s the soft, chewy texture, the golden-brown crust, or the subtle sweetness in every bite, these pretzels have a way of stopping you in your tracks. Originating in a farmer’s market stand in Pennsylvania in 1988, Auntie Anne’s quickly became a staple in malls and airports across the U.S. and beyond. Their appeal isn’t just in the taste—it’s the experience.
Every pretzel is made fresh, twisted by hand, and baked to perfection. And let’s not forget the mouth-watering dips and sweet cinnamon sugar variations that elevate the classic pretzel game. Over time, fans have tried to recreate these heavenly snacks at home, and while nothing beats grabbing one fresh from the oven at a kiosk, this recipe comes incredibly close.
What Makes This Recipe Special?
This homemade version of Auntie Anne’s pretzels captures all the characteristics you love—soft interior, crispy crust, and buttery finish. But what sets this recipe apart is its simplicity and authenticity. You don’t need a commercial kitchen to get professional-quality results. With a handful of pantry staples and a little patience, you can whip up a batch of pretzels that rivals the original.
What’s even better? You can customize them however you like—salted, cinnamon-sugar, cheesy, or garlic butter. Plus, this guide walks you through every step, making it nearly foolproof. Whether you’re an experienced home baker or just dipping your toes into the dough world, this recipe ensures success from the first twist to the last bite.
Ingredients You’ll Need
For the Pretzel Dough
Before you dive into pretzel-making, gather all your ingredients. Here’s what you’ll need for the dough:
- 1 ½ cups warm water (110°F)
- 1 packet active dry yeast (about 2 ¼ teaspoons)
- 2 tablespoons brown sugar
- 1 teaspoon salt
- 1 tablespoon unsalted butter, melted
- 4 cups all-purpose flour (plus extra for kneading)
These ingredients combine to make a soft and elastic dough that is easy to shape and yields a chewy texture once baked.
For the Pretzel Bath and Topping
A key element in making Auntie Anne’s-style pretzels is the baking soda bath. This not only gives the pretzels their signature chewy exterior but also helps them develop that rich, golden-brown color. Here’s what you’ll need:
- ½ cup baking soda
- 9 cups water
- Coarse sea salt or pretzel salt for topping
- 2 tablespoons unsalted butter (for brushing after baking)
Optional for flavor variations:
- Cinnamon and sugar (for sweet)
- Shredded cheese
- Garlic powder
- Melted cheese or mustard for dipping
Pro tip: Always prepare your ingredients in advance. This mise en place approach makes the process smoother and prevents any mid-recipe scrambles to find what you need.
Step-by-Step Instructions to Make Auntie Anne’s Pretzels at Home
Step 1: Preparing the Dough
Start by activating the yeast. In a large mixing bowl, combine the warm water and brown sugar. Stir to dissolve the sugar, then sprinkle the yeast on top. Let it sit for 5–10 minutes until it becomes frothy. This froth is a sign that the yeast is alive and active, which is crucial for getting a good rise in your dough.
Once the yeast is bubbly, add the melted butter and salt. Gradually stir in the flour, one cup at a time. The dough will start out sticky but will become more cohesive as you mix. By the time you’ve added the fourth cup, the dough should start pulling away from the sides of the bowl. If it’s too sticky, add a bit more flour, one tablespoon at a time.
Transfer the dough onto a floured surface and knead it for about 5-7 minutes. You’re looking for a smooth, elastic texture that springs back when poked. Don’t rush this part—kneading develops the gluten, which gives the pretzels their signature chew.
Step 2: Kneading and Rising
Once kneaded, form the dough into a ball and place it in a lightly greased bowl. Cover the bowl with a clean kitchen towel or plastic wrap and let it rise in a warm, draft-free area for about 1 hour or until it doubles in size.
This rising phase allows the yeast to ferment the sugars, creating those delightful air pockets that make the pretzels so fluffy inside. If your kitchen is cold, you can place the bowl in an oven (turned off) with just the light on—this creates a perfect environment for dough to rise.
After it has doubled in size, punch the dough down gently to release the gas. Turn it out onto a floured surface and divide it into 8 equal portions. These will become your pretzels!
Step 3: Shaping the Pretzels
Here’s where the fun (and a bit of finesse) comes in. Take each dough ball and roll it into a long rope, about 20–24 inches in length. Don’t worry if they’re not perfectly uniform—practice makes perfect.
To shape a traditional pretzel, take the ends of the rope, form a U-shape, then twist the ends together twice and fold them down toward the bottom of the U. Press the ends gently into the dough to hold the shape. If this sounds tricky, think of it like tying a ribbon—but without pulling it tight.
Place your shaped pretzels on a parchment-lined baking sheet. Make sure there’s enough space between them so they don’t stick together as they rise and bake.
If you’re aiming for pretzel bites or sticks instead of the classic twist, just cut the ropes into bite-size pieces or simple lengths. These are great for dipping and make for excellent party snacks.
Step 4: Baking Soda Bath
This is a crucial step that separates a great pretzel from an okay one. The baking soda bath gives the pretzels their golden-brown color and chewy crust.
Bring the 9 cups of water to a boil in a large pot. Once boiling, carefully add the ½ cup of baking soda. Be cautious—it will bubble up. Stir gently until dissolved.
Using a slotted spoon, dip each pretzel into the baking soda bath for 20–30 seconds. Don’t leave them in too long or they’ll taste metallic. Let the excess water drip off before returning the pretzel to the baking sheet.
This alkaline bath mimics the traditional lye bath used in commercial baking. It alters the pH of the dough’s surface, which is what causes that deep brown color and firm texture during baking.
Step 5: Baking and Topping
Preheat your oven to 450°F (230°C). After your pretzels have had their soda bath, arrange them neatly on the baking sheet again. While they’re still damp, sprinkle coarse sea salt or pretzel salt over the top. Don’t be shy—the salt is part of the classic Auntie Anne’s flavor.
Bake the pretzels in the preheated oven for 12–14 minutes, or until they are a deep golden brown. Keep an eye on them, especially during the last few minutes. You’re aiming for that signature pretzel crust—crispy on the outside, soft and fluffy on the inside.
Once out of the oven, immediately brush each pretzel generously with melted butter. This adds shine, enhances flavor, and gives that indulgent, irresistible Auntie Anne’s finish.
Serve warm with your favorite dipping sauces—cheese, mustard, honey mustard, or even chocolate sauce if you’re feeling fancy!
Tips and Tricks for Perfect Pretzels
Common Mistakes to Avoid
Even though this recipe is pretty foolproof, there are a few pitfalls you should watch out for:
- Under-proofing the dough: Don’t rush the rising process. If your dough hasn’t doubled, your pretzels may turn out dense.
- Skipping the baking soda bath: It’s tempting to skip this, but don’t. It’s the key to getting that chewy texture and golden crust.
- Over-boiling in the baking soda bath: Too long in the solution and your pretzels can taste bitter or metallic.
- Not brushing with butter after baking: This step locks in flavor and gives the pretzels their shiny finish.
Also, make sure your oven is properly preheated and use parchment paper or a silicone baking mat to prevent sticking.
Making Pretzels Ahead of Time
Want to make these for a party or special event? You can prepare the dough a day in advance. Just cover it and refrigerate after the first rise. Let it come back to room temperature before shaping and baking.
You can also freeze the shaped, unbaked pretzels. After shaping, place them on a tray and freeze until solid. Transfer them to a freezer bag and store for up to a month. When you’re ready to bake, thaw slightly, give them the soda bath, then bake as usual.
Baked pretzels can also be frozen. Wrap tightly and store in an airtight bag. Reheat in a 300°F oven for about 10 minutes. They’ll be just as good as fresh.
Variations and Flavor Ideas
Cinnamon Sugar Twist
Once your pretzels come out of the oven, skip the salt and butter them generously. Mix ½ cup granulated sugar with 1 tablespoon cinnamon and sprinkle it all over the pretzels while they’re still warm.
For an extra sweet touch, serve with a side of cream cheese frosting or vanilla glaze. Perfect for dessert or a sweet snack.
Garlic Butter Delight
After baking, brush pretzels with a mix of melted butter and minced garlic (or garlic powder). Sprinkle with chopped parsley and a bit of grated Parmesan cheese.
This version tastes like garlic bread met a pretzel and had a delicious baby. It’s savory, buttery, and loaded with flavor.
Cheese-Stuffed Pretzels
Take your pretzels to the next level by stuffing them! Roll out your dough ropes a bit wider and place small chunks of cheddar or mozzarella along the center. Pinch the dough around the cheese to seal it in, then proceed with shaping and baking as usual.
When you bite into that warm, gooey cheese center, you’ll never want plain pretzels again.
FAQs about Auntie Anne’s Pretzel Recipe
Can I freeze the dough?
Absolutely! After the dough rises, shape it into pretzels and place them on a baking sheet lined with parchment paper. Freeze until solid, then transfer them to an airtight container or freezer bag. When you’re ready to bake, just let them thaw slightly, dip in the baking soda bath, and bake as directed.
What kind of flour works best?
All-purpose flour is perfect for this recipe and yields a soft yet chewy texture. If you want a slightly denser pretzel with more bite, you can substitute some of the all-purpose flour with bread flour. But for a classic Auntie Anne’s-style experience, stick to all-purpose.
Can I make these gluten-free?
Yes, but results may vary. Use a 1:1 gluten-free baking flour that contains xanthan gum for the best results. Keep in mind that gluten-free dough is more delicate, so handle it gently when shaping. Also, the texture may be slightly less chewy than traditional pretzels.
How do I get the golden-brown crust?
The secret lies in the baking soda bath. Boiling the pretzels in a baking soda solution before baking alters the pH on the surface of the dough, allowing it to brown beautifully in the oven. Don’t skip this step!
Can I use instant yeast?
Yes, instant yeast works just as well as active dry yeast and doesn’t require proofing. Simply mix it directly with the dry ingredients, then add warm water and proceed with the recipe as usual. Just make sure the water is not too hot, or it might kill the yeast.
Conclusion
What makes this homemade recipe so special isn’t just how closely it mimics the original. It’s that you can tweak it to your heart’s content. Sweet, savory, stuffed, or classic—your kitchen becomes the stage for all the variations you’ve craved while walking through the mall.
So what are you waiting for? Get your hands in some dough, roll out a few ropes, and twist your way into pretzel bliss. With a little patience and a lot of butter, you’ll have a tray of warm, chewy Auntie Anne’s pretzels ready to devour—no mall required.

