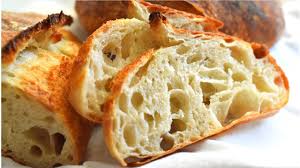
Artisan Bread Recipe: Artisan bread is the perfect way to combine simple ingredients into a masterpiece of flavor and texture. Known for its rustic crust and chewy interior, this bread type stands out from mass-produced loaves. Making artisan bread at home may sound intimidating, but with patience and a bit of practice, it becomes an enjoyable and rewarding activity.
What is Artisan Bread?
Artisan bread refers to bread crafted with traditional techniques, often using just flour, water, yeast, and salt. It’s free from preservatives and focuses on quality over quantity. The hallmark features include a crisp crust, airy crumb, and deep flavor, achieved through slow fermentation.
Benefits of Baking Your Own Bread
When you bake artisan bread, you control every ingredient, ensuring there are no additives or artificial flavors. Plus, the process is therapeutic—it’s a sensory journey from kneading the dough to the aroma filling your kitchen during baking. Best of all, the result is a loaf far superior to store-bought alternatives.
Ingredients for Artisan Bread
You don’t need a long list of ingredients to make artisan bread, but using high-quality items is key to achieving bakery-worthy results.
Essential Ingredients
- Flour: Bread flour is ideal for its high protein content, but all-purpose flour works too.
- Water: Use lukewarm water to activate the yeast.
- Yeast: Instant or active dry yeast is typically used.
- Salt: Enhances flavor and strengthens the dough structure.
Optional Add-ins for Flavor
- Seeds: Sunflower, sesame, or poppy seeds for added crunch.
- Nuts: Walnuts or almonds for a hearty texture.
- Herbs: Rosemary, thyme, or basil for a savory twist.
Tools You’ll Need
Having the right tools simplifies the bread-making process and ensures consistent results.
Basic Baking Tools
- Mixing Bowls: For combining and proofing the dough.
- Measuring Cups and Spoons: Accuracy is crucial for baking success.
- Bench Scraper: Handy for shaping and dividing dough.
Specialty Tools for Artisan Bread
- Dutch Oven: Creates a steam environment for a crispy crust.
- Baking Stone: Ideal for even heat distribution.
- Proofing Basket (Banneton): Helps maintain the dough’s shape during proofing.
The Science Behind Artisan Bread
Understanding the science behind artisan bread-making ensures your efforts pay off in a perfect loaf.
How Yeast Works
Yeast is a living organism that consumes sugar and releases carbon dioxide, causing the dough to rise. Its activity is influenced by temperature, hydration, and fermentation time.
Importance of Fermentation
Fermentation is the key to artisan bread’s complex flavor. As the yeast ferments, it develops natural acids that enhance the taste and texture of the bread. A long fermentation period yields the best results, allowing the dough to mature fully.
Preparing the Dough
The journey to artisan bread begins with careful preparation. Each step builds the foundation for a flavorful, well-textured loaf.
Step 1: Measuring Ingredients Accurately
Precision is non-negotiable in baking. Use a kitchen scale for accurate measurements—especially for flour and water. Incorrect ratios can lead to overly dry or wet dough.
Step 2: Mixing the Dough
Combine your ingredients in a large mixing bowl. Start by mixing flour, water, yeast, and salt until a shaggy dough forms. You can mix by hand or with a stand mixer using the dough hook attachment. Ensure the ingredients are thoroughly combined but avoid over-mixing.
Kneading Techniques for Artisan Bread
Kneading develops gluten, the protein responsible for the dough’s structure and elasticity.
Traditional Kneading Method
Turn the dough onto a floured surface and knead for 8–10 minutes, folding and pressing it repeatedly. The dough should become smooth and elastic.
No-Knead Method
Prefer a hands-off approach? The no-knead method relies on time instead of effort. After mixing, let the dough rest for 12–18 hours. The long fermentation naturally develops gluten, creating a soft and airy crumb.
First Rise – Bulk Fermentation
The bulk fermentation process is where the magic truly begins. This stage is all about letting the yeast do its job while flavor and structure develop in the dough.
What Happens During the Bulk Rise
During this stage, the yeast ferments the sugars in the flour, producing carbon dioxide gas. This gas creates bubbles in the dough, giving artisan bread its characteristic open crumb. The slow fermentation also allows complex flavors to emerge.
- Duration: Typically lasts 1–2 hours, but can go longer for no-knead recipes.
- Visual Indicators: The dough should double in size, and small bubbles should form on the surface.
Tips for Successful Fermentation
- Temperature Control: Maintain a warm (but not hot) environment, around 75–78°F (24–26°C).
- Fold the Dough: Gently fold the dough every 30 minutes to redistribute the yeast and equalize temperature.
Shaping the Dough
Shaping is a critical step that determines the final look of your bread. It also redistributes gases, helping the dough maintain structure during baking.
Common Shaping Techniques
- Boules (Rounds): Perfect for rustic loaves, boules are shaped into tight spheres.
- Batards (Oblongs): Great for sandwiches, these are slightly elongated shapes.
Start by turning the dough onto a lightly floured surface. Use a bench scraper to divide it into portions if making multiple loaves. Shape gently to avoid deflating the dough.
How to Avoid Overworking the Dough
Be gentle! Overworking can damage the gluten network and cause the bread to collapse during baking. Focus on light, quick movements when shaping.
Final Proofing
The final proofing stage gives the dough time to rest and rise before baking, ensuring a light and airy crumb.
Why Proofing Matters
Proofing lets the dough relax, allowing it to expand without tearing. It also ensures the yeast has enough time to complete fermentation, maximizing flavor and texture.
Creating the Perfect Proofing Environment
- Use a Proofing Basket (Banneton): This helps the dough maintain shape.
- Cover with Damp Cloth: Prevents the dough from drying out.
- Control Humidity and Temperature: A slightly warm, moist environment is ideal.
Final proofing usually takes 1–2 hours, or longer if your kitchen is on the cooler side.
Baking the Bread
This is where your dough transforms into a beautifully golden loaf. The baking process seals the structure and develops the iconic artisan crust.
Preheating the Oven
Preheat your oven to 475°F (245°C) for at least 30 minutes. If you’re using a Dutch oven, place it inside during preheating to ensure even heat distribution.
Using Steam for a Crispy Crust
Steam is the secret to achieving that signature crust. Here’s how to create steam:
- With a Dutch Oven: The lid traps steam released by the dough itself.
- Without a Dutch Oven: Place a pan of hot water on the bottom rack of the oven.
Bake your bread for 25–30 minutes with steam, then remove the lid or pan for the last 10 minutes to brown the crust.
Cooling and Storing Your Bread
Resist the temptation to slice your bread immediately! Cooling is essential to complete the baking process.
Why Cooling is Essential
As the bread cools, the interior continues to set, and the flavors fully develop. Cutting too soon can make the crumb gummy and uneven.
- Cooling Time: Let the loaf rest on a wire rack for at least 1 hour.
Best Practices for Storing Artisan Bread
- Short-Term Storage: Keep it in a paper bag to maintain the crust’s crispness.
- Long-Term Storage: Wrap in plastic and freeze for up to 3 months. Reheat in the oven to restore freshness.
Troubleshooting Common Issues
Even seasoned bakers encounter challenges. Here are solutions to common problems:
Why Did My Bread Not Rise?
- Possible Causes: Old yeast, incorrect water temperature, or insufficient fermentation time.
- Solution: Use fresh yeast and ensure your water is lukewarm (not hot). Allow enough time for proofing.
Fixing a Dense Loaf
Dense bread often results from under-proofing or too little hydration. Increase the proofing time or slightly adjust the water content in your recipe.
Flavor Variations and Additions
Artisan bread is versatile and can be customized with endless flavor options.
Adding Seeds and Nuts
Incorporate sunflower seeds, sesame seeds, or chopped walnuts into the dough for added crunch and flavor. Sprinkle extra on top before baking for a decorative touch.
Using Herbs and Spices
Mix fresh herbs like rosemary or dried spices like garlic powder into the dough. These additions pair well with savory dishes and elevate your bread to gourmet status.
Serving and Enjoying Artisan Bread
Freshly baked artisan bread is incredibly satisfying on its own, but there are plenty of ways to enjoy it.
Pairing with Soups, Salads, and More
Serve slices with hearty soups, fresh salads, or as the base for bruschetta. The bread’s chewy texture complements both light and rich dishes.
Creative Uses for Leftover Bread
- Croutons: Cube and toast for salads.
- Breadcrumbs: Process in a food processor for a versatile pantry staple.
- Bread Pudding: Use stale bread to make a comforting dessert.
Tips for Advanced Bakers
Once you’ve mastered the basics, challenge yourself with these advanced techniques.
Experimenting with Sourdough
Sourdough bread uses natural fermentation for a tangy flavor. It requires a starter, but the results are worth the effort.
Mastering Decorative Scoring
Scoring allows the bread to expand while baking and adds artistic flair. Use a sharp razor blade to create intricate patterns on the dough’s surface before baking.
FAQs About Artisan Bread Recipe
1. What is artisan bread?
Artisan bread refers to bread made using traditional methods, often by hand, and without the use of preservatives. It typically features a crisp crust, airy interior, and rich flavor.
2. What are the basic ingredients for artisan bread?
The key ingredients include flour, water, salt, and yeast. Some recipes may include additional elements like olive oil, herbs, or seeds for enhanced flavor.
3. How is artisan bread different from regular bread?
Artisan bread is characterized by its rustic appearance, chewy texture, and complex flavors, which are often achieved through a longer fermentation process. Regular bread may be mass-produced and include preservatives.
4. Do I need special equipment to make artisan bread?
While not mandatory, a Dutch oven or baking stone can help achieve the signature crusty texture. A kitchen scale is also useful for precise measurements.
5. How long does it take to make artisan bread?
The process can take anywhere from 12 to 24 hours, including fermentation time. This slow process enhances the flavor and texture.
6. Can I make artisan bread without yeast?
Yes, you can use a sourdough starter as a natural alternative to commercial yeast. This method adds a tangy flavor to the bread.
7. How do I store artisan bread?
To keep artisan bread fresh, store it in a paper bag at room temperature for up to 2 days. For longer storage, wrap it in plastic and freeze it.
8. Can I customize artisan bread recipes?
Absolutely! You can add ingredients like nuts, seeds, dried fruits, or spices to personalize your artisan bread.
Conclusion
Artisan bread-making is a labor of love, but the results are incredibly rewarding. From the crispy crust to the tender crumb, homemade bread elevates any meal. Remember, each loaf teaches you something new, so don’t be afraid to experiment and refine your technique.


