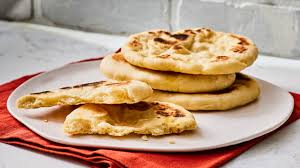
Arabic Bread Recipe: Arabic bread, also known as Khubz, is more than just food—it’s a cultural staple in Middle Eastern kitchens. Whether you’re scooping up hummus, wrapping shawarma, or dipping into olive oil and za’atar, this soft, puffy flatbread is the perfect companion to almost every dish.
Making it at home might sound intimidating, but with the right guidance and ingredients, you’ll be baking it like a pro. Not only is homemade Arabic bread fresher and tastier, but it also gives you full control over ingredients and flavor.
What is Arabic Bread?
Arabic bread, often referred to as Khubz, is a round, soft, and slightly puffed bread commonly found throughout the Arab world. While it’s closely related to pita, it differs slightly in texture and preparation depending on the region. In Lebanon, it’s thinner and softer. In Jordan and Palestine, it might be thicker and heartier. Despite the variations, Arabic bread is always a versatile essential, used to scoop, wrap, and accompany meals.
What makes it special? That magical pocket! When baked at a high temperature, steam puffs up the dough, creating a pocket inside. This makes it easy to slice and stuff with anything from falafel to grilled meats. It’s vegan, quick to prepare, and deliciously soft.
Why Make Arabic Bread at Home?
Ever bought a pack of pita only to find it dry or lacking that fresh aroma? That’s where homemade Arabic bread shines. You get:
- Freshness – Straight from your oven to your table
- Flavor – Nothing beats the warm, yeasty smell of freshly baked bread
- Control – Choose whole wheat, organic, or gluten-free ingredients
- Savings – It’s way cheaper than buying it at specialty stores
Plus, it’s therapeutic. Kneading the dough, watching it rise, and seeing it puff up in the oven is a satisfying process. And the reward? Soft, pillowy bread perfect for wraps, dips, and more.
List of Ingredients You’ll Need
Here’s a simple list to get you started. Most of these are pantry staples:
Basic Ingredients:
- 3 cups all-purpose flour (or whole wheat)
- 1 tablespoon instant yeast
- 1 teaspoon sugar
- 1 teaspoon salt
- 1 cup warm water (around 110°F or 43°C)
- 1 tablespoon olive oil (optional but adds richness)
Optional Additions:
- 1 tablespoon yogurt (for a softer dough)
- Sesame seeds or nigella seeds (for topping)
- Whole wheat flour (substitute 1 cup for a healthier option)
Ingredient Tips:
- Flour: All-purpose works fine, but bread flour gives more chew.
- Yeast: Use instant yeast for a faster rise or active dry yeast with a 5-minute proofing time.
- Water: Needs to be warm, not hot. Hot water kills yeast.
Simple, right? Let’s move on to what you’ll need to actually make it.
Equipment Needed for Arabic Bread
You don’t need a professional bakery setup to make Arabic bread at home. Here’s what you’ll want to gather:
Essential Equipment:
- Large mixing bowl
- Measuring cups and spoons
- Rolling pin
- Clean towel or plastic wrap (for covering dough)
- Baking sheet or pizza stone
- Oven (at least 475°F / 245°C)
Optional (but Helpful):
- Stand mixer with dough hook
- Cast iron skillet or pizza steel
- Dough scraper
- Kitchen scale (for accuracy)
If you’re working with minimal tools, don’t worry—your hands are the best tools when it comes to making bread!
Tips Before You Start
Before diving into the mixing bowl, here are a few pro tips:
- Preheat your oven early – It must be HOT (think 475°F and up) to puff the bread.
- Measure ingredients accurately – Especially water and flour. Too much flour = tough bread.
- Let the dough rest – Don’t skip rising times. That’s where the magic happens.
- Don’t over-knead – About 10 minutes by hand or 6-7 minutes in a mixer is enough.
- Use a hot surface – A preheated pizza stone or heavy pan helps create the steam puff.
Setting up your workspace in advance makes the whole process smoother. Let’s knead some dough!
Step-by-Step Guide to Making Arabic Bread
Here’s where the magic begins. Follow this guide, and you’ll have fresh, puffy Arabic bread in no time.
1. Mix the Dough
In a large mixing bowl, combine:
- Warm water
- Sugar
- Yeast
Let it sit for 5 minutes if you’re using active dry yeast (skip this if using instant yeast). Then add:
- Flour
- Salt
- Olive oil (optional)
Mix until a shaggy dough forms.
2. Knead the Dough
Turn it onto a floured surface and knead for 10 minutes. You’re looking for a smooth, elastic dough. It should spring back when pressed.
Shortcut: Use a stand mixer with a dough hook for 6-7 minutes.
3. First Rise (Proofing)
Place the dough in a greased bowl, cover with a towel or plastic wrap, and let it rise in a warm place for about 1–1.5 hours, or until doubled in size.
4. Divide and Shape
Once risen, punch down the dough gently. Divide into 6-8 equal balls. Cover and let them rest for 15 minutes.
Then, on a floured surface, roll each ball into a circle about 1/4 inch thick.
5. Preheat the Oven
While the dough rests, preheat your oven to 475°F (245°C). If you have a pizza stone or heavy baking sheet, place it in the oven now.
6. Bake the Bread
Place the rolled dough rounds on the hot stone or sheet. Bake for 2-3 minutes. You’ll see them puff up beautifully. Flip and bake for another 1-2 minutes if you want a bit of color on both sides.
7. Cool and Store
Remove and place on a clean towel. Cover with another towel to keep them soft as they cool.
Common Mistakes and How to Avoid Them
Even though Arabic bread is relatively simple, a few common mistakes can mess with your results. Here’s what to watch out for—and how to fix it:
1. Dough Too Dry or Too Wet
- The Problem: If your dough is dry, your bread will be tough. If it’s too wet, it becomes difficult to handle.
- Fix: Add water slowly and mix gradually. The dough should be soft, slightly sticky but manageable. Use the “finger poke test”: press your finger gently into the dough—if it springs back, it’s perfect.
2. Oven Not Hot Enough
- The Problem: Your bread doesn’t puff and stays flat.
- Fix: A high temperature is essential to create the steam pocket. Preheat your oven for at least 30 minutes, especially if using a pizza stone or heavy pan.
3. Rolling Too Thin or Too Thick
- The Problem: Rolling too thin = no puff. Too thick = undercooked inside.
- Fix: Roll each dough ball into a circle about 1/4 inch thick. Consistency matters, so take your time.
4. Opening the Oven Door Frequently
- The Problem: Drops oven temperature quickly, killing the rise.
- Fix: Resist the urge! Peek through the oven window if you can.
Making Arabic bread is a bit like a science experiment—you learn and get better each time. Don’t worry if your first batch isn’t perfect. You’ll improve fast!
How to Store Arabic Bread
Fresh Arabic bread is amazing, but what if you made too much? Don’t worry—it stores beautifully.
Short-Term Storage (1–2 Days):
- Keep it in an airtight container or ziplock bag at room temperature.
- To keep it soft, wrap it in a clean kitchen towel before placing it in the bag.
Refrigeration:
- Not recommended unless you plan to use it within 48 hours.
- Bread tends to go stale faster in the fridge.
Freezing (Best Option for Long-Term):
- Stack breads with parchment paper between each piece.
- Wrap tightly in foil or plastic wrap, then place in a ziplock freezer bag.
- Freeze for up to 3 months.
Reheating Frozen Bread:
- Oven: Preheat to 350°F (175°C), wrap bread in foil, and heat for 8–10 minutes.
- Skillet: Heat for 1-2 minutes on each side.
- Microwave: Wrap in a damp paper towel and microwave for 20-30 seconds.
Always reheat just before serving to get that fresh-baked feel again.
Serving Suggestions
Now comes the fun part—what do you eat with your freshly baked Arabic bread? Honestly, the options are endless. Here are some of the best pairings:
Classic Middle Eastern Dishes:
- Hummus – Dip the warm bread straight into a bowl of garlicky, creamy hummus.
- Falafel Wraps – Stuff your bread with crispy falafel, lettuce, tomatoes, and tahini sauce.
- Shawarma – Beef or chicken shawarma wrapped in Arabic bread is next-level delicious.
- Labneh & Za’atar – Spread creamy yogurt cheese and sprinkle with olive oil and za’atar.
Modern Twists:
- Use as a pizza base – Just top with sauce and cheese, then broil.
- Make quesadillas – Fold with cheese and toast on a pan.
- Cut into triangles and bake – Homemade pita chips!
You can also use Arabic bread as sandwich bread, toast it for crunch, or just eat it plain—it’s that good.
Nutritional Information
Wondering what’s in a piece of Arabic bread? Here’s a general idea (per 1 medium-sized piece):
| Nutrient | Amount |
|---|---|
| Calories | 165 kcal |
| Carbohydrates | 33 g |
| Protein | 5 g |
| Fat | 1 g |
| Fiber | 2 g |
| Sugar | 0.5 g |
Healthier Version?
- Whole Wheat Flour: Swap in whole wheat flour for more fiber and nutrients.
- Low Salt: Reduce salt if you’re watching sodium.
- Oil-Free: Skip olive oil if you want a fat-free option (it’s not essential).
Arabic bread can fit into most diets—vegan, vegetarian, and even Mediterranean-friendly. Just control the portion size if you’re counting carbs.
Variations of Arabic Bread
Arabic bread has a whole family of cousins across the Middle East. Here are a few variations you might want to try:
1. Pita (Khubz Arabi)
- The most common variation, with a pocket inside.
- Usually baked in hot ovens to create steam puff.
2. Saj Bread
- Paper-thin, flexible flatbread made on a domed metal griddle.
- Popular in Lebanon and Syria.
3. Markook Bread
- Very large, thin, and stretchy.
- Used often with dips or wrapped with cheese and vegetables.
4. Samoon
- An Iraqi version shaped like a diamond or torpedo.
- Thicker and fluffier inside.
5. Stuffed Arabic Bread
- Fill with minced meat, spinach, or cheese before baking.
- Think of it like a Middle Eastern calzone.
Each region has its own twist, and experimenting with different versions is a great way to explore Middle Eastern cuisine from your own kitchen.
How to Make Arabic Bread Without an Oven
No oven? No problem! You can still make Arabic bread on a stove-top using a cast iron or non-stick skillet.
Stovetop Method:
- Preheat a dry skillet over medium-high heat.
- Place your rolled-out dough on the hot surface.
- Cook for 1–2 minutes on each side.
- Press lightly with a spatula to encourage puffing.
Tips:
- Don’t use oil in the pan.
- The skillet must be hot before the dough hits it.
- Cover the skillet for 30 seconds with a lid to trap steam—it helps with the puff.
This method works especially well for thin breads like Saj or Markook, and is perfect for small kitchens or camping trips!
FAQs about Arabic Bread Recipe
1. Can I make Arabic bread without yeast?
Yes, but it won’t puff the same. You can use baking powder for a quick flatbread, but you’ll miss out on the soft pocket.
2. Why didn’t my Arabic bread puff up?
Most likely the oven wasn’t hot enough or the dough was too thick or dry. Try rolling thinner and make sure the baking surface is preheated.
3. Can I use whole wheat flour only?
Yes, but the bread may be denser. Mix whole wheat with white flour (50/50) for the best texture.
4. Is Arabic bread gluten-free?
Traditional Arabic bread contains gluten. To make a gluten-free version, use a mix of gluten-free flours and xanthan gum, though the texture will differ.
5. How long does Arabic bread stay fresh?
At room temperature, it lasts 1–2 days. For longer storage, freeze and reheat as needed.
Conclusion
Making Arabic bread at home might seem like a big task, but once you try it, there’s no going back. The ingredients are simple, the process is surprisingly fun, and the results? Deliciously soft, puffed bread that beats anything store-bought.
Whether you’re enjoying it with hummus, wrapping up a shawarma, or just toasting it with olive oil, homemade Arabic bread will become a staple in your kitchen. Try it once, and you’ll be hooked.
Now, roll up your sleeves, heat that oven, and get baking!