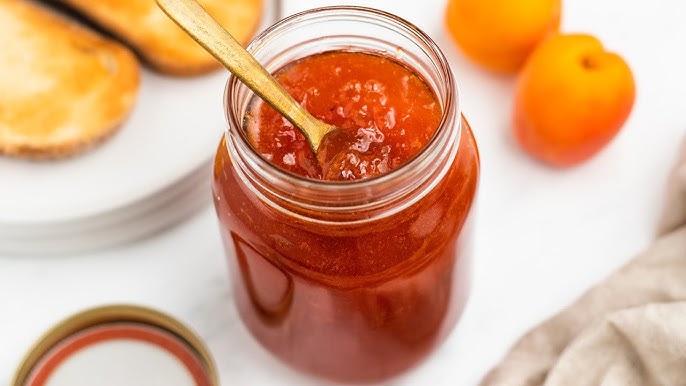
Apricot Jam Recipe: There’s something incredibly satisfying about making your own apricot jam. The sweet, tangy flavor of ripe apricots, captured in a golden jar, feels like bottling up summer. Whether you want a spread for toast, a topping for desserts, or a secret ingredient in sauces, apricot jam delivers. It’s a simple pleasure, but making it from scratch gives you full control over the sweetness, consistency, and quality. Plus, it’s surprisingly easy once you get the hang of it!
Why Make Apricot Jam at Home?
Sure, you can buy a jar from the store—but homemade apricot jam has that unbeatable taste and texture that supermarket versions often lack. When you make it yourself, you know exactly what goes into it: no preservatives, no artificial flavors, just pure fruit and love. It’s a great way to use up a bounty of fresh apricots during the peak season and reduce food waste. Even better, the process itself is kind of therapeutic. Chopping, simmering, stirring—it’s almost meditative.
The Taste and Versatility of Apricot Jam
Apricot jam isn’t just for your morning toast. It pairs perfectly with cheeses, works wonders in baking, and can even glaze meats like chicken or pork for a tangy twist. Its naturally rich flavor and bright color make it a kitchen staple you’ll reach for again and again. Some even say it’s the jam world’s unsung hero—less popular than strawberry, but more complex and versatile.
Ingredients You’ll Need
Let’s start with the basics. The quality of your jam depends a lot on your ingredients.
Choosing the Best Apricots
Fresh, ripe apricots are your best bet. You want them to be fragrant, slightly soft, and vibrant in color. Overripe apricots can make the jam mushy and too sweet, while underripe ones might not break down properly or deliver that classic jam flavor. If you’re using dried apricots, soak them in water overnight to rehydrate them before starting the recipe.
Sugar and Its Importance
Sugar isn’t just there to sweeten the jam—it also acts as a preservative. Most recipes use equal parts apricots and sugar by weight, but you can adjust this to taste. If you prefer a low-sugar version, use pectin or lemon juice to help the jam set properly. Keep in mind that less sugar might affect the shelf life.
Optional Ingredients for Extra Flavor
- Lemon juice: Balances the sweetness and enhances the fruit flavor.
- Vanilla bean or extract: Adds a creamy, aromatic depth.
- Cinnamon or cardamom: For a warm, spiced twist.
- Almond extract: Complements apricots beautifully with a nutty aroma.
You don’t need to add all of these, but a little experimentation can elevate your jam to gourmet status.
Essential Tools for Jam Making
Now, let’s talk equipment. You don’t need fancy gear, but a few basics are essential.
Kitchen Tools Checklist
- Large heavy-bottomed pot or jam pan
- Wooden spoon or silicone spatula
- Potato masher (optional, for breaking down fruit)
- Ladle and funnel
- Clean glass jars with lids
- A candy or jam thermometer (optional but helpful)
Sterilizing Jars the Right Way
Sterilizing jars is crucial to avoid mold or bacteria. Here’s a quick guide:
- Wash jars and lids in hot, soapy water.
- Place them in a large pot of boiling water for 10 minutes.
- Let them air dry on a clean towel.
- Keep them warm in a low oven (around 200°F or 90°C) until you’re ready to fill them.
This step might seem fussy, but it’s what keeps your jam safe and shelf-stable.
Step-by-Step Apricot Jam Recipe
Let’s get into the heart of the matter. Follow these steps carefully, and you’ll end up with a delicious, golden jar of apricot jam that you’ll want to gift to everyone you know.
Step 1: Wash and Pit the Apricots
Rinse your apricots thoroughly under cool water. Slice them in half, remove the pits, and cut them into smaller pieces if you like a smoother jam. If you prefer chunkier jam, leave the pieces a bit larger. Pro tip: Save a few of the apricot kernels if you want to add a subtle almond flavor later (they must be boiled and prepared properly for safety).
Step 2: Prepare the Cooking Pot
Add the chopped apricots and sugar into your large pot. If you’re using lemon juice or other flavorings, add them now. Stir everything together and let it sit for 30-45 minutes. This resting time allows the fruit to macerate and release its juices, making the cooking process smoother and reducing the need for added water.
Step 3: Cooking the Apricot Mixture
Turn the heat to medium and bring the mixture to a gentle boil. Stir often to prevent sticking. As the jam starts to bubble, foam might form on the surface—just skim it off with a spoon. Let it simmer for 25-30 minutes, stirring frequently. You’ll notice the fruit softening and the mixture thickening. If you’re using a thermometer, aim for 220°F (104°C), which is the magic point where jam sets.
Step 4: Checking the Consistency
Here’s an old trick: place a small plate in the freezer before you start cooking. When the jam seems ready, spoon a bit onto the cold plate and let it sit for a minute. Push it with your finger—if it wrinkles and holds its shape, it’s done! If not, keep cooking a few more minutes and test again.
Step 5: Jarring the Jam Properly
Once your jam is ready, use a ladle and funnel to transfer it into your sterilized jars, leaving about ¼ inch of headspace. Wipe the rims clean with a damp cloth, screw on the lids, and let the jars cool at room temperature. As they cool, you should hear the satisfying pop of the lids sealing. Store in a cool, dark place. Once opened, refrigerate and use within 3-4 weeks.
Tips and Tricks for Perfect Jam Every Time
When it comes to jam-making, a few small tips can make a big difference in your results. Here’s how to make sure your apricot jam turns out beautifully every single time.
Avoiding Common Mistakes
- Skipping the maceration step: Don’t rush. Letting the fruit sit with sugar allows it to release natural juices and prevents burning.
- Overcooking: It’s tempting to let the jam boil endlessly, but overcooking can lead to a dark color and a caramelized flavor that masks the apricot’s freshness.
- Using too little sugar without pectin: If you’re reducing sugar, you need another thickener. Without it, the jam may stay runny.
- Skipping the consistency test: Always do the freezer plate test or use a thermometer to ensure your jam sets properly.
- Not sterilizing jars correctly: This is one of the biggest mistakes and can cause spoilage. Make sure your jars are hot, clean, and dry before filling them.
How to Store and Preserve Your Jam
Once your jam is sealed and cooled, label each jar with the date. Store unopened jars in a cool, dark cupboard or pantry. Properly sealed and stored jars can last up to a year. After opening, refrigerate and consume within a month.
If you’re making a large batch, consider water-bath canning to increase shelf life. Just submerge the filled jars in a pot of boiling water for 10-15 minutes. This process kills any lingering bacteria and ensures a tight seal.
Creative Ways to Use Apricot Jam
Don’t limit yourself to just toast. Here are some fun and delicious ways to use your homemade apricot jam:
- Glaze for meats: Brush apricot jam onto roasted chicken, pork, or ham for a sticky-sweet finish.
- Filling for pastries: Use it in thumbprint cookies, Danish pastries, or jam bars.
- Mix into yogurt: A spoonful of apricot jam can turn plain yogurt into a fruity delight.
- Sandwich spread: Pair it with brie or goat cheese for a gourmet grilled cheese.
- Dessert topping: Drizzle it over ice cream, pancakes, or cheesecake for added flavor.
Apricot jam also makes a lovely homemade gift. Tie a ribbon around the jar, add a cute label, and voilà—thoughtful, edible charm.
Nutritional Benefits of Apricot Jam
Apricot jam doesn’t just taste good—it has some nutritional perks too, especially when made with fresh fruit and minimal sugar.
- Vitamin A & C: Apricots are naturally high in these immune-boosting vitamins.
- Antioxidants: Homemade jam retains more antioxidants than processed versions.
- No additives: When you make it yourself, you avoid preservatives, food dyes, and artificial flavorings.
- Moderation is key: While it’s still a sweet treat, enjoying it in moderation can fit into a healthy diet.
FAQs about Apricot Jam Recipe
1. Can I make apricot jam without sugar?
Yes, but you’ll need to use a pectin product made for low-sugar recipes or add lemon juice to help it set. Keep in mind the shelf life will be shorter.
2. How long does homemade apricot jam last?
If properly sealed and stored, it lasts up to 12 months in a cool, dark place. Once opened, refrigerate and use within 3-4 weeks.
3. Can I use frozen apricots for this recipe?
Absolutely! Just thaw them first and drain excess liquid. The flavor and texture might vary slightly from fresh apricots.
4. My jam is too runny. What can I do?
You can reboil it with a bit of added pectin or lemon juice to help it set. Always use the freezer plate test before jarring.
5. Do I need a candy thermometer?
No, but it helps. The jam sets at around 220°F (104°C). Alternatively, use the freezer plate trick to test for doneness.
Conclusion
Homemade apricot jam is one of life’s simple joys. It captures the pure flavor of summer in every bite and transforms humble fruit into a golden delicacy you can enjoy year-round. From the careful choice of ingredients to the sweet reward at the end, every step is worth it. Whether you’re a beginner or an experienced cook, once you try this recipe, you’ll never look at store-bought jam the same way again. So grab those apricots and start jamming—you’ll be amazed at how deliciously easy it is!