Apple Preserves Recipe: Apple preserves are one of those timeless kitchen creations that feel like comfort, tradition, and smart food storage all wrapped into one jar. If you’ve ever wanted to capture the taste of fresh apples and enjoy it months later on toast, pancakes, or straight from the spoon, this guide is for you.
In this complete, professional guide, we’ll walk through everything you need to know about making apple preserves at home—from choosing the right apples to perfecting texture, flavor, storage, and troubleshooting. This is not a rushed recipe. It’s a masterclass.
Let’s get started.
What Are Apple Preserves?
Apple preserves are a fruit-forward spread made by slowly cooking apples with sugar until the mixture thickens while still maintaining distinct fruit pieces. Unlike applesauce, which is smooth, or apple butter, which is deeply cooked and pureed, apple preserves celebrate texture.
Think of apple preserves as apples suspended in a glossy, flavorful syrup. They’re rustic, rich, and incredibly versatile.
Apple Preserves vs Apple Jam vs Apple Butter
Understanding the difference helps you nail expectations.
- Apple Preserves: Chunky, visible fruit pieces, lighter cooking time
- Apple Jam: More broken-down fruit, thicker and more uniform
- Apple Butter: Fully smooth, dark, slow-cooked for hours
If you like texture and bite, apple preserves are the clear winner.
Why Homemade Apple Preserves Are Better
Store-bought versions often:
- Contain preservatives
- Use artificial flavors
- Over-process the fruit
Homemade apple preserves give you:
- Full control over sweetness
- Real apple flavor
- No chemicals
- Custom textures and spices
Plus, making them yourself costs less and feels incredibly satisfying.
Best Apples for Apple Preserves
Choosing the right apples is half the success.
Sweet Apples
- Fuji
- Gala
- Honeycrisp
These add natural sweetness and soften nicely.
Tart Apples
- Granny Smith
- Braeburn
They balance sugar and help preserves set.
Best Apple Blends
The secret? Mix sweet and tart apples.
This creates depth, balance, and better texture.
Ingredients You’ll Need
Core Ingredients
- 4 pounds apples (peeled, cored, diced)
- 3 cups granulated sugar
- 1 tablespoon lemon juice
- ½ cup water
These four ingredients are the backbone of classic apple preserves.
Optional Flavor Enhancers
- Cinnamon sticks
- Ground nutmeg
- Vanilla extract
- Cloves
- Ginger
- Orange zest
Use sparingly—apples should remain the star.
Essential Tools and Equipment
- Large heavy-bottom pot
- Wooden spoon or heat-resistant spatula
- Sharp knife
- Cutting board
- Measuring cups
- Clean glass jars with lids
- Ladle
- Clean kitchen towels
No fancy equipment required—just patience.
Step-by-Step Guide to Making Apple Preserves
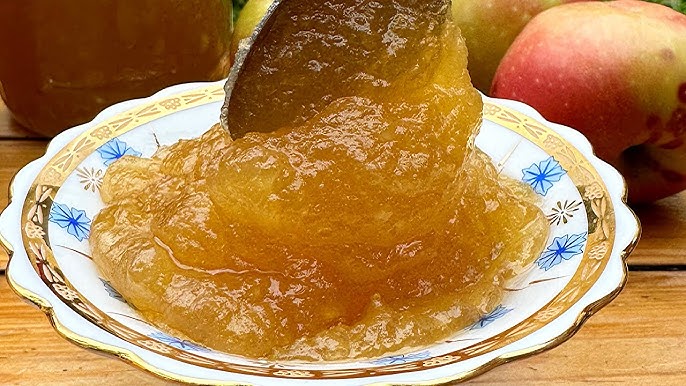
Apple preserves are sweet, chunky, and perfect for spreading, with a rich apple-forward flavor that keeps well.
Step 1 – Preparing the Apples
Wash, peel, core, and chop the apples into small chunks. Uniform pieces help the preserves cook evenly.
Step 2 – Macerating the Apples
Place the apples in a bowl with sugar and lemon juice. Stir well, cover, and let sit for 30–60 minutes. This draws out juices and enhances flavor.
Step 3 – Cooking the Preserves
Transfer the apple mixture to a heavy-bottomed pot. Cook over medium heat, stirring occasionally, until the apples soften and release more liquid. Reduce heat and simmer until thickened.
Step 4 – Testing for Doneness
To test, place a small spoonful on a chilled plate. If it wrinkles when pushed with your finger, it’s ready. If runny, continue simmering and retest.
Step 5 – Final Flavor Adjustments
Taste and adjust sweetness or acidity. Add a pinch of cinnamon, nutmeg, or vanilla if desired. Stir well and remove from heat.
Step 6 – Sterilizing Jars
Wash jars and lids thoroughly. Sterilize by boiling them in water for 10 minutes, then let them air-dry on a clean towel.
Step 7 – Filling and Sealing Jars
Carefully spoon hot preserves into sterilized jars, leaving about ¼ inch headspace. Wipe rims clean, seal tightly, and cool completely.
Store in the refrigerator or process further for shelf stability. These apple preserves are warm, versatile, and beautifully homemade—perfect on toast, pastries, or cheese boards. 🍎🍯
Texture Control: Chunky vs Smooth Preserves
- For chunky preserves, stir gently and avoid overcooking.
- For softer texture, mash lightly during cooking.
- For almost jam-like, cook longer and stir more often.
Your kitchen, your rules.
Natural Pectin and How Apple Preserves Set
Apples naturally contain pectin, especially:
- Granny Smith
- Slightly underripe apples
Lemon juice activates pectin, helping preserves thicken without additives.
Sugar Choices and Sweetness Control
You can use:
- White sugar (classic)
- Brown sugar (richer flavor)
- Honey (use less)
Reduce sugar carefully—too little affects preservation and texture.
Flavor Variations You Can Try
Cinnamon Apple Preserves
Add 2 cinnamon sticks during cooking.
Spiced Apple Preserves
Add cloves, nutmeg, and ginger.
Vanilla Apple Preserves
Stir in 1 tablespoon vanilla at the end.
Low-Sugar Apple Preserves
Use low-sugar pectin and increase lemon juice.
Common Mistakes and How to Avoid Them
- ❌ Overcooking → gummy texture
- ❌ Undercooking → runny preserves
- ❌ Skipping lemon juice → poor setting
- ❌ Not stirring → burning
Patience is the secret ingredient.
How to Store Apple Preserves
- Sealed jars: store in a cool, dark place
- Opened jars: refrigerate
- Always use clean utensils
Shelf Life and Safety Tips
- Sealed: up to 12 months
- Opened: 3–4 weeks refrigerated
Discard if you see mold, off-smell, or gas buildup.
How to Use Apple Preserves
- Spread on toast or bagels
- Swirl into yogurt or oatmeal
- Serve with cheese boards
- Fill pastries and cakes
- Spoon over pancakes or waffles
Make-Ahead and Batch Cooking Tips
- Double the recipe for gifting
- Label jars with dates
- Make during apple season for best flavor
Apple Preserves Recipe (with Video)
FAQs about Apple Preserves Recipe
1. Do I need pectin for apple preserves?
No. Apples naturally contain pectin, especially when cooked with lemon juice, which helps the preserves thicken without added pectin.
2. Can I make apple preserves without peeling the apples?
Yes. Leaving the peels on is fine, but expect a more rustic texture. Peels add color and nutrients but won’t break down as smoothly.
3. Why are my apple preserves runny?
Runny preserves usually mean they need more cooking time to reduce excess liquid. In some cases, adding a bit more lemon juice can help activate natural pectin.
4. Can I freeze apple preserves?
Yes. Apple preserves freeze well. Store them in airtight, freezer-safe containers and freeze for up to 6 months. Thaw in the refrigerator before use.
5. What’s the best apple combination for preserves?
A blend of Granny Smith and Honeycrisp works beautifully. Granny Smith provides tartness and structure, while Honeycrisp adds natural sweetness.
These tips will help you make perfectly set, flavorful apple preserves every time. 🍎🍯
Conclusion
Apple preserves are more than a recipe—they’re a way to capture the season, reduce waste, and elevate everyday meals. With the right apples, a little patience, and this step-by-step guide, you can create beautiful, flavorful preserves that rival anything from the store.
Once you master this, you’ll never look at apples the same way again.