Apple Pie Dough Recipe: You know what separates a good apple pie from a great one? The crust. That golden, flaky, buttery pie dough that melts in your mouth and holds all that delicious apple filling together—it’s a game-changer. Sure, store-bought crusts can save time, but they simply don’t compare to the taste and texture of a homemade pie dough. Once you experience how easy and satisfying it is to make your own, you’ll never want to go back.
Making pie dough from scratch allows you to control every aspect: the type of fat used, the level of flakiness, and even the thickness. Plus, it’s surprisingly simple when broken down step by step. Whether you’re a seasoned baker or a total newbie, learning to make this dough is a skill that will elevate all your baking.
This guide will take you from flour and butter to the best apple pie base you’ve ever made. No fancy ingredients. No stress. Just honest, tasty, homemade pie dough.
What Makes This Recipe Unique?
There are thousands of pie crust recipes out there—but this one is designed for real home kitchens. We’re not using fancy food processors or obscure ingredients. This is a no-fuss, foolproof recipe that uses cold butter (not shortening), ice water, and basic pantry staples.
The secret? We keep everything cold, we don’t overwork the dough, and we let it rest. It’s these little details that make a huge difference in the final product.
Ingredients You’ll Need
Essential Ingredients
To make the perfect apple pie dough, you only need a handful of simple ingredients. Most of them are probably already in your kitchen.
Here’s what you’ll need:
| Ingredient | Amount | Notes |
|---|---|---|
| All-purpose flour | 2 ½ cups (312g) | Unbleached preferred |
| Unsalted butter | 1 cup (226g) | Cold, cut into cubes |
| Salt | 1 tsp | Enhances flavor |
| Granulated sugar | 1 tbsp (optional) | Adds slight sweetness |
| Ice water | 6–8 tbsp | Added slowly as needed |
Pro tip: Keep your butter in the fridge until the moment you need it. Cold butter is what creates those irresistible flaky layers.
Optional Additions for Flavor Enhancement
- Cinnamon (½ tsp): Adds warmth that pairs beautifully with apple filling.
- Vanilla extract (½ tsp): For a subtle sweetness.
- Apple cider vinegar (1 tsp): Helps prevent the dough from getting tough.
These are completely optional, but if you want to give your dough a little extra character, consider adding one or two of them.
Ingredient Substitutes (for dietary needs)
- Butter substitute: Use vegan butter sticks for a dairy-free version. Avoid spreads or tub-style butter—they contain too much water.
- Gluten-free flour: A 1-to-1 gluten-free flour blend can be used, though results may vary slightly in texture.
- No sugar: Feel free to skip the sugar altogether. It’s not required for structure.
Remember, the key to success with substitutions is maintaining the cold temperature and the fat-to-flour ratio.
Equipment Needed
Basic Tools for Making Pie Dough
You don’t need to be a professional baker or have a high-end kitchen setup to make this recipe. These basic tools will get the job done:
- Large mixing bowl – for combining all your ingredients
- Pastry cutter or two forks – to cut the butter into the flour
- Measuring cups and spoons – accuracy matters here
- Plastic wrap or beeswax wrap – for chilling the dough
- Rolling pin – a must-have for rolling out your dough
- Bench scraper (optional) – helpful for handling and folding the dough
Nice-to-Have Kitchen Gadgets
If you want to make your life a little easier, these tools can elevate your dough game:
- Food processor – speeds up the butter incorporation (use pulse mode!)
- Kitchen scale – for precise measurement, especially flour
- Silicone baking mat – prevents sticking when rolling out
- Pie weights or dried beans – for blind baking (optional step)
Having the right tools can make your workflow smoother, but remember, the magic lies in the technique—not the gear.
Step-by-Step Guide to Making Apple Pie Dough
Step 1 – Measure Your Ingredients Precisely
Accuracy is critical in baking. Too much flour and your dough turns dry. Too much water and it gets sticky and hard to work with.
Here’s how to do it right:
- Flour: Spoon it into the measuring cup and level off with a knife. Avoid scooping straight from the bag—it packs the flour and adds too much.
- Butter: Use cold, unsalted butter and cut it into small ½-inch cubes. Stick it back in the fridge while you prep everything else.
- Water: Fill a cup with water and ice cubes. Measure from this as needed to keep everything icy cold.
It may seem trivial, but trust me—this step sets the stage for a flawless dough.
Step 2 – Cut the Butter into the Flour
This is where the texture magic happens. You want the butter to be broken down into pea-sized bits that are coated in flour.
Here’s how to do it:
- Add flour, salt, and sugar (if using) to a large mixing bowl.
- Toss in your cold butter cubes.
- Use a pastry cutter, two forks, or even your fingers to cut the butter into the flour.
- Stop when the mixture looks like coarse crumbs with some larger bits of butter remaining.
Don’t overwork it! Those visible butter bits will melt in the oven, creating steam and producing that perfect flaky crust we all love.
Step 3 – Add Ice Water Slowly
This is where most people go wrong. Adding too much water too quickly can turn your dough into a sticky mess. The key is to go slow and only use as much water as needed.
Here’s the process:
- Sprinkle 1 tablespoon of ice water over the flour-butter mixture.
- Gently toss with a fork or your hands to distribute.
- Continue adding 1 tablespoon at a time, mixing after each addition.
You’ll usually need 6–8 tablespoons total, but the exact amount depends on your flour and environment. You’re looking for a dough that just starts to hold together when pinched. It shouldn’t be wet or sticky.
Once it starts forming into clumps, stop adding water. Less is more. Overhydrated dough will be tough and gummy instead of light and flaky.
Step 4 – Form the Dough into a Disc
Now that your dough is holding together, it’s time to shape it:
- Turn the dough out onto a clean surface (use a bit of flour if it’s sticking).
- Use your hands or a bench scraper to gently bring it together. Don’t knead.
- Once it comes together, divide it in half if making a double crust, or leave as one if not.
- Shape each portion into a flat, round disc—about 1 inch thick.
Wrap each disc tightly in plastic wrap or beeswax wrap. The disc shape makes it easier to roll out evenly later.
This step isn’t just for neatness—it sets you up for success when it’s time to roll.
Step 5 – Chill the Dough
This step is non-negotiable. Chilling the dough allows the gluten to relax (so your crust doesn’t shrink) and the butter to firm up again, which is crucial for a flaky texture.
- Refrigerate the wrapped dough for at least 1 hour, or up to 2 days.
- For longer storage, freeze it for up to 3 months (just thaw overnight in the fridge before using).
During chilling, the flour fully absorbs the water and fat, making it easier to roll and less prone to cracking.
Pro tip: If you’re in a rush, pop it in the freezer for 30 minutes—but never skip chilling altogether. It makes a huge difference in the final pie.
Rolling Out the Dough
Best Techniques for Rolling
When you’re ready to roll, let the dough sit at room temperature for about 5–10 minutes so it softens just slightly. Cold dough cracks—room-temp dough rolls.
Here’s how to roll like a pro:
- Lightly flour your work surface and rolling pin.
- Place your disc in the center and begin rolling from the center outward.
- Turn the dough 90 degrees every couple rolls to maintain a circle.
- Keep it moving—don’t let it stick. Add flour under the dough as needed.
You want your dough to be about ⅛ inch thick and at least 1–2 inches wider than your pie pan.
To transfer it:
- Gently roll it onto your rolling pin, then unroll it into your pie dish.
- Carefully lift and ease it into the dish—don’t stretch it, or it will shrink when baked.
Common Mistakes to Avoid
- Rolling too thin or too thick – aim for ⅛ inch; anything thinner may tear.
- Forgetting to flour the surface – leads to sticking and tearing.
- Using warm dough – butter melts, and your crust won’t be flaky.
Rolling out pie dough gets easier with practice. The more you do it, the more you’ll feel what the dough needs—like a dough whisperer.
Blind Baking (Optional but Helpful)
When and Why to Blind Bake
Blind baking means pre-baking your crust before filling it. It’s not always necessary, but it’s essential if:
- You’re making a custard pie (like a quiche or cream pie)
- Your filling is very moist (hello, juicy apples!)
- You want a super crisp bottom crust
It prevents the dreaded soggy bottom, which no one wants.
How to Blind Bake Perfectly
- After placing your dough in the pan, dock it (poke with a fork) to prevent puffing.
- Chill again for 15–30 minutes.
- Line the crust with parchment paper or foil and fill with pie weights (or dried beans).
- Bake at 375°F (190°C) for 15–20 minutes.
- Remove the weights and parchment and bake for another 5–10 minutes until lightly golden.
Let it cool before filling.
Even if you’re not blind baking this time, learning the technique is a great skill to have in your baking toolbox.
Storing Your Dough
Refrigerator vs. Freezer Storage
One of the best things about homemade pie dough is that it stores like a dream. You can make it ahead of time and be ready for impromptu baking sessions whenever the craving hits.
Refrigerator Storage:
- Wrap the dough tightly in plastic wrap or place in an airtight container.
- Store in the fridge for up to 2 days.
- Let it sit at room temp for 10–15 minutes before rolling out.
Freezer Storage:
- For longer storage, freeze your dough.
- Wrap the disc in plastic wrap, then foil, or place it in a freezer-safe bag.
- Store for up to 3 months.
- To use: transfer to the refrigerator 24 hours before you plan to use it.
Bonus Tip: You can even roll out the dough, fit it into your pie pan, and then freeze the whole shell for later. This is a huge time-saver during the holidays.
How Long Does It Last?
- Fridge: 2 days before quality starts to decline.
- Freezer: 3 months, though best within 1–2 months for top flavor and texture.
If your dough develops gray patches or a sour smell, it’s time to toss it. Fresh dough should smell buttery and slightly nutty from the flour.
Using Your Dough for Apple Pie
Pairing It with the Right Apple Filling
Your apple pie dough is ready. Now what?
Choosing the right apples and filling style will take your pie to the next level. Here’s what pairs best with this buttery, flaky crust:
Best Apples for Pie:
- Granny Smith: Tart and holds shape well
- Honeycrisp: Juicy with sweet-tart balance
- Braeburn or Pink Lady: Great for depth of flavor
Mixing two or more types gives your pie layers of flavor and texture.
Classic Apple Pie Filling (Quick Recipe):
- 6–8 apples, peeled and sliced
- ½ cup sugar
- ¼ cup brown sugar
- 2 tbsp flour or cornstarch
- 1 tsp cinnamon
- ¼ tsp nutmeg
- 1 tbsp lemon juice
- 1 tbsp butter (dot on top before baking)
Toss everything in a bowl and let it sit for 10–15 minutes so the juices release before filling your crust.
Tips for Crimping and Venting
Once your filling is ready and you’ve rolled out your dough:
- Place the bottom crust into your pie dish.
- Add your apple filling evenly.
- Top with the second rolled dough round or a lattice.
Crimping the Edges:
- Pinch the edges together using your fingers or a fork to seal.
- Crimping helps lock in the juices and gives your pie that beautiful bakery look.
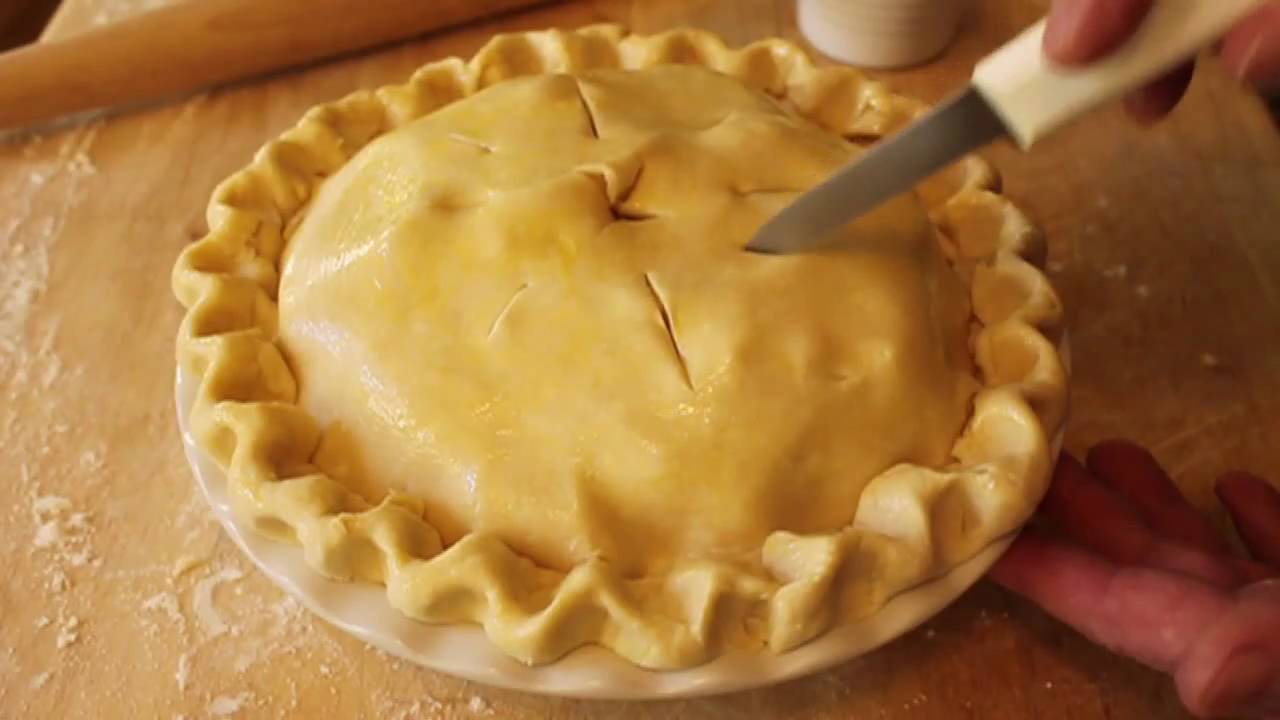
Venting:
- Cut 3–5 slits into the top crust (unless using a lattice).
- This allows steam to escape and prevents a soggy pie.
Brush with an egg wash (1 egg beaten with 1 tbsp water) for a golden, glossy finish.
Common Troubleshooting Tips
Even seasoned bakers run into issues with pie dough. Here are quick fixes for the most common problems:
Dough Too Sticky?
Sticky dough can be a nightmare to roll. It’s usually caused by:
- Too much water
- Warm butter melting into the flour
Fix it:
- Add a tablespoon of flour at a time until it’s workable.
- Chill it in the fridge for 15–20 minutes before rolling again.
Always err on the side of slightly dry dough—it’s easier to fix than a sticky mess.
Dough Cracking When Rolling?
Cracking is frustrating, but it’s usually a sign the dough is too cold or dry.
Fix it:
- Let it sit at room temp for 5–10 minutes to soften slightly.
- Lightly mist it with water and gently press the cracks back together.
To avoid this in the future, make sure you add enough water during the mixing stage and don’t overwork the dough.
Other Common Issues:
- Shrinking crust? Chill before baking and avoid stretching the dough.
- Tough dough? You likely overworked it—mix just until combined next time.
- Soggy bottom? Blind bake or use a metal pie dish on a preheated baking sheet.
Remember: baking is a science, but it’s also an art. Mistakes are part of the journey—and every pie teaches you something new.
FAQs about Apple Pie Dough Recipe
Can I use margarine instead of butter?
Technically yes, but it’s not recommended. Butter gives the crust its rich flavor and flakiness. Margarine has more water, which can make the dough soggy.
How do I make it vegan?
Use vegan butter sticks (like Earth Balance) and skip the egg wash or replace it with a mix of plant milk and maple syrup for a glossy finish.
Can I double the recipe?
Absolutely. Just divide the dough into two equal portions before chilling, and be sure to mix gently to avoid overworking the dough.
What’s the best flour to use?
Unbleached all-purpose flour is perfect. If you’re feeling adventurous, try substituting ¼ cup with whole wheat or almond flour for a nutty twist.
Why does my dough shrink after baking?
It’s usually because the dough wasn’t chilled enough or was stretched when placed in the pie pan. Always let your dough rest in the fridge before baking and avoid pulling it to fit the pan.
Conclusion
Mastering pie dough is like unlocking a superpower in your kitchen. It opens the door to not just apple pie, but quiches, galettes, pot pies, and so much more. With just a few simple ingredients and a bit of technique, you can create a buttery, flaky crust that steals the show.
This recipe is built to be flexible, forgiving, and full of flavor. Whether you’re baking for a holiday gathering or just treating yourself on a cozy Sunday afternoon, this apple pie dough delivers every time.
Take your time, don’t skip the chilling step, and trust the process. Soon, you’ll be known as the pie expert among your friends and family—and once they taste that homemade crust, there’s no going back.


