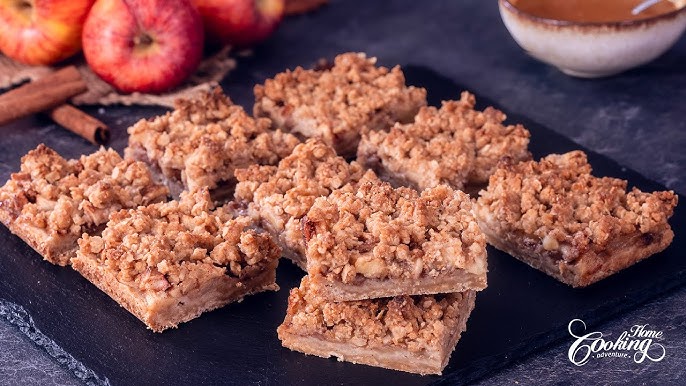
Apple Pie Bars Recipe: Apple pie bars are everything we love about classic apple pie—sweet cinnamon apples, buttery crust, cozy aroma—but in an easy-to-slice, no-stress bar form. Think of them as apple pie’s more practical cousin: less rolling, less mess, more consistency, and perfect edges every time.
If apple pie feels like a weekend project, apple pie bars are a weekday win.
In this ultra-detailed guide, you’ll learn exactly how to make bakery-quality apple pie bars from scratch, including ingredient breakdowns, pro tips, common mistakes, texture secrets, and variations. Whether you’re baking for family, a party, or content creation, this recipe delivers.
Why Apple Pie Bars Are Better Than Traditional Apple Pie
Before we dive in, let’s be honest—traditional apple pie is beautiful but demanding. Apple pie bars solve many of its problems.
Benefits of Apple Pie Bars
- No rolling pin required
- Perfect portion control
- Easy to transport and store
- Even apple distribution in every bite
- Cleaner slices with less filling spill
They’re ideal for:
- Bake sales
- Parties
- Meal prep desserts
- Holiday trays
- Cafés and home bakeries
What Makes a Perfect Apple Pie Bar?
A truly great apple pie bar has three distinct layers, each doing its job perfectly.
1. The Crust
- Buttery
- Slightly crisp
- Strong enough to hold the filling
2. The Apple Filling
- Tender but not mushy
- Balanced sweetness
- Warm spice flavor
3. The Topping
- Either a crumb streusel or solid crust
- Adds texture contrast
- Locks in moisture
When these layers work together, the result is magic.
Ingredients You’ll Need
Let’s start with everything required. Quality ingredients matter here—apple pie bars are simple, so every component shows up.
For the Crust (Bottom Layer)
- All-purpose flour – 2½ cups
- Granulated sugar – ½ cup
- Unsalted butter (cold, cubed) – 1 cup (226g)
- Salt – ½ teaspoon
- Baking powder – ½ teaspoon
- Vanilla extract – 1 teaspoon
- Egg – 1 large
Why this works:
Cold butter creates a tender, shortbread-style crust that stays firm under the apple filling.
For the Apple Filling
- Apples (peeled, sliced) – 6–7 medium
- Brown sugar – ¾ cup
- Granulated sugar – ¼ cup
- Ground cinnamon – 2 teaspoons
- Ground nutmeg – ¼ teaspoon
- Ground cloves (optional) – pinch
- Cornstarch – 2 tablespoons
- Lemon juice – 1 tablespoon
- Vanilla extract – 1 teaspoon
Apple choice matters. Use firm apples that hold their shape.
Best Apples for Apple Pie Bars
- Granny Smith
- Honeycrisp
- Braeburn
- Pink Lady
Avoid soft apples like Red Delicious.
For the Crumb Topping (Optional but Recommended)
- All-purpose flour – ¾ cup
- Brown sugar – ½ cup
- Unsalted butter (melted) – ½ cup
- Cinnamon – 1 teaspoon
- Salt – pinch
Kitchen Tools You’ll Need
- 9×13-inch baking pan
- Mixing bowls
- Pastry cutter or fork
- Sharp knife
- Measuring cups and spoons
- Parchment paper
Step-by-Step Guide: How to Make Apple Pie Bars
Apple pie bars deliver all the cozy flavor of classic apple pie in an easy-to-slice, handheld form—perfect for sharing and make-ahead baking.
Step 1: Prepare the Pan and Oven
Preheat your oven to 350°F (175°C). Line a square or rectangular baking pan with parchment paper, leaving an overhang for easy removal.
Step 2: Make the Crust Base
In a bowl, mix flour, sugar, salt, and melted butter until crumbly. Press the mixture firmly into the bottom of the prepared pan to form an even crust.
Step 3: Prepare the Apple Filling
Peel, core, and thinly slice apples. Toss with sugar, cinnamon, nutmeg, lemon juice, and a little flour or cornstarch to thicken the filling.
Step 4: Assemble the Layers
Spread the apple mixture evenly over the crust, making sure it’s well distributed for consistent flavor in every bite.
Step 5: Add the Topping
Sprinkle a crumb topping made from flour, butter, and sugar over the apples. This adds texture and a buttery finish.
Step 6: Bake Until Golden
Bake for 40–45 minutes, or until the top is golden brown and the apples are tender and bubbly.
Step 7: Cool and Slice
Let the bars cool completely in the pan. Once set, lift out using the parchment and slice into neat squares or bars.
Serving Tips
- Serve plain or with vanilla ice cream
- Drizzle with caramel sauce for extra indulgence
- Store refrigerated for clean slices
These apple pie bars are simple, comforting, and irresistibly delicious—everything you love about apple pie, made easier. 🍎🍰
How to Cut Apple Pie Bars Perfectly
- Lift bars out using parchment
- Use a sharp knife
- Wipe blade between cuts
For bakery-style squares, chill for 30 minutes before slicing.
Texture, Flavor & Taste Profile
Apple pie bars are:
- Soft but structured
- Sweet with balanced acidity
- Buttery and aromatic
- Comforting without being heavy
They taste like autumn wrapped in dessert form.
Common Mistakes to Avoid
Using the Wrong Apples
Soft apples = mushy filling.
Skipping the Pre-Bake
Leads to soggy crust.
Too Much Sugar
Overpowers apple flavor.
Cutting Too Early
Bars fall apart.
Apple Pie Bars Variations
Caramel Apple Pie Bars
Drizzle caramel sauce over apples before baking.
Oat Crumble Apple Bars
Replace topping flour with rolled oats.
Vegan Apple Pie Bars
Use plant butter and flax egg.
Gluten-Free Version
Use a 1:1 gluten-free flour blend.
How to Store Apple Pie Bars
Room Temperature
- 1–2 days
- Covered tightly
Refrigerator
- Up to 5 days
- Improves firmness
Freezer
- Freeze individually wrapped bars
- Lasts up to 3 months
Reheat gently for best flavor.
Serving Ideas
- With vanilla ice cream
- Warm with whipped cream
- Drizzled with caramel
- Dusted with powdered sugar
Perfect for holidays, brunches, or late-night cravings.
Are Apple Pie Bars Healthy?
They’re a treat—but apples do provide:
- Fiber
- Antioxidants
- Natural sweetness
You can reduce sugar slightly without losing flavor.
Why This Recipe Works Every Time
- Balanced ratios
- Structured layers
- Tested bake time
- Foolproof method
This is not guesswork—it’s reliable, repeatable baking.
FAQs about Apple Pie Bars Recipe
1. Can I make apple pie bars ahead of time?
Yes. Apple pie bars are an excellent make-ahead dessert. In fact, they often taste better the next day after the layers have fully set and the flavors meld together.
2. Do I need to cook the apples before baking?
No. As long as the apples are thinly sliced, they will cook perfectly in the oven while the bars bake. Pre-cooking is optional, not required.
3. Can I reduce the sugar?
Yes. You can safely reduce the sugar by up to 25% without affecting the structure or texture of the bars. Adjust spices slightly to maintain flavor balance.
4. Why are my bars soggy?
Sogginess usually happens if the crust wasn’t pre-baked or if very juicy apples were used without a thickener like cornstarch or flour.
5. Can I use store-bought pie filling?
You can, but homemade apple filling delivers better texture, fresher flavor, and more control over sweetness and spice.
These tips will help you bake firm, flavorful apple pie bars every time. 🍎🍰
Conclusion
Apple pie bars are the answer when you want the comfort of apple pie without the complexity. They’re easy, crowd-pleasing, freezer-friendly, and endlessly customizable. Whether you’re a beginner baker or a seasoned pro, this step-by-step guide gives you everything you need to bake perfect apple pie bars every single time.
Once you try them, you may never go back to traditional pie.