Apple Galette Recipe: A galette is like a rustic pie’s laid-back cousin. Originating from France, it’s a free-form pastry that doesn’t require a pie dish or any fancy skills. The crust is rolled out, topped with fruit (like apples), and then folded over just enough to cradle the filling. The edges are meant to be a little rough—this dessert embraces imperfection with delicious charm. Unlike a traditional apple pie, a galette is quicker and simpler but still delivers that warm, buttery, fruity delight we all crave.
Why You’ll Love This Recipe
If you love apples, flaky pastry, and easy recipes, this one’s a no-brainer. This apple galette is:
- Super simple and beginner-friendly.
- Packed with warm spices and sweet apple flavor.
- Perfect for any season, especially fall.
- Easily customizable with other fruits or toppings.
- Impressive-looking without the stress of perfect crust work.
It’s a go-to dessert when you want something homemade and heartwarming but don’t want to deal with complicated baking processes. Ready to bake up some cozy vibes?
Ingredients You’ll Need
For the Dough
You’ll need just a handful of pantry staples to whip up a buttery, flaky crust:
- 1 1/4 cups all-purpose flour
- 1/2 teaspoon salt
- 1 tablespoon sugar
- 1/2 cup (1 stick) cold unsalted butter, cubed
- 3 to 4 tablespoons ice water
This basic dough is incredibly forgiving and forms the perfect base for the apples to shine.
For the Apple Filling
Here’s what goes into the rich, flavorful filling:
- 3 to 4 medium apples (like Granny Smith, Honeycrisp, or Fuji)
- 1/4 cup granulated sugar
- 2 tablespoons brown sugar
- 1 teaspoon ground cinnamon
- 1/4 teaspoon ground nutmeg
- 1 tablespoon lemon juice
- 1 tablespoon all-purpose flour (for thickening)
- Optional: 1 teaspoon vanilla extract for extra depth
Optional Toppings
Want to take your galette to the next level? Consider these:
- Egg wash (1 egg + 1 tablespoon water) for a golden crust
- Coarse sugar for a sparkly crunch
- Caramel drizzle or a scoop of vanilla ice cream for serving
Tools and Equipment
You don’t need a fancy kitchen setup to make a galette. Here’s what you’ll need:
- Mixing bowls
- Pastry cutter or food processor (for dough)
- Rolling pin
- Baking sheet
- Parchment paper
- Knife and cutting board
- Pastry brush (for egg wash)
These basics will have you baking like a pro without needing a full bakery setup.
Preparing the Galette Dough
Mixing the Ingredients
Start with the crust—it’s the heart of your galette. In a large mixing bowl, combine flour, sugar, and salt. Add in the cold, cubed butter. The key here is cold butter—it creates those flaky layers we all love. Use a pastry cutter or your fingers to mix until it resembles coarse crumbs.
Then, add ice water one tablespoon at a time, mixing gently after each addition. You’ll know it’s ready when the dough holds together when pressed but isn’t sticky. Don’t overwork it—this keeps it tender.
Chilling the Dough
Shape the dough into a disk, wrap it in plastic wrap, and pop it into the fridge for at least 30 minutes (or up to 2 days). This step is crucial. Chilling relaxes the gluten and firms the butter, which means your crust won’t shrink while baking and it’ll have the perfect flake.
Making the Apple Filling
Choosing the Right Apples
Not all apples are created equal, especially when it comes to baking. For a galette, you want apples that hold their shape and balance sweetness with a bit of tartness. The best varieties include:
- Granny Smith: Firm, tart, and a baking classic.
- Honeycrisp: Juicy with a nice sweet-tart flavor.
- Fuji or Gala: Sweet and mild, perfect if you want a softer apple.
Avoid overly soft apples like Red Delicious—they tend to break down and turn mushy. You can also mix apple types to add depth and complexity to your galette.
Prepping the Apple Slices
Peel, core, and slice your apples thinly (about 1/8-inch thick). Uniform slices ensure even baking and a beautiful layout. In a bowl, toss the apples with sugar, brown sugar, lemon juice, cinnamon, nutmeg, and a bit of flour. The flour helps absorb the apple juices so your crust doesn’t turn soggy.
Let the apples sit for 10–15 minutes. This short marination helps the flavors meld and draws out excess moisture, which can then be drained off to avoid a soggy bottom.
Flavor Enhancements
To deepen the flavor, try adding:
- A splash of vanilla extract
- A pinch of allspice or clove
- A drizzle of maple syrup or honey
- A tablespoon of apple brandy or bourbon (for the adults!)
These little extras make your galette feel gourmet without much extra effort.
Assembling the Galette
Rolling Out the Dough
Once the dough has chilled, lightly flour a clean surface and roll it into a 12-inch circle, about 1/8 inch thick. Don’t worry if it’s not a perfect circle—rustic is the goal here.
Transfer the rolled-out dough to a parchment-lined baking sheet. The parchment helps with sticking and makes cleanup easier.
Adding the Filling
Spoon the apple mixture into the center of the dough, leaving a 2-inch border all around. Arrange the slices in a spiral or just pile them casually—it’s your creation!
Avoid adding too much of the liquid from the apples, as it can leak out and burn during baking. Less juice equals a crispier bottom.
Folding the Edges
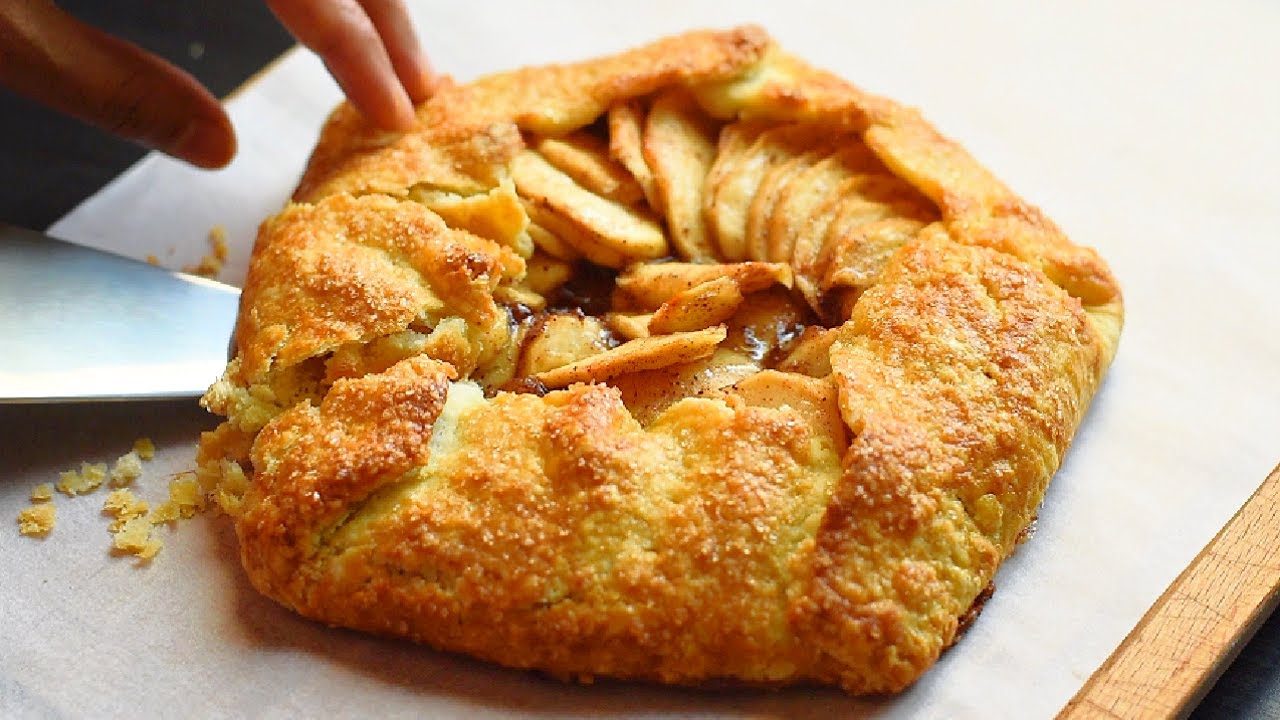
Gently fold the edges of the dough over the apples, pleating every couple of inches to create a rim. The center should remain exposed. This folding style gives it that classic, rustic look.
Brush the dough edges with an egg wash for a shiny, golden finish. If you want a sweet crunch, sprinkle the crust with coarse sugar.
Baking the Galette
Setting the Oven
Preheat your oven to 400°F (200°C). Make sure it’s fully heated before the galette goes in—this helps achieve that perfect golden crust.
Place your assembled galette on the middle rack to bake evenly. If your oven tends to run hot, consider placing a baking sheet on the lower rack to catch any potential drips.
Time and Temperature
Bake for 35–45 minutes, or until the crust is golden brown and the apples are tender and bubbling. If the crust browns too quickly, cover the edges with foil and continue baking.
During the final 5 minutes, you can brush a little melted apricot jam or honey over the apples for a glossy finish. This trick gives your galette a bakery-style look and a subtle hint of sweetness.
Cooling and Serving
Best Serving Suggestions
Let the galette cool on the pan for at least 10–15 minutes before slicing. This helps the filling set and makes it easier to cut.
Serve warm or at room temperature. Add a scoop of vanilla ice cream or a dollop of whipped cream for that perfect finishing touch. A drizzle of caramel or a sprinkle of chopped nuts also takes it up a notch.
This dessert pairs beautifully with coffee, tea, or a glass of chilled white wine for a sophisticated touch.
Storage Tips
If you have leftovers (which is rare!), store them in an airtight container at room temperature for up to 2 days, or refrigerate for up to 4 days.
To reheat, warm in a 300°F oven for 10–15 minutes. This brings back that fresh-baked texture. Avoid microwaving—it softens the crust and ruins that flaky magic.
Customization Ideas
Other Fruits You Can Use
Don’t limit yourself to just apples. The beauty of a galette lies in its flexibility. You can swap out the apples or mix in other fruits depending on the season and what’s in your kitchen. Some popular choices include:
- Pears: Similar texture to apples and pair well with cinnamon and nutmeg.
- Berries: Blueberries, raspberries, or blackberries create a juicy, tangy twist.
- Peaches and nectarines: Perfect for a summer galette—sweet, soft, and slightly tart.
- Plums or cherries: These offer a rich, slightly sour bite that balances sweet pastry.
You can even do combinations like apple-pear or peach-berry for layered flavor profiles.
Adding Nuts or Spices
Want extra crunch and depth? Sprinkle a handful of chopped pecans, walnuts, or almonds over the fruit before folding the crust. Toasted nuts add richness and a satisfying bite.
For added aroma and spice, consider mixing in:
- A pinch of cardamom or clove
- A dash of ginger
- A hint of allspice
And if you’re feeling bold, try adding a spoonful of lemon zest or a splash of almond extract to elevate the flavor complexity.
Tips for the Perfect Galette
Getting that perfect galette—golden, flaky, and bursting with flavor—comes down to a few key tips:
- Keep your ingredients cold: Especially the butter and water for the dough. This ensures a flaky crust.
- Don’t overwork the dough: Mix it just enough to bring it together. Overworking creates a tough crust.
- Use a baking sheet lined with parchment paper: It prevents sticking and makes cleanup a breeze.
- Slice apples thin and evenly: This guarantees even cooking and a pretty presentation.
- Avoid overfilling: Too much fruit can leak and make the crust soggy. Balance is key.
- Brush with egg wash: This helps achieve that bakery-style golden sheen.
- Cool before slicing: Hot galette can fall apart if cut too early. Letting it set ensures cleaner cuts.
Following these tips consistently will make your galette game strong, even on your first try.
Common Mistakes to Avoid
Even though a galette is a rustic, forgiving dessert, a few common pitfalls can ruin the final result. Here’s what to watch out for:
- Using warm butter: Your dough won’t be flaky. Always start with cold butter.
- Skipping the chill time: Warm dough is hard to work with and won’t hold its shape.
- Overloading the filling: Too many apples can cause the crust to break or the galette to bake unevenly.
- Not draining the apple juices: Excess liquid from the fruit can seep into the crust, making it soggy.
- Burning the crust: Keep an eye on the galette during the last 10 minutes and shield the edges with foil if needed.
- Cutting too soon: It’s tempting to dive in right away, but patience will reward you with cleaner slices and better texture.
Avoiding these mistakes is simple once you’ve made a galette or two. Practice really does make perfect.
Nutritional Information
Here’s a general breakdown of what you can expect per serving (based on 8 servings total):
| Nutrient | Amount per Serving |
|---|---|
| Calories | 280–320 kcal |
| Total Fat | 15g |
| Saturated Fat | 9g |
| Carbohydrates | 38g |
| Sugars | 18g |
| Fiber | 3g |
| Protein | 3g |
Note: These numbers are approximate and will vary based on exact ingredients and portion sizes.
For a lighter version, you can reduce the sugar slightly or swap some butter with Greek yogurt. Want gluten-free? Use a GF flour blend, and you’re good to go!
FAQs about Apple Galette Recipe
1. Can I make the dough ahead of time?
Absolutely! You can store the dough in the fridge for up to 2 days or freeze it for up to a month. Just thaw overnight in the fridge before using.
2. What’s the best way to reheat a galette?
Use a 300°F oven to reheat slices for about 10 minutes. This keeps the crust crisp, unlike the microwave.
3. Can I use puff pastry instead of making dough?
Yes! Puff pastry is a great shortcut. Just follow the same filling and baking instructions, but reduce baking time slightly.
4. Why is my galette leaking juice?
This usually happens if you use too many apples or skip the flour in the filling. Make sure to drain any excess liquid before assembling.
5. How can I make this galette vegan?
Use plant-based butter in the crust and skip the egg wash (or use plant milk + maple syrup). It’s just as delicious!
Conclusion
There you have it—a full-proof, step-by-step guide to making an irresistible apple galette. Whether you’re a seasoned baker or just dipping your toes into the pastry world, this recipe delivers every single time. It’s simple, customizable, and absolutely stunning on the table. With its flaky crust, spiced apple filling, and that irresistible rustic charm, this dessert hits all the right notes.
So next time you’re craving something cozy and homemade, skip the pie and make a galette instead. Trust me, your kitchen will smell amazing—and your guests will be asking for seconds.