Apple Filling Recipe: Homemade apple filling is like comfort food wrapped in a warm hug. Whether you’re baking a pie, whipping up turnovers, or just want a sweet topping for your pancakes, a good apple filling makes all the difference. But here’s the deal: store-bought filling just doesn’t cut it. It’s often overly sweet, packed with preservatives, and lacks that cozy, from-scratch flavor. That’s why learning how to make your own apple filling at home is a total game-changer.
In this guide, you’ll get a full step-by-step breakdown to help you create the best apple filling right in your own kitchen. It’s easier than you think, and once you make it yourself, you’ll never want to go back to the canned stuff again. Ready to get cooking?
Benefits of Homemade Apple Filling
There’s something incredibly satisfying about making your own apple filling. First off, it’s fresh. No preservatives, no mystery ingredients—just real fruit and natural flavors. You can control everything: how sweet it is, how thick it gets, how soft or crisp you want your apples to be. That’s something no store-bought can offer.
Plus, homemade apple filling is super versatile. You can tweak it for dietary needs—less sugar, no gluten, vegan? No problem. You can also make a big batch and store it for future use. Imagine having homemade apple pie filling ready to go for those spontaneous baking urges. That’s the beauty of making it yourself.
List of Ingredients You’ll Need
Before diving into the process, make sure you’ve got everything on hand. Here’s what you’ll need:
- Fresh apples – About 6 medium-sized apples (Granny Smith, Honeycrisp, or a mix)
- Sugar – ½ cup white sugar (adjust to taste)
- Brown sugar – ¼ cup for deeper flavor
- Ground cinnamon – 1 teaspoon
- Ground nutmeg – ¼ teaspoon
- Salt – Just a pinch to enhance flavors
- Lemon juice – 1 tablespoon (prevents browning and adds brightness)
- Cornstarch – 2 tablespoons (for thickening)
- Water – ½ cup
- Butter – 1 tablespoon (optional, adds richness)
Optional Add-ins:
- Vanilla extract (½ teaspoon)
- Allspice or cloves (for a warmer spice profile)
This ingredient list gives you a rich, flavorful filling that’s perfect for a wide range of desserts and breakfast dishes.
Choosing the Right Apples
Not all apples are created equal—especially when it comes to making apple filling. Some apples break down too much and turn mushy, while others hold their shape beautifully even after cooking. The best fillings strike a balance between tender pieces and a thick, syrupy base.
Best apples for filling:
- Granny Smith – Tart, firm, and doesn’t turn to mush. Great for pies.
- Honeycrisp – Juicy and sweet, holds shape well.
- Braeburn – A little tart, a little sweet, cooks evenly.
- Fuji or Gala – Sweeter, but may become soft quickly—use in combo with firmer apples.
Pro tip: Mix sweet and tart apples for a more complex flavor. Think Granny Smith + Honeycrisp = magic.
Make sure to peel, core, and slice apples evenly so they cook uniformly. Thin slices work best, about ¼ inch thick. You can also dice them for a chunkier filling depending on your use.
Tools and Equipment Required
You don’t need a fancy setup to make great apple filling, but having the right tools helps a lot.
Here’s what you should have ready:
- Peeler – To remove the skin from apples easily.
- Apple corer/slicer – Speeds up the prep work.
- Cutting board & knife – If you prefer slicing by hand.
- Measuring cups & spoons – Accuracy matters, especially for thickening agents.
- Large saucepan or skillet – For cooking everything together.
- Wooden spoon or spatula – For stirring without scratching your pan.
Optional but helpful:
- Lemon squeezer – For fresh lemon juice.
- Storage containers – If you’re making ahead or freezing portions.
Once you’ve got everything ready, it’s time to dive into the fun part: cooking!
Step-by-Step Guide to Make Apple Filling
Step 1: Peel, Core, and Slice Apples
Start by peeling the apples. You don’t want skins in your filling—it ruins the texture. Then core and slice them into thin, even slices (about ¼ inch thick). If you’re using a mix of apples, this is where you get to control the flavor.
Step 2: Mix the Dry Ingredients
In a small bowl, mix the sugars, cinnamon, nutmeg, and a pinch of salt. This will be your spice-sugar mix. Some people like to add a little allspice or cloves here too—totally optional, but it adds depth.
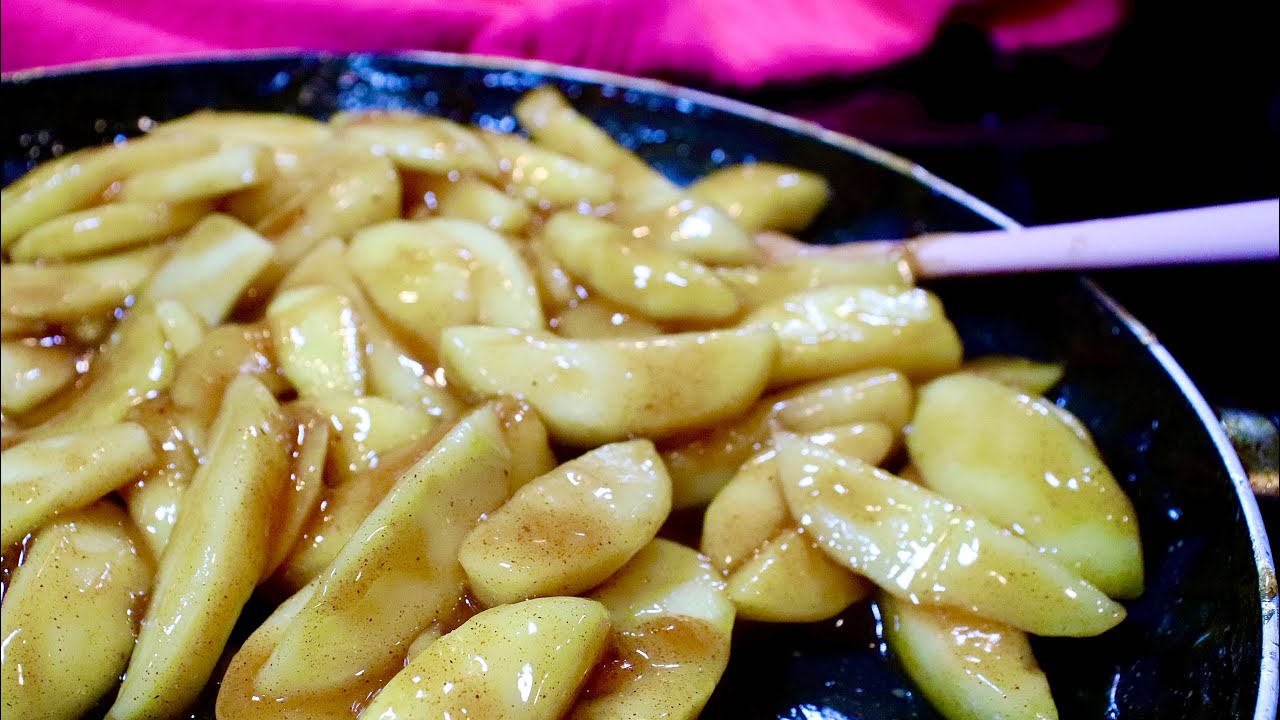
Step 3: Cook the Apples
In a large saucepan, melt butter (if using) over medium heat. Add your apple slices and cook for about 2–3 minutes, just to soften them slightly. Stir in the spice-sugar mix and toss everything so it’s evenly coated. Your kitchen should already start smelling amazing.
Step 4: Add Liquids and Thicken
Pour in the lemon juice and water. Stir well. Now sprinkle the cornstarch over the mixture (don’t dump it all in one spot—this can cause clumps). Keep stirring as the filling begins to thicken. This usually takes 5–7 minutes. If it gets too thick, add a splash more water. Too runny? Cook a little longer.
Step 5: Let It Cool
Once it’s thick and glossy and the apples are tender (but not mushy), remove from heat. Let it cool before using or storing. The filling will continue to thicken as it cools.
Tips for Perfect Apple Filling
Making apple filling is simple, but a few expert tips can take it from good to mouthwatering. First up—adjust sweetness to your taste. Some apples are naturally sweeter (like Fuji or Gala), so if you’re using those, you might not need as much sugar. On the flip side, tart apples like Granny Smith will need a bit more sweetener to balance things out.
Another thing? Pay attention to moisture. Apples release juice as they cook, so don’t be tempted to add too much water right away. It’s better to start with less and add more only if needed. Too much liquid = runny filling = soggy desserts (and no one wants that).
If your filling is looking a little too dry, you can add a tablespoon of apple cider or a splash of vanilla extract to bring in some extra flavor and moisture. And don’t forget the lemon juice—it doesn’t just keep your apples from browning; it adds a bright pop of acidity that balances the sweetness.
Also, don’t overcook your apples. You want them tender, not mushy. They should still hold their shape so the texture comes through in your pie or pastry.
Storage Instructions
So you’ve made your apple filling—now what? If you’re not using it immediately, proper storage is key to keeping it fresh and flavorful.
Refrigeration: Let your filling cool completely. Then transfer it to an airtight container and store it in the refrigerator. It’ll stay fresh for about 5 to 7 days. This is perfect for planning ahead if you’re prepping for a holiday meal or just want it ready for weekend baking.
Freezing: Yes, apple filling freezes beautifully. Just portion it into freezer-safe bags or containers, press out as much air as possible, and freeze for up to 3 months. Make sure to label it with the date so you don’t forget.
When you’re ready to use frozen apple filling, let it thaw in the fridge overnight. Give it a gentle stir, and if it feels a little watery, just reheat and let it simmer for a few minutes to thicken up again.
Pro Tip: Freeze the filling in pie-shaped portions if you’re making pies often. That way, you can just pop it into your crust when you’re ready to bake.
How to Use Apple Filling
This apple filling is incredibly versatile—you’re not just limited to pies!
Here are some delicious ideas to put it to use:
- Classic Apple Pie – Pour it into a buttery crust, top with a lattice, and bake until golden brown.
- Turnovers & Hand Pies – Spoon filling into puff pastry or pie dough, fold, seal, and bake.
- Crisps & Crumbles – Pour filling into a baking dish and top with oat crumble for a quick dessert.
- Pancake or Waffle Topping – Warm it up and spoon it over your breakfast. Add whipped cream if you’re feeling fancy.
- Ice Cream Topping – Vanilla ice cream + warm apple filling = total bliss.
- Yogurt Parfait – Layer it with granola and yogurt for a fall-inspired snack.
- Cheesecake Topping – Adds a cozy twist to a classic dessert.
And don’t forget savory options—apple filling pairs surprisingly well with pork dishes as a sweet side!
Make-Ahead Tips
Want to get ahead of the game? This apple filling is super make-ahead friendly, making your life a lot easier when it’s crunch time.
You can double or triple the recipe and store it in separate containers or freezer bags. That way, whenever the craving strikes, your filling is ready to go—just reheat and use. This is perfect for holiday baking, party prep, or when you’re trying to get dessert on the table fast.
Here’s another pro tip: make your apple filling in big batches during apple season. Use fresh, in-season apples while they’re at their peak, then freeze the filling for later. It’s like preserving a bit of fall flavor for when you really need it.
Just make sure to cool the filling completely before storing it—whether in the fridge or freezer. This helps preserve its texture and flavor, and avoids unwanted condensation that could make it soggy.
Common Mistakes to Avoid
Even with a simple recipe like apple filling, there are a few pitfalls you’ll want to dodge:
- Using the wrong apples
Some apples just don’t hold up during cooking. Red Delicious, for example, turns into mush. Always go for firm varieties that hold their shape. - Too much sugar
If your filling ends up way too sweet, it can overpower the natural apple flavor. Start with less, then taste and adjust. - Skipping the thickener
Cornstarch (or flour) is crucial. Without it, your filling will be runny and won’t hold up in pies or turnovers. - Overcooking the apples
You want them tender, not mushy. Keep an eye on them and remove from heat once they’re just right. - Not letting it cool before storing
Hot filling in the fridge can lead to condensation, sogginess, and even spoilage. Let it cool first.
Avoid these slip-ups and your filling will turn out perfect every single time.
Apple Filling for Special Diets
Whether you’re avoiding certain ingredients or cooking for friends with dietary restrictions, this apple filling can easily be adapted to suit a variety of special diets—without sacrificing flavor.
1. Sugar-Free Apple Filling: If you’re trying to cut down on sugar or making a dessert for someone who’s diabetic, no problem. Swap out the white and brown sugar for a sugar substitute like Stevia, Erythritol, or Monk Fruit sweetener. These alternatives still provide sweetness but without the blood sugar spike.
Another natural option? Unsweetened applesauce or mashed dates—they bring natural sweetness and added moisture to your filling. Just be sure to reduce the amount of water a bit to prevent your mixture from being too runny.
2. Vegan-Friendly Apple Filling: This recipe is almost vegan by default. Just leave out the butter or replace it with vegan butter or coconut oil. Everything else—apples, spices, sugar, and lemon juice—is plant-based. If you’re adding vanilla extract, make sure it’s alcohol-based and vegan-certified.
3. Gluten-Free Apple Filling: Cornstarch is naturally gluten-free, so you’re in luck! But if you’re sensitive to corn or need a substitute, try arrowroot powder, tapioca starch, or potato starch. These alternatives work just as well to thicken your filling while keeping it 100% gluten-free.
The best part? These swaps don’t affect the taste or texture too much. You still get that gooey, cinnamon-kissed apple filling goodness—just tailored to your dietary needs.
Flavor Variations
Want to spice things up a bit? Apple filling is super customizable. You can switch up the flavor profile depending on what you’re making or what season you’re in. Here are some fun and tasty variations to try:
1. Apple-Caramel Filling:
Once your filling is cooked and thickened, stir in a few tablespoons of caramel sauce (store-bought or homemade). It adds rich, buttery sweetness that takes your pies and pastries to the next level.
2. Spiced Apple-Ginger Filling:
Add a ½ teaspoon of ground ginger or a few teaspoons of freshly grated ginger along with the cinnamon and nutmeg. It gives the filling a warm, zesty bite—perfect for fall and winter baking.
3. Apple-Cherry Combo:
Toss in a cup of dried or fresh cherries with the apples for a sweet-tart twist. This combo works beautifully in pies and crumbles. You can also try cranberries or raisins for more depth and texture.
4. Apple-Pear Blend:
Mix in chopped pears (like Bosc or Bartlett) with the apples for a mellow, juicy contrast. Pears soften faster than apples, so slice them slightly thicker to keep the texture balanced.
5. Spiked Apple Filling (Adults Only):
Add a splash of bourbon, brandy, or spiced rum after cooking the apples. The alcohol cooks off, leaving behind deep, rich flavor that pairs perfectly with vanilla ice cream or whipped cream.
Don’t be afraid to experiment—apple filling is super forgiving, and the possibilities are endless!
Troubleshooting Apple Filling Issues
Even seasoned bakers hit a bump now and then. If something’s off with your apple filling, here’s how to fix it:
Too Watery?
This usually means you didn’t add enough thickener or the apples released more juice than expected. Easy fix: stir in a slurry of cornstarch and water (1 tsp cornstarch + 1 tbsp water), return to heat, and simmer until thickened.
Too Thick?
If your filling looks more like apple paste, add a splash of apple juice or water, one tablespoon at a time, while gently stirring over low heat. This should loosen it up.
Too Sweet?
This is a bit trickier, but you can balance sweetness with a little more lemon juice or a pinch of salt. Adding a few slices of tart apple and simmering again can also help even things out.
Bland Flavor?
Add a pinch more cinnamon, a dash of nutmeg, or even a little vanilla extract. If you’re after more depth, try brown sugar instead of all white sugar for that molasses richness.
Remember, cooking is all about adjusting as you go. The best apple fillings are the ones you tweak to your taste!
FAQs about Apple Filling Recipe
1. Can I freeze apple filling?
Absolutely! Let it cool completely, store in a freezer-safe container or zip bag, and freeze for up to 3 months. Thaw overnight in the fridge and reheat gently before using.
2. What apples are best for pie filling?
Granny Smith, Honeycrisp, and Braeburn are all top picks. They stay firm after cooking and have great flavor balance.
3. How long does homemade apple filling last?
In the fridge, it’ll stay fresh for 5–7 days. In the freezer, up to 3 months. Always store it in an airtight container.
4. Can I use honey or maple syrup instead of sugar?
Yes! Both are great natural sweeteners. Start with less and adjust to taste. You may need to reduce the added water slightly.
5. Do I need to peel the apples?
It’s strongly recommended. Apple skins can become tough and chewy in cooked filling. Peeling gives you a smoother, more pleasant texture.
Conclusion
And there you have it—a complete, step-by-step guide to making the best homemade apple filling from scratch. It’s simple, flexible, and packed with flavor that store-bought versions just can’t compete with. Whether you’re baking a pie, flipping pancakes, or just want a spoonful of cozy apple goodness, this filling has you covered.
With the right apples, the perfect blend of spices, and just the right touch of sweetness, this recipe will become your go-to for desserts, breakfasts, and everything in between. Plus, the ability to make it ahead and store it gives you baking freedom on demand.
Now that you’ve got the know-how, it’s time to grab those apples and get started. Your kitchen is about to smell amazing.