Apple Bars Recipe: Who doesn’t love a warm, buttery dessert that combines the comforting flavors of cinnamon and apple? Apple bars are the perfect blend of pie and crumble—all packed into a handheld treat.
Whether you’re baking for fall festivities or just craving a cozy homemade dessert, this step-by-step guide will walk you through making apple bars from scratch.
Let’s dive into it and make your kitchen smell like an apple orchard!
What Are Apple Bars?
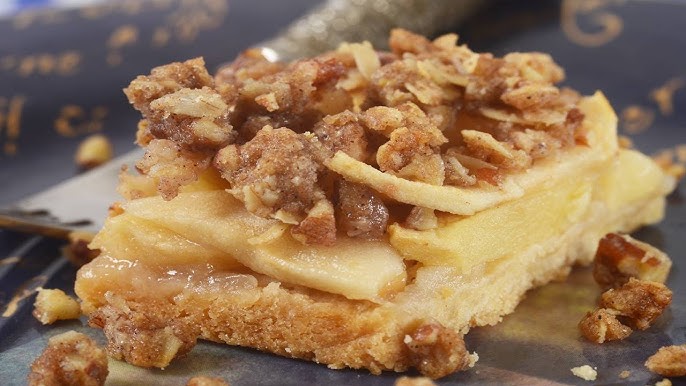
Apple bars are a delicious dessert made with layers of shortbread-like crust, spiced apple filling, and a crumbly streusel topping. Think of them as a simpler, more portable version of apple pie. These bars are baked in a rectangular or square pan and cut into squares or rectangles, making them ideal for serving at parties, potlucks, or afternoon snacks.
What makes apple bars so special? It’s the contrast between the soft, gooey apple center and the crispy buttery crust. Plus, they’re incredibly customizable—you can add nuts, drizzle caramel, or even top them with a scoop of vanilla ice cream.
Why You’ll Love This Recipe
- Easy to follow – This guide breaks it down step by step.
- Simple ingredients – Everything you need is probably in your pantry.
- Perfect for any season – Apples are great year-round.
- Customizable – You can switch up the spices, add nuts, or drizzle on some glaze.
- Family favorite – Everyone from kids to grandparents will love it.
Whether you’re a beginner baker or a seasoned pro, these apple bars are foolproof. You’ll be amazed at how such a simple recipe can turn into something so irresistible.
List of Ingredients You’ll Need
Let’s get you prepped before you bake! Here’s everything you’ll need to make these classic apple bars.
For the Crust and Crumble Topping:
- 2 ½ cups all-purpose flour
- 1 cup unsalted butter, cold and cubed
- ¾ cup granulated sugar
- ¼ cup brown sugar (light or dark)
- ½ teaspoon salt
- 1 teaspoon cinnamon (optional, for extra flavor)
For the Apple Filling:
- 4 cups apples (peeled, cored, and thinly sliced)
- ⅓ cup granulated sugar
- ¼ cup brown sugar
- 2 tablespoons all-purpose flour (to thicken the filling)
- 1 ½ teaspoons ground cinnamon
- ¼ teaspoon nutmeg (optional)
- 1 tablespoon lemon juice (to prevent browning and brighten the flavor)
Choosing the Right Apples
Not all apples are created equal, especially when it comes to baking. Picking the right variety can make or break your apple bars.
Best Apples for Baking:
- Granny Smith – Tart and firm, perfect for structure and contrast.
- Honeycrisp – Sweet, crisp, and juicy; holds up well in baking.
- Braeburn – Balanced sweet-tart flavor.
- Jonagold – A great mix of tangy and sweet.
- Fuji – Super sweet and softens beautifully.
Tips for Prepping Apples:
- Peel the apples – Skins can be chewy in baked goods.
- Slice thinly and evenly – Even slices ensure even baking.
- Toss with lemon juice – Keeps them fresh and flavorful.
Pro tip: Mix two or more types of apples for depth of flavor!
Tools and Equipment Needed
Make sure you’ve got everything ready to go:
- 9×13 inch baking pan
- Mixing bowls
- Pastry cutter or fork
- Measuring cups and spoons
- Apple peeler/corer/slicer
- Rubber spatula or spoon
- Parchment paper (optional, for easy cleanup)
- Wire rack for cooling
Step-by-Step Guide to Make Apple Bars
Let’s walk through the whole process together. It’s easier than you think!
Step 1: Preheat the Oven
Preheat your oven to 350°F (175°C). Line a 9×13 inch baking pan with parchment paper for easy lifting and cleanup. You don’t want to be fiddling with this when your hands are covered in dough.
Step 2: Prepare the Crust
In a large mixing bowl, combine:
- 2 ½ cups all-purpose flour
- ¾ cup granulated sugar
- ¼ cup brown sugar
- ½ teaspoon salt
- (Optional: 1 teaspoon cinnamon)
Cut in the cold, cubed butter using a pastry cutter or fork until the mixture resembles coarse crumbs. If you’re feeling fancy, use your fingertips—but work quickly so the butter doesn’t melt.
Take two-thirds of this mixture and press it firmly into the bottom of your prepared pan. This will be your crust. Set the remaining one-third aside for the crumble topping.
Bake the crust for about 10-12 minutes until it’s just set—don’t worry if it’s not golden yet. Let it cool slightly while you prepare the filling.
Step 3: Make the Apple Filling
In a large bowl, toss your sliced apples with:
- ⅓ cup granulated sugar
- ¼ cup brown sugar
- 2 tablespoons flour
- 1 ½ teaspoons cinnamon
- ¼ teaspoon nutmeg (if using)
- 1 tablespoon lemon juice
Mix until all the apples are well coated. The flour helps thicken the juices while baking, so don’t skip it!
Step 4: Assemble the Layers
Once the crust has slightly cooled, spread the apple filling evenly over it. Make sure the apple slices are nicely arranged without huge gaps. This layer is where the magic happens.
Step 5: Add the Crumble Topping
Now take that reserved crumb mixture and sprinkle it evenly over the apples. Don’t pack it down—just scatter it like a delicious buttery snowfall.
Want to take it up a notch? Toss in a handful of chopped pecans or walnuts to the topping.
Step 6: Bake to Perfection
Place the pan in the preheated oven and bake for 40–45 minutes, or until the topping is golden brown and the filling is bubbling.
If your edges start browning too quickly, lightly cover with foil during the last 10 minutes.
Step 7: Cool and Slice
Remove the bars from the oven and let them cool completely in the pan on a wire rack. This step is key—if you cut too early, the filling won’t set.
Once cool, lift out the parchment and slice into bars. You should get about 12–16 bars, depending on size.
Expert Tips for the Best Apple Bars
Want to make apple bars like a pro? These little tweaks and baking secrets can take your bars from good to bakery-quality!
- Use cold butter for the crust and topping. This is essential for that flaky, tender texture. Room-temperature butter won’t give you the same result—it’ll melt too fast and make your crust greasy instead of crisp.
- Chill the crust before baking. If you have time, pop the crust in the fridge for 10–15 minutes before blind baking. This helps keep the structure tight and crumbly.
- Don’t overfill with apples. It’s tempting to pile on the filling, but too much moisture can make the bars soggy.
- Let them cool completely before slicing. Warm bars may fall apart or become mushy. Cooling allows the filling to set perfectly, making clean slices possible.
- Dust with powdered sugar. Want that Insta-worthy finish? A light dusting of powdered sugar gives your bars a bakery-style look.
You could even drizzle them with icing or caramel if you’re feeling extra. But honestly, they’re so good you don’t even need it!
Optional Add-Ons and Variations
Want to make this recipe your own? Here are a few fun ways to customize it:
Flavor Add-Ins:
- Chopped nuts – Walnuts, pecans, or almonds add crunch and a nutty depth.
- Dried fruit – Add dried cranberries or raisins for a twist.
- Caramel drizzle – Just before serving, drizzle warm caramel over the top for a rich dessert bar.
- Vanilla glaze – Mix powdered sugar with a splash of milk and vanilla extract for a simple glaze.
- Oats – Add ½ cup of rolled oats to the crumb topping for a rustic texture.
Dietary Variations:
- Gluten-Free – Use a 1:1 gluten-free flour blend.
- Vegan – Swap butter with vegan margarine and use a flax egg if needed in alternative recipes.
- Low Sugar – Replace sugar with a sugar substitute like monk fruit or erythritol.
You can tweak this recipe to fit just about any preference or need without sacrificing flavor.
Storing and Freezing Apple Bars
These bars aren’t just delicious—they’re super convenient to store and freeze too.
How to Store Apple Bars:
- Room Temperature: If you’re eating them within 1–2 days, store them in an airtight container at room temp.
- Refrigerator: For longer storage (up to 5–6 days), keep them chilled in the fridge. Just make sure they’re in a sealed container so they don’t dry out.
Tip: Warm them up in the microwave for 10–15 seconds before serving for that fresh-from-the-oven feel.
Can You Freeze Apple Bars?
Absolutely! Apple bars freeze wonderfully.
Here’s how to do it:
- Let the bars cool completely.
- Wrap them individually in plastic wrap.
- Place the wrapped bars in a freezer-safe container or zip-top bag.
- Freeze for up to 3 months.
When ready to enjoy, thaw at room temperature or warm in the microwave. They’re perfect for meal-prepping desserts or saving leftovers.
Serving Suggestions
Apple bars are super versatile when it comes to serving. You can keep them simple or dress them up depending on the occasion.
Simple Ideas:
- With a hot cup of coffee or tea
- As an after-school snack
- Packed in lunchboxes
Fancy Presentation:
- Warmed up and topped with a scoop of vanilla ice cream
- Drizzled with warm caramel sauce and a dollop of whipped cream
- Served with a sprinkle of cinnamon sugar and crushed nuts
Whether you’re enjoying them solo or entertaining guests, these bars fit right in!
Common Mistakes to Avoid
Even easy recipes can go wrong if you miss some small but critical steps. Watch out for these common mistakes:
- Using warm butter for the crust – Makes the crust greasy and dense instead of crisp.
- Overbaking – The bars can dry out or become too hard. Check them around the 40-minute mark.
- Cutting too early – This results in messy, falling-apart bars. Cooling is non-negotiable.
- Skipping lemon juice – It might seem minor, but it really brightens up the apple flavor and prevents browning.
- Not using parchment paper – You’ll thank yourself later when lifting the bars out cleanly!
Follow the recipe closely and you’ll avoid these pitfalls easily.
Nutritional Information (Approximate Per Bar)
| Nutrient | Amount |
|---|---|
| Calories | 280–320 |
| Total Fat | 14g |
| Saturated Fat | 8g |
| Carbohydrates | 42g |
| Sugar | 24g |
| Fiber | 2g |
| Protein | 2g |
| Sodium | 90mg |
Note: Nutritional content may vary depending on exact ingredients used and serving size.
Why This Recipe Works
This apple bars recipe hits that perfect balance of textures and flavors. The crust is buttery and firm enough to hold the filling without falling apart, while the apples bake into a soft, spiced layer that tastes like fall in every bite.
Using simple pantry ingredients makes it accessible for everyday bakers. And the crumble topping adds just the right crunch and sweetness to round it out.
It’s a no-fuss, crowd-pleasing treat that’s easy enough for beginners but delicious enough to impress your guests. What more could you ask for in a dessert?
FAQs about Apple Bars Recipe
1. Can I use canned apple pie filling instead of fresh apples?
Yes, you can! If you’re short on time, canned filling works fine. Just skip the apple filling step and layer it directly over the crust. However, fresh apples provide better texture and flavor.
2. What type of apples should I avoid for baking?
Super soft apples like Red Delicious tend to get mushy and watery. Stick with firmer apples that hold their shape when baked.
3. Can I make these bars gluten-free?
Absolutely. Substitute the flour with a gluten-free 1:1 baking blend. Make sure your other ingredients are certified gluten-free as well.
4. How do I prevent soggy crust?
Blind bake the crust for about 10–12 minutes before adding the filling. This helps it set and stay crisp.
5. Are these bars good for picnics or parties?
Yes! These bars are sturdy, easy to cut, and transport well, making them perfect for gatherings or lunchbox treats.
Conclusion
So there you have it—your complete, step-by-step guide to making the ultimate apple bars. Whether you’re baking for a special occasion or just a cozy night in, this recipe brings all the warm, comforting vibes you crave. With just a few simple ingredients and some easy steps, you’ll have a dessert that’s sure to become a go-to favorite.
Now it’s your turn—gather those apples, preheat that oven, and treat yourself to something seriously delicious. 🍏