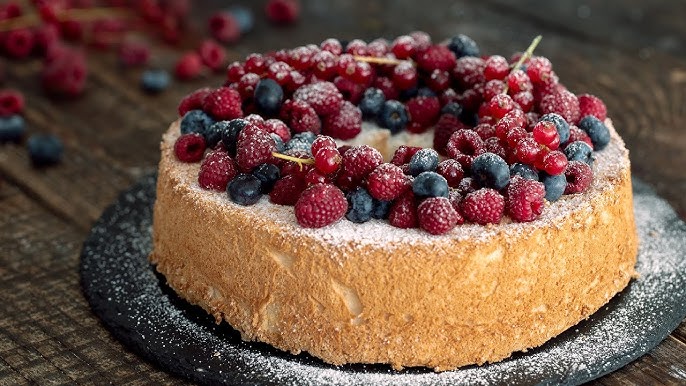
Angel Cake Recipe: Light, fluffy, and cloud-like—Angel Cake has earned its name and reputation as one of the most delicate and delightful desserts out there. If you’re a fan of desserts that feel like biting into a sweet breeze, then this is the cake for you. Angel Cake, also known as Angel Food Cake, is made primarily from egg whites, sugar, and flour. What makes it stand out? No butter or oil! It’s fat-free yet still incredibly moist and flavorful.
This cake has become a favorite for many not just because it’s a lower-calorie dessert option, but because of its unique texture and versatility. It’s the perfect base for fruity toppings, whipped cream, or even eaten on its own. Whether you’re baking it for a celebration, a family dinner, or simply to satisfy your sweet tooth, Angel Cake fits every occasion.
The beauty of this cake lies in its simplicity. With just a few ingredients and some careful mixing, you can create something that looks and tastes like it came from a fancy bakery. Don’t worry if you’re new to baking—this step-by-step guide will walk you through every detail to ensure your cake turns out heavenly every time.
Ingredients Needed for Angel Cake
Before we dive into mixing and baking, let’s talk ingredients. The secret to a perfect Angel Cake is using the right ingredients in the right proportions. Here’s what you’ll need:
Basic Ingredients:
- 1 cup cake flour (sifted)
- 1 1/2 cups granulated sugar (divided)
- 12 large egg whites (room temperature)
- 1 1/2 teaspoons cream of tartar
- 1/4 teaspoon salt
- 1 teaspoon vanilla extract
- 1/2 teaspoon almond extract (optional)
That’s it! No butter, no oil, no baking powder. The magic happens through the egg whites, which, when whipped correctly, give the cake its signature airy texture.
Choosing Quality Ingredients:
- Egg Whites: Fresh eggs work best. Room temperature egg whites whip up higher and more stable.
- Cake Flour: This type of flour has a lower protein content, giving your cake that tender crumb.
- Cream of Tartar: This stabilizes the egg whites and helps hold the structure of the cake.
Using good-quality vanilla extract and almond extract (if you like that hint of nutty flavor) can take your cake to the next level. Avoid using artificial flavors if possible.
Tools and Equipment You’ll Need
You don’t need a full bakery setup to make Angel Cake, but having the right tools can make a big difference. Here’s a list of essentials:
Must-Have Tools:
- 10-inch tube pan (ungreased)
- Electric hand mixer or stand mixer
- Fine mesh sieve (for sifting flour and sugar)
- Rubber spatula
- Cooling rack
Why a Tube Pan?
This special pan helps the cake rise evenly and provides support as it cools upside down. It also allows for airflow, which is crucial when you’re baking something as light as Angel Cake.
Don’t Grease the Pan!
One of the key rules in baking Angel Cake is to leave the pan ungreased. The batter needs to cling to the sides as it rises, and a greased pan will prevent that.
If you don’t have a tube pan, you can use a bundt pan as a last resort—but be aware it might not come out as perfectly airy.
Preparing Your Ingredients Properly
Success with Angel Cake starts long before it hits the oven. Prepping your ingredients correctly ensures your batter will whip up light and fluffy every time.
Step 1: Sifting
- Sift your cake flour with half the sugar (3/4 cup). This aerates the flour and mixes it evenly with sugar, which will later help incorporate smoothly into the egg whites.
Step 2: Separating Egg Whites
- Carefully separate the egg whites from the yolks—no trace of yolk should get into your whites.
- Use a clean, dry bowl. Even a small bit of oil or yolk will prevent the whites from whipping properly.
Step 3: Beating Egg Whites
- Start mixing the egg whites at medium speed until they become frothy.
- Add the cream of tartar and salt, then continue beating.
- Gradually add the remaining sugar (3/4 cup) and beat until you reach stiff peaks.
- Add vanilla (and almond extract if using) near the end.
What are Stiff Peaks?
When you lift your beater, the peak formed in the egg whites should stand straight up without drooping. That’s your green light to move on.
Step-by-Step Instructions to Make Angel Cake
Now that everything is prepped, it’s time to make some baking magic happen.
Step 1: Fold in the Flour Mixture
- Gently sprinkle 1/4 of the sifted flour/sugar mixture over the whipped egg whites.
- Use a rubber spatula to fold—not stir—it into the batter. Repeat until all the dry ingredients are incorporated.
Step 2: Transfer to the Pan
- Pour the batter into your ungreased tube pan. Run a knife or skewer through the batter to pop any air bubbles and smooth the top.
Step 3: Bake the Cake
- Preheat your oven to 350°F (175°C).
- Bake for 35–40 minutes until the top is golden and springs back when lightly touched.
Step 4: Invert and Cool
- Immediately invert the pan after baking. Use the pan’s feet or place it over a bottle.
- Let it cool completely—about 1–2 hours—before attempting to remove it from the pan.
Tips for the Perfect Angel Cake
Baking the perfect Angel Cake can feel like a little science experiment—but with the right tips, you’ll nail it every time. Let’s talk about what separates a good Angel Cake from a truly heavenly one.
1. Room Temperature Egg Whites Are Key
Cold egg whites don’t whip as well as those at room temperature. Leave your eggs out for about 30 minutes before separating them. This simple step can make your cake taller and fluffier.
2. Don’t Overbeat the Egg Whites
It’s tempting to keep beating just to be safe, but overbeating can ruin the structure. Stop when your peaks are stiff and glossy. Overbeaten whites will become dry and grainy, which doesn’t fold well with flour.
3. Be Gentle While Folding
The word “fold” really matters here. Don’t stir. Use a spatula to gently fold in the flour mixture, cutting down through the middle, then across the bottom and over the top. This keeps your batter full of air.
4. Don’t Grease the Pan—Seriously!
We’ve mentioned this before, but it’s so important it’s worth repeating. A greased pan prevents the cake from climbing the sides. If it can’t cling, it can’t rise.
5. Invert Immediately After Baking
Angel Cake is super delicate. If you don’t invert it while it cools, gravity will flatten it. Cooling upside down helps keep its volume and prevents collapse.
6. Use the Right Flour
Cake flour is non-negotiable. All-purpose flour will give your cake a coarser texture and can weigh it down. Stick to cake flour for that light-as-air bite.
7. Check for Doneness Carefully
Don’t rely on color alone. Gently press the top—if it springs back, it’s ready. You can also insert a skewer; if it comes out clean, it’s done.
8. Let It Cool Fully Before Removing
Removing the cake too early can cause it to tear or collapse. Give it the full cooling time upside down before you even think about touching it.
Master these tips, and your Angel Cake will look and taste bakery-worthy every single time.
Frosting and Decorating Your Angel Cake
While Angel Cake is pretty perfect on its own, dressing it up can take it to another level. You can go simple with fresh fruit and whipped cream or get creative with frostings and glazes.
1. Classic Toppings
- Whipped Cream: Light and airy, just like the cake. Add a touch of vanilla or almond extract for extra flavor.
- Fresh Berries: Strawberries, raspberries, or blueberries are great because they add color and a little tartness that balances the sweetness of the cake.
- Powdered Sugar: For a minimalist finish, dust the top with a fine layer of powdered sugar.
2. Frosting Options
- Meringue Frosting: A perfect complement that adds height and more fluffiness. Think of it as an angel cake’s soulmate.
- Glazes: A lemon or vanilla glaze adds a sweet zing. Just drizzle over the top and let it drip down the sides for a beautiful finish.
- Chocolate Ganache: For a decadent twist, drizzle dark chocolate ganache for a rich contrast to the light cake.
3. Creative Decoration Ideas
- Edible Flowers: These bring elegance and a pop of color—great for special occasions.
- Layered Look: Cut the cake into layers and add whipped cream and fruit in between for a stacked presentation.
- Themed Decorations: For birthdays or holidays, you can go wild with sprinkles, colored frosting, or even edible glitter.
You don’t need to be a professional decorator to make your Angel Cake stunning. Use what you love and make it your own. The simplicity of the cake allows for a variety of toppings without overwhelming the flavor.
Serving Suggestions
Angel Cake is so versatile that it fits right in at any table, from casual brunches to elegant dinners. Here are a few serving ideas to get you inspired:
1. Simple & Sweet
- A thick slice of Angel Cake with a dollop of whipped cream and a handful of berries is always a hit.
- Add a drizzle of honey or maple syrup for a natural sweetener twist.
2. Elegant Dessert Plating
- Slice the cake and fan it on a dessert plate with a quenelle of ice cream or sorbet.
- Add a mint leaf and dust with cocoa powder or powdered sugar for that restaurant feel.
3. Themed Dessert Ideas
- Summer BBQ: Serve with grilled peaches and a balsamic glaze.
- Holiday Treat: Pair with peppermint whipped cream and crushed candy canes.
- Tropical Vibes: Top with coconut cream and pineapple chunks.
4. Kids-Friendly Version
- Cut the cake into fun shapes using cookie cutters.
- Let kids decorate with sprinkles, mini chocolate chips, or colorful icing.
The light flavor and texture make Angel Cake the perfect canvas for all kinds of pairings. Whether you go classic or creative, it always delivers.
Storing Angel Cake
Angel Cake is best enjoyed fresh, but if you have leftovers (lucky you!), proper storage is key to maintaining that fluffy texture.
Short-Term Storage
- Wrap the cake tightly in plastic wrap or store it in an airtight container.
- Keep it at room temperature for up to 2 days. Avoid refrigerating unless absolutely necessary—it can dry out the cake.
Freezing Angel Cake
- Yes, you can freeze it! Wrap individual slices or the entire cake in plastic wrap, then aluminum foil.
- Place in a freezer-safe bag and freeze for up to 3 months.
- To thaw, let it sit at room temperature for a few hours, still wrapped, to prevent it from drying out.
Pro Tip: If you’re storing frosted cake, freeze it first for 1 hour uncovered to set the frosting, then wrap and store. This helps preserve its look and texture.
Variations of Angel Cake
Angel Cake is a classic, but there’s no rule saying you can’t mix things up a bit. In fact, playing with different flavors and styles can breathe new life into this already wonderful dessert. Let’s explore some exciting variations of Angel Cake that will wow your taste buds.
1. Chocolate Angel Cake
Who says you can’t have chocolate and lightness at the same time? By adding cocoa powder to the flour mix, you can create a rich chocolate version without sacrificing that airy texture. Use about 1/4 cup of unsweetened cocoa powder and reduce the flour slightly to balance things out. Top it with chocolate whipped cream or drizzle with ganache for the ultimate indulgence.
2. Lemon or Citrus Angel Cake
Add some zest to your cake—literally! Mix in the zest of one lemon, lime, or orange along with a teaspoon of citrus extract. This variation is perfect for spring or summer, giving your cake a bright, refreshing taste. Pair it with a lemon glaze or a dollop of citrus whipped cream.
3. Fruit-Filled Angel Cake
Angel Cake works wonderfully as a base for layered desserts. Slice the cake horizontally into two or three layers and fill it with sweetened whipped cream, custard, or fresh berries. Strawberries and blueberries are popular choices, but mango and kiwi work beautifully too.
4. Mini Angel Cakes or Cupcakes
Want individual servings? Make mini angel cakes or cupcakes using a muffin tin. Just be sure to use paper liners and avoid greasing the cups. These are perfect for parties or gatherings where individual portions are preferred.
5. Marble Angel Cake
Swirl in a bit of chocolate or raspberry puree into the batter before baking for a beautiful marbled effect. It adds a pop of flavor and looks impressive when sliced.
These creative takes on the classic Angel Cake offer something for everyone—from the chocolate lover to the fruit fanatic. Feel free to experiment and make it your own.
Gluten-Free and Vegan Alternatives
Got dietary restrictions? No problem! Angel Cake can be adapted to suit different diets while still keeping its dreamy texture. It takes a little finesse, but with the right swaps, you can make gluten-free or even vegan versions that everyone can enjoy.
Gluten-Free Angel Cake
The biggest change here is replacing the cake flour. Use a gluten-free cake flour blend that includes xanthan gum for structure. You’ll also want to make sure all other ingredients (like flavorings) are certified gluten-free.
- Substitute: Use a 1:1 gluten-free baking flour or make your own with rice flour, cornstarch, and potato starch.
- Tip: Sift multiple times to ensure lightness and avoid a gritty texture.
Vegan Angel Cake
Here’s where things get tricky—since the main ingredient is egg whites. But don’t worry, there are plant-based alternatives that mimic their texture:
- Aquafaba: The liquid from canned chickpeas can be whipped into stiff peaks just like egg whites.
- Cream of Tartar: Still essential to stabilize the aquafaba and help with structure.
- Flour Swap: Use all-purpose or a gluten-free flour blend, but make sure it’s light in texture.
Important Notes:
- Vegan versions won’t be exactly the same in taste or texture but can be surprisingly close.
- Let vegan cakes cool even longer before attempting to remove them from the pan, as they are slightly more fragile.
With these adjustments, Angel Cake becomes more inclusive without losing its charm. It might take a couple of practice runs, but once you get it, you’ll be proud of your allergen-friendly dessert.
Nutritional Information
Angel Cake is often considered a “guilt-free” dessert option compared to richer cakes. Let’s break down the nutritional aspects so you know exactly what you’re enjoying.
| Nutrient | Per Slice (1/12 cake) |
|---|---|
| Calories | ~140 |
| Total Fat | 0g |
| Cholesterol | 0mg |
| Sodium | 55mg |
| Total Carbohydrates | 30g |
| Sugars | 20g |
| Protein | 4g |
What Makes It Lighter?
- No Butter or Oil: This is one of the few cakes made without any added fats.
- High in Protein: Thanks to all those egg whites, Angel Cake has more protein than most cakes.
- Low in Cholesterol: Zero yolks means zero cholesterol.
Is It Healthy? In moderation, yes! Angel Cake is one of the better dessert choices if you’re watching your fat intake or looking for something light. However, it does have sugar, so it’s not exactly a health food—but it’s definitely a better pick compared to heavy cream-based desserts.
Want to cut back even more? Serve it with fresh fruit instead of sugary toppings. The fruit adds fiber and vitamins, making your treat a little more wholesome.
Troubleshooting Common Problems
Even experienced bakers run into trouble with Angel Cake—it’s a bit of a diva in the kitchen. Here are some common issues and how to fix them:
1. Cake Collapses After Baking
- Cause: Underbaking or not cooling upside down.
- Fix: Bake until the top springs back and let it cool fully inverted.
2. Cake Sticks to the Pan
- Cause: That’s actually good! It means your pan wasn’t greased (as it shouldn’t be).
- Fix: Run a thin knife around the sides and center tube gently to release the cake.
3. Cake is Dense, Not Fluffy
- Cause: Egg whites weren’t whipped enough or flour was overmixed.
- Fix: Next time, beat to stiff peaks and fold gently. Also, sift flour well.
4. Flat Top or No Rise
- Cause: Oven too cool or egg whites deflated.
- Fix: Make sure your oven is fully preheated. Avoid opening the oven during baking.
5. Sticky or Gummy Texture
- Cause: Cake underbaked or not cooled properly.
- Fix: Bake a bit longer and always cool upside down.
Mastering Angel Cake takes practice, but with these tips, you’ll bounce back from any baking blunder and impress everyone at the table.
FAQs About Angel Cake Recipe
1. What makes angel cake different from regular cakes?
Angel cake is made with only egg whites—no yolks or butter—giving it a super light, airy, and fluffy texture. It’s basically a sweet cloud you can eat.
2. Can I use regular flour for angel cake?
Technically yes, but cake flour is best. It has less protein, which helps the cake stay tender and spongy instead of dense.
3. Why did my angel cake collapse?
Collapsed cake? Blame the grease! Angel cakes need ungreased pans so the batter can cling to the sides and rise tall. Also, avoid underbaking—it needs time to set properly.
4. How do I store angel food cake?
Wrap it tightly in plastic wrap or store it in an airtight container at room temperature for up to 2 days. For longer storage, freeze it.
5. Can I add flavors or toppings?
Absolutely! A touch of vanilla, almond extract, or citrus zest adds magic. Serve with berries, whipped cream, or a dusting of powdered sugar to make it pop.
Conclusion
Angel Cake is more than just a dessert—it’s a celebration of texture, simplicity, and sweetness. From its airy crumb to its fat-free formula, it’s a guilt-free treat that doesn’t compromise on flavor. Whether you stick with the traditional recipe or try out one of the many variations, you’re sure to find a version that suits your taste.
With the right ingredients, a bit of patience, and our detailed step-by-step guide, you can bake the perfect Angel Cake right at home. So why not try it this weekend? Your kitchen deserves a little slice of heaven.