Air Fryer Chicken Breast Recipe: Cooking chicken breast in an air fryer is one of those culinary hacks that feels like you’re cheating the system—in the best way possible. Imagine juicy, golden chicken breasts with a deliciously seasoned crust, all ready in less than 20 minutes and without the mess of frying or the dryness of baking. That’s what the air fryer brings to your kitchen table.
Whether you’re on a meal prep mission, trying to eat clean, or just want something quick and satisfying for dinner, this air fryer chicken breast recipe ticks all the boxes. Not only is it healthier due to the reduced oil use, but it’s also incredibly simple. No flipping, no constant monitoring—just set it and go.
And here’s the best part: you don’t need to be a kitchen pro. Anyone can master this recipe with just a few pantry staples and some basic know-how. By the time you’re done reading this, you’ll have a reliable go-to recipe that works every time.
Ingredients You’ll Need
The beauty of this recipe lies in its simplicity. With just a few key ingredients, you can whip up a meal that’s both healthy and mouth-wateringly good.
Basic Ingredients
- 2 boneless, skinless chicken breasts
- 1 tablespoon olive oil
- 1 teaspoon garlic powder
- 1 teaspoon onion powder
- 1 teaspoon paprika
- ½ teaspoon salt
- ½ teaspoon black pepper
These seasonings hit the sweet spot of flavor without being overpowering. They’re also versatile enough to pair well with almost any side dish—whether it’s a fresh salad, roasted veggies, or creamy mashed potatoes.
Optional Add-ons for Extra Flavor
Want to mix things up? Try adding:
- ½ teaspoon dried herbs like thyme, rosemary, or oregano
- A squeeze of lemon juice before air frying
- A dash of cayenne for heat
- Parmesan cheese for a cheesy crust
Customizing the flavor profile allows you to cater this recipe to different moods or dietary needs. You could even go for an Asian twist with soy sauce and sesame oil or a Mexican vibe with chili powder and cumin.
Keep in mind: the simpler your seasoning, the more versatile the finished chicken will be for other recipes like salads, sandwiches, or wraps.
Choosing the Right Chicken Breast
Not all chicken breasts are created equal, especially when it comes to air frying. The size, thickness, and freshness of your chicken can affect cooking time and final taste.
Fresh vs. Frozen
Fresh chicken breasts are generally preferred because they cook more evenly and result in juicier meat. However, if you’re using frozen, make sure to:
- Fully thaw the chicken in the fridge (not on the counter!)
- Pat it dry thoroughly before seasoning
Frozen chicken can work just as well in a pinch, but skipping the thawing process is a common mistake that leads to dry or unevenly cooked meat.
Ideal Thickness and Weight
The ideal chicken breast for this recipe should be:
- Between 6 to 8 ounces
- Around ¾ to 1 inch thick
If your chicken breast is thicker, consider butterflying it or pounding it down with a meat mallet. This helps ensure even cooking throughout without drying out the edges.
Remember: consistency is key. Uniform pieces cook more evenly, so you don’t end up with one juicy breast and one overcooked puck.
Prepping the Chicken Breast
This is where the magic really starts. Prepping your chicken breast properly not only adds flavor but also helps lock in moisture and ensures a beautiful golden finish.
How to Marinate or Season
You don’t need to marinate for hours to get flavor-packed results. Here’s a quick seasoning method:
- Pat the chicken breast dry with paper towels. This helps the seasoning stick better and gives a crisper finish.
- Drizzle olive oil over each side and rub to coat evenly.
- Sprinkle your seasoning blend generously over both sides and rub in well.
If you have time, let the chicken sit for 15-30 minutes to let the flavors penetrate. For more intense flavor, refrigerate for up to 4 hours—but even a short rest makes a difference.
Tips for Juicier Results
- Brine it: Soaking the chicken in a saltwater brine for 15 minutes can add extra moisture.
- Room temperature rest: Let the chicken sit out for about 10 minutes before cooking. Cold meat straight from the fridge cooks unevenly.
- Use a meat thermometer: The sweet spot for juicy chicken is 165°F internal temperature.
Air Fryer Preheat and Setup
Your air fryer is about to become your best kitchen friend—but only if you treat it right.
Why Preheating Matters
Just like your oven, preheating your air fryer ensures the chicken starts cooking immediately when it hits the basket. This helps create that irresistible sear on the outside while keeping the inside juicy.
Most air fryers have a preheat function, but if yours doesn’t, just run it at the cooking temp for 3-5 minutes before adding your food.
Setting the Right Temperature and Time
Here’s the golden rule for chicken breasts:
- Temperature: 375°F (190°C)
- Time: 16-18 minutes, flipping halfway through
Always check the internal temperature using a meat thermometer. It should read 165°F (74°C) at the thickest part. If it’s close but not quite there, let it rest—it’ll continue to cook slightly from residual heat.
Pro tip: Don’t overcrowd the basket. Air circulation is key for that signature crispy exterior. If you’re cooking multiple breasts, make sure they’re in a single layer with space between each piece.
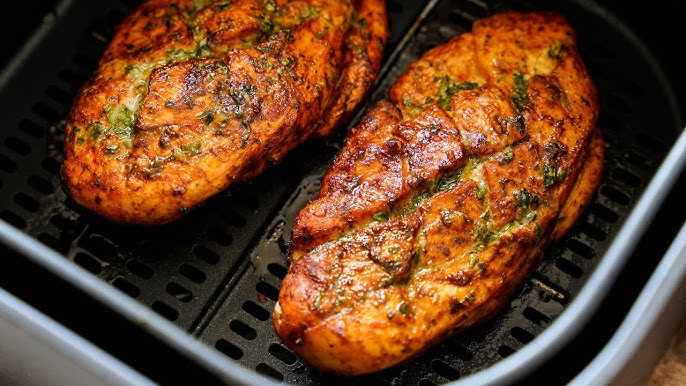
Cooking the Chicken in the Air Fryer
Getting this step right is the heart of the whole recipe. Once your chicken is prepped and seasoned, it’s time to let the air fryer do its thing. The goal here is crispy edges and a juicy, tender center—and trust me, the air fryer delivers every single time.
Step-by-Step Cooking Process
- Preheat your air fryer to 375°F (190°C) if it doesn’t have an auto-preheat feature.
- Place the chicken breasts in the basket in a single layer. Avoid stacking or crowding them.
- Set the timer for 16 to 18 minutes total.
- Flip the chicken halfway through, around the 8-minute mark. This ensures both sides get that beautiful golden crust.
- Check the internal temperature during the final minutes with a meat thermometer. You’re aiming for 165°F (74°C) at the thickest part.
If your chicken isn’t quite there yet, add another 2–3 minutes and recheck. Every air fryer is a bit different, and the exact cook time can vary based on the size of your chicken.
Pro Tips for Perfect Texture
- Lightly spray the basket with oil before adding the chicken. This keeps it from sticking and adds a hint of extra crispiness.
- Don’t open the basket too often. Every time you do, heat escapes, extending the cook time.
- Let it rest for 5 minutes before slicing. This locks in the juices and prevents a dry bite.
The result? Golden, perfectly seasoned chicken breasts with crispy edges and juicy insides—no dry or rubbery disasters here.
Serving Suggestions for Air Fryer Chicken Breast
Now that you’ve mastered the art of air fryer chicken, what do you serve it with? The beauty of this recipe is that it’s a blank canvas, ready to match your mood or meal plan.
Low-Carb Options
If you’re going for a lighter meal:
- Serve over a bed of cauliflower rice
- Pair with roasted Brussels sprouts, asparagus, or zucchini
- Add to a leafy green salad with a drizzle of balsamic vinaigrette
Comfort Food Combos
Craving something cozy?
- Pair with mashed potatoes and steamed green beans
- Make a chicken sandwich with whole grain buns and a dollop of mayo
- Serve over creamy pasta for a hearty meal
Creative Meal Prep Ideas
- Slice it and store for wraps and sandwiches throughout the week
- Use it in chicken tacos with avocado and salsa
- Add it to meal-prep containers with quinoa and veggies
This chicken is versatile enough to work in salads, wraps, bowls, or even eaten cold straight from the fridge (no judgment—we’ve all been there).
Storing and Reheating Leftovers
Got extras? Perfect. Air fryer chicken breasts store like a dream and reheat beautifully without turning into rubbery leftovers.
How to Store
- Let the chicken cool completely
- Store in an airtight container
- Keep in the fridge for up to 4 days
For longer storage, freeze the chicken:
- Wrap each piece in parchment or foil
- Place in a freezer-safe bag or container
- Label with date and freeze for up to 3 months
Reheating Tips
Avoid the microwave if you can—it’s a moisture-sucker. Instead:
- Air fryer: Reheat at 350°F for 5–6 minutes
- Oven: Cover with foil and heat at 350°F for 10–15 minutes
- Skillet: Add a splash of broth or water, cover, and warm on medium-low
This brings the chicken back to life without drying it out or making it tough.
Common Mistakes to Avoid
Even with a foolproof recipe, there are a few pitfalls that could throw off your results. Let’s avoid them, shall we?
Overcooking
This is the number one chicken killer. Even a few extra minutes can turn juicy chicken into dry jerky. Use a meat thermometer every time and pull the chicken at 165°F.
Not Preheating the Air Fryer
It might seem minor, but skipping preheat can totally mess with your cook time and texture. Always preheat for at least 3 minutes.
Crowding the Basket
Tempted to cook all your chicken at once? Don’t do it. Air fryers need space to circulate air properly. Crowding the basket leads to soggy, uneven results.
Skipping the Rest Period
It’s only 5 minutes, but letting your chicken rest makes all the difference. Slice too soon and the juices run out—wait, and they stay locked inside.
Health Benefits of Air Fryer Chicken
If you’re looking for guilt-free comfort food, this recipe is right up your alley. It’s delicious, satisfying, and surprisingly healthy.
Lower Fat Content
Using an air fryer reduces the need for excessive oil. You get that fried texture without the added fat or calories of deep frying.
High Protein, Low Carb
Chicken breast is naturally lean and packed with protein, making it perfect for keto, paleo, and other low-carb diets.
No Added Preservatives
Unlike store-bought or fast-food chicken, this is real food with real ingredients. No mystery additives or greasy coating.
Plus, you’re in control. Adjust the salt, swap in your favorite spices, and enjoy a meal that’s tailored to your taste and nutrition goals.
Air Fryer Chicken Breast for Meal Prep
If you’re the type who loves having lunch or dinner ready to grab and go, then you’ll love how air fryer chicken breast fits into your meal prep routine.
Easy to Make in Batches
You can cook several chicken breasts in batches, especially if your air fryer has a large basket or dual-layer rack. Just repeat the cooking process and store your portions in separate containers for the week ahead.
Versatile for Multiple Meals
Once cooked, this chicken becomes your go-to protein source for various dishes:
- Chop it up for salads
- Dice it into a stir-fry
- Layer it into sandwiches or wraps
- Mix it into a rice or grain bowl
By changing up the sides or sauces, you’ll never get bored—even if you eat it five days in a row.
Storage Tips for Meal Preppers
- Use glass containers for best freshness
- Store with veggies and grains in divided sections
- Reheat only what you’ll eat to avoid over-drying
Meal prep doesn’t have to be boring—and with this juicy, flavor-packed chicken, it definitely won’t be.
Different Seasoning Ideas for Variety
One of the best things about this air fryer chicken breast recipe is how easily you can switch up the flavors with just a few tweaks.
Flavor Profiles to Try
- Italian Herb – Oregano, basil, garlic, and Parmesan cheese
- Spicy Cajun – Cajun seasoning, paprika, cayenne, and a squeeze of lime
- Lemon Pepper – Zesty lemon juice, cracked pepper, and a little garlic powder
- BBQ Style – Rub with BBQ seasoning and brush with sauce during the last few minutes
- Asian-Inspired – Soy sauce, sesame oil, and ginger for a savory kick
Use Spice Blends
Don’t feel like mixing seasonings? Use your favorite store-bought spice blends. Just make sure they don’t have too much added salt to avoid over-seasoning.
Dry Rub vs. Marinade
Both work well in an air fryer. Dry rubs are faster and crispier, while marinades can add a deeper flavor—but may require longer cooking if they add moisture.
Keep experimenting! Once you find your favorite combo, you might never cook chicken another way again.
Why This Recipe Works for Every Diet
No matter your lifestyle or diet plan, this air fryer chicken breast recipe can easily be adjusted to fit your needs.
Keto & Low-Carb
- Skip the sugar-based sauces
- Pair with low-carb veggies like spinach, mushrooms, or broccoli
Whole30 & Paleo
- Use only whole spices and herbs
- Avoid dairy or processed cheese
Gluten-Free
- Stick to natural, gluten-free seasonings
- Avoid breadcrumbs or flour-based coatings
High-Protein, Low-Fat
- Chicken breast is already lean
- Air frying avoids added fats
This flexibility is what makes it a weekly staple for many. One recipe, endless possibilities—and it’s naturally healthy.
FAQs about Air Fryer Chicken Breast Recipe
1. How long should I cook chicken breast in an air fryer?
Typically, boneless chicken breasts take about 18–20 minutes at 375°F (190°C), flipping halfway through for even cooking.
2. Do I need to preheat my air fryer?
Yes, preheating helps cook the chicken evenly and gives it a better texture. Preheat for about 3–5 minutes before placing the chicken inside.
3. How do I keep air fryer chicken breast from drying out?
To avoid dryness, don’t overcook it and always use a meat thermometer to ensure it reaches an internal temperature of 165°F (74°C). Marinating or brushing with oil also helps retain moisture.
4. Can I cook frozen chicken breast in the air fryer?
Yes, you can, but you’ll need to increase the cook time to 25–30 minutes and cook at a lower temperature (around 350°F) initially to ensure it cooks through.
5. What seasonings work best for air fryer chicken breast?
Popular seasonings include paprika, garlic powder, onion powder, Italian herbs, and black pepper. You can also use store-bought or homemade dry rubs.
6. Should I use oil when cooking chicken breast in the air fryer?
A light spray of oil helps crisp the outside and prevents sticking. Use a high smoke-point oil like olive oil or avocado oil.
7. Can I cook multiple chicken breasts at once?
Yes, but don’t overcrowd the basket. Leave space between pieces so air can circulate, or cook in batches for best results.
8. How do I store and reheat leftovers?
Store in an airtight container in the fridge for up to 3–4 days. Reheat in the air fryer at 350°F for 4–5 minutes to keep it juicy and tender.
9. Is air-fried chicken breast healthier?
Yes! It uses less oil than traditional frying, making it a lower-calorie, high-protein option without sacrificing taste.
10. Can I use bone-in chicken breast in the air fryer?
Absolutely, but it requires a longer cook time (about 25–30 minutes). Always check the internal temperature for doneness.
Final Thoughts
Making air fryer chicken breast is a game-changer for busy weeknights, meal preppers, or anyone who loves simple, delicious food. With minimal ingredients and a foolproof cooking process, you get mouthwatering, juicy chicken every single time—without the hassle of traditional cooking methods.
Whether you’re trying to eat healthier, save time in the kitchen, or just love a solid chicken recipe, this one delivers. And with all the seasoning options and serving ideas, there’s zero chance of getting bored. It’s healthy comfort food made easy, and once you try it, there’s no turning back.