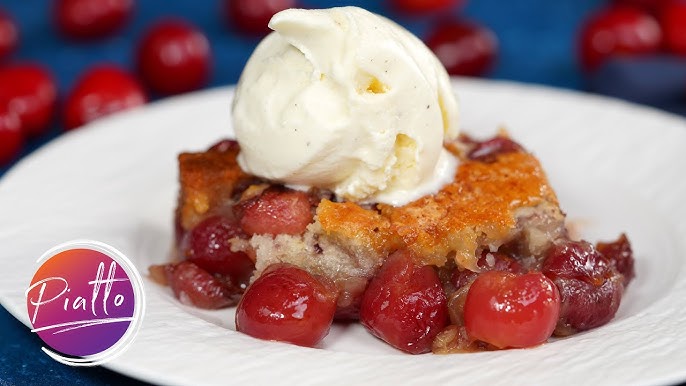
Cherry Cobbler Recipe: When it comes to comfort food desserts, cherry cobbler sits comfortably at the top of the list. With its juicy, tangy cherry filling and buttery, golden topping, this dessert is a true classic.
Cobblers date back to early American settlers who improvised pies using simple ingredients, creating a dessert that’s as rustic as it is delicious. Cherry cobbler remains a timeless favorite, loved for its simplicity and ability to please a crowd.
Whether you’re a seasoned baker or a newbie in the kitchen, this step-by-step guide will walk you through making the perfect cherry cobbler.
Ingredients Needed for Cherry Cobbler
To make a delicious cherry cobbler, you’ll need the following ingredients:
For the Cherry Filling:
- 4 cups of fresh or frozen cherries, pitted
- 1 cup granulated sugar (adjust based on cherry sweetness)
- 2 tablespoons cornstarch
- 1 tablespoon lemon juice
- 1 teaspoon vanilla extract
For the Cobbler Topping:
- 1 cup all-purpose flour
- 1 cup granulated sugar
- 1 teaspoon baking powder
- 1/4 teaspoon salt
- 1/2 cup unsalted butter, melted
- 3/4 cup whole milk
Optional Toppings:
- Vanilla ice cream or whipped cream for serving
Substitutes:
- Use almond extract instead of vanilla for a nutty twist.
- Replace all-purpose flour with gluten-free flour for a gluten-free version.
- Use a sugar substitute like erythritol for a lower-calorie dessert.
Kitchen Tools and Equipment
Having the right tools on hand ensures your baking process is smooth. Here’s what you’ll need:
- Large mixing bowls
- Whisk and spatula
- Baking dish (9×13 inch is ideal)
- Saucepan (if cooking fresh cherries)
- Measuring cups and spoons
- Oven mitts
- Cooling rack
Optional:
- Cherry pitter for convenience
- Pastry brush for an extra buttery topping
Step-by-Step Instructions
1. Preparing the Cherry Filling
Start by preheating your oven to 375°F (190°C). If using fresh cherries, rinse and pit them. In a saucepan, combine cherries, sugar, cornstarch, lemon juice, and vanilla extract. Cook over medium heat, stirring frequently, until the mixture thickens slightly. If you’re using frozen cherries, there’s no need to thaw them—just extend the cooking time slightly.
2. Making the Cobbler Topping
In a mixing bowl, whisk together the flour, sugar, baking powder, and salt. Gradually add the melted butter and milk, stirring until a smooth batter forms. The consistency should be similar to pancake batter—easy to pour but not too runny.
3. Assembling the Cobbler
Grease your baking dish with butter or non-stick spray. Pour the cherry filling evenly into the dish. Spoon or pour the cobbler topping over the cherries, ensuring it covers most of the filling. Don’t worry if some cherries peek through; the topping will spread as it bakes.
Baking the Cherry Cobbler
Place the assembled cobbler in the preheated oven and bake for 35–40 minutes or until the topping is golden brown and the filling is bubbling. Keep an eye on it during the last 10 minutes to avoid over-browning. To check for doneness, insert a toothpick into the topping—it should come out clean.
Tips for Perfect Cherry Cobbler
Crafting the perfect cherry cobbler involves a few key techniques to ensure your dessert turns out just right. Here are some tips to elevate your cobbler game:
- Use the Right Cherries: Sour cherries work best for cobblers due to their tangy flavor, which balances the sweetness of the topping. If you prefer sweeter cobblers, try Bing or Rainier cherries.
- Balance Sweetness and Tartness: Taste your cherry mixture before baking. If it’s too tart, add a little more sugar; if it’s overly sweet, squeeze in a bit of lemon juice.
- Get a Golden Topping: For an extra golden crust, brush the topping with a little melted butter or cream before baking.
- Prevent a Soggy Bottom: Ensure your filling is thickened adequately by cooking it beforehand, especially if using frozen cherries. This prevents excess liquid from making the topping soggy.
Common Mistakes to Avoid
Avoiding common pitfalls can make the difference between a good cobbler and a great one. Here are some common mistakes and how to sidestep them:
- Overcooked Filling: Be cautious when pre-cooking the cherry mixture. Overcooking can turn your cherries into mush, ruining the texture of the filling. Aim for a slightly thickened sauce.
- Soggy Topping: To avoid a soggy topping, ensure the cherry mixture is not too watery before assembling the cobbler. Drain excess juice if needed.
- Uneven Topping: Spread the topping evenly over the cherries, but don’t worry if some gaps remain—it will spread during baking.
Serving Suggestions
Cherry cobbler is best enjoyed warm, straight from the oven. Here are a few ways to make your serving extra special:
- Top It with Ice Cream: A scoop of vanilla ice cream melting over the warm cobbler creates the ultimate dessert experience.
- Add Whipped Cream: Lightly sweetened whipped cream complements the tart cherries and buttery crust beautifully.
- Sprinkle with Nuts: For added crunch, sprinkle chopped almonds, pecans, or walnuts on top after baking.
- Beverage Pairings: Serve your cobbler with a hot cup of coffee, tea, or even a glass of chilled dessert wine for a sophisticated touch.
Variations of Cherry Cobbler
This versatile recipe can be customized in many ways. Here are some exciting variations:
- Gluten-Free Cherry Cobbler: Replace all-purpose flour with a gluten-free flour blend and ensure your baking powder is gluten-free.
- Vegan Cherry Cobbler: Use plant-based butter and milk alternatives such as almond milk or oat milk. Substitute sugar with maple syrup for a natural sweetener.
- Mixed Fruit Cobbler: Combine cherries with other fruits like peaches, blueberries, or raspberries for a colorful, flavorful twist.
- Chocolate Cherry Cobbler: Add chocolate chips to the cherry filling or cocoa powder to the topping for a rich and decadent dessert.
Storage and Reheating Tips
If you have leftovers (lucky you!), follow these tips to store and reheat your cherry cobbler:
- Storage: Let the cobbler cool completely before covering it with plastic wrap or transferring it to an airtight container. Store in the refrigerator for up to 4 days.
- Freezing: You can freeze the cobbler for up to 3 months. Wrap it tightly in aluminum foil and place it in a freezer-safe container.
- Reheating: Reheat in a 350°F (175°C) oven for 15–20 minutes, or microwave individual servings for 1–2 minutes. To maintain the topping’s crispiness, avoid using the microwave for larger portions.
Nutritional Information
Here’s a quick look at the approximate nutritional values for one serving of cherry cobbler (based on 8 servings):
- Calories: 250–300 kcal
- Carbohydrates: 45g
- Protein: 3g
- Fat: 8g
- Fiber: 2g
Keep in mind that these values may vary depending on ingredient substitutions or portion sizes.
FAQs About Cherry Cobbler Recipe
What kind of cherries should I use for cherry cobbler?
For the best cherry cobbler, use fresh cherries when they’re in season. Sweet cherries like Bing or Rainier are excellent choices. If fresh cherries aren’t available, frozen cherries are a great substitute and do not need to be thawed before use.
Do I need to pit the cherries first?
Yes, pitting your cherries is essential for a pleasant eating experience. You can use a cherry pitter or a small knife to remove the pits. Be careful, as cherry juice can stain!
Can I make cherry cobbler ahead of time?
Absolutely! You can prepare the cherry filling and store it in the refrigerator up to two days ahead. The dough or topping can also be made ahead and kept chilled. Assemble and bake when ready to serve for the best results.
Is cherry cobbler gluten-free?
Traditional cherry cobbler recipes are not gluten-free, but you can easily make it gluten-free by using a gluten-free flour blend for the topping. Ensure all other ingredients are certified gluten-free if you’re catering to a celiac or highly sensitive diet.
How should I serve cherry cobbler?
Cherry cobbler is best served warm. It pairs wonderfully with a scoop of vanilla ice cream or a dollop of whipped cream. You can also enjoy it at room temperature or cold, depending on your preference.
Can cherry cobbler be frozen?
Yes, cherry cobbler can be frozen. Cool it completely, then cover it tightly with plastic wrap and aluminum foil. It can be frozen for up to 3 months. Thaw in the refrigerator and reheat in the oven before serving.
Conclusion
Cherry cobbler is a delightful dessert that’s as comforting as it is versatile. Whether you’re serving it at a family gathering or enjoying it as a midweek treat, its blend of tangy cherries and buttery topping never fails to impress. With this step-by-step guide, you’re well-equipped to create a cobbler that’s sure to become a favorite in your kitchen.


