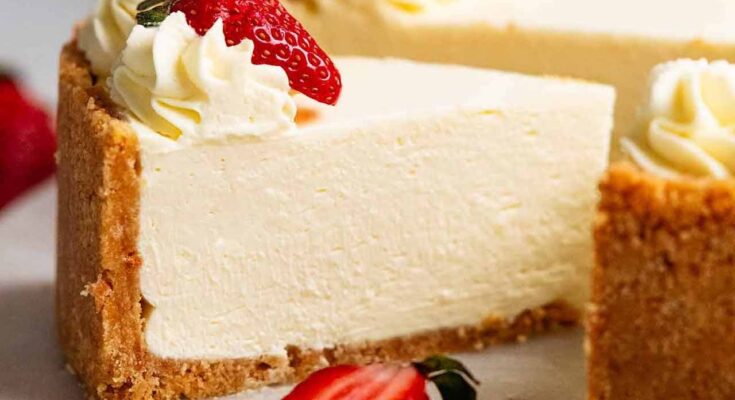
No Bake Cheesecake Recipe: Are you craving a creamy, decadent dessert but don’t want to deal with the hassle of baking? A no-bake cheesecake is your perfect solution!
With its luscious filling and crunchy crust, this dessert comes together quickly and effortlessly, making it an ideal choice for beginners and seasoned bakers alike. Plus, it’s incredibly versatile—you can customize it with endless toppings and flavors.
Ready to dive in? Let’s make the ultimate no-bake cheesecake step by step.
Ingredients Needed for the No-Bake Cheesecake
To ensure your cheesecake turns out perfect, gathering the right ingredients is essential. Here’s what you’ll need:
For the crust:
- 2 cups of crushed graham crackers or digestive biscuits.
- 1/2 cup of unsalted butter, melted.
- 1/4 cup of granulated sugar.
For the filling:
- 16 oz (450g) of cream cheese, softened.
- 1 cup of powdered sugar.
- 1 tsp of vanilla extract.
- 1 cup of heavy whipping cream (chilled).
Optional: Fresh fruits, chocolate shavings, or caramel sauce for topping.
Tools and Equipment Required
Before starting, make sure you have these tools on hand to streamline the process:
- A 9-inch springform pan or pie dish.
- Mixing bowls.
- Hand mixer or stand mixer.
- Spatula.
- Measuring cups and spoons.
- Parchment paper or cling wrap.
Step-by-Step Instructions to Prepare the Cheesecake
Preparing the Crust
- Crush the crackers: Place the graham crackers or biscuits in a food processor and blend until fine crumbs form. Alternatively, you can use a rolling pin and a resealable bag.
- Mix with butter and sugar: In a mixing bowl, combine the crumbs, melted butter, and sugar until the mixture resembles wet sand.
- Press into the pan: Line the base of your springform pan with parchment paper. Firmly press the crumb mixture into the bottom to create an even layer. Use the back of a spoon or a flat-bottomed glass for a smooth surface.
- Chill the crust: Place the pan in the refrigerator for at least 15 minutes to firm up.
Making the Creamy Filling
- Whip the cream: Using a hand or stand mixer, beat the chilled heavy cream on medium-high speed until stiff peaks form. Set aside.
- Combine the cream cheese and sugar: In another bowl, beat the softened cream cheese and powdered sugar until smooth and creamy. Add the vanilla extract and mix well.
- Fold in the whipped cream: Gently fold the whipped cream into the cream cheese mixture. Use a spatula to combine, being careful not to deflate the whipped cream.
Assembling the Cheesecake
- Pour the filling over the crust: Transfer the filling onto the chilled crust, spreading it evenly with a spatula. Smooth the top for a polished appearance.
- Refrigerate to set: Cover the pan with cling wrap or aluminum foil and refrigerate for at least 6 hours, preferably overnight, to allow the cheesecake to set completely.
Chilling the Cheesecake
The chilling step is crucial to achieving the right texture. Avoid shortcuts like freezing, as this can affect the consistency. Patience pays off with a perfectly creamy cheesecake!
Creative Topping Ideas
Elevate your no-bake cheesecake with these topping ideas:
- Fresh fruits: Add a vibrant touch with sliced strawberries, blueberries, or mangoes.
- Chocolate drizzle: Melt dark or white chocolate and drizzle it artfully over the cheesecake.
- Caramel or butterscotch sauce: A rich addition that pairs wonderfully with the creamy filling.
Tips for a Perfect No-Bake Cheesecake
- Ensure cream cheese is softened: This prevents lumps in the filling.
- Whip the cream properly: Stiff peaks are key to a light and airy texture.
- Chill thoroughly: Skipping or rushing this step can result in a runny cheesecake.
Variations of No-Bake Cheesecake
- Chocolate Cheesecake: Add melted dark chocolate to the filling for a rich twist.
- Vegan Cheesecake: Substitute cream cheese with a plant-based alternative and use coconut cream.
- Gluten-Free Option: Swap graham crackers with gluten-free biscuits.
Serving and Presentation Tips
- Use a sharp, warm knife for clean slices.
- Plate with a drizzle of sauce and a sprig of mint for an elegant touch.
Storage and Shelf-Life
- Refrigerate: Store leftovers in an airtight container in the fridge for up to 4 days.
- Freezing: Freeze the cheesecake without toppings for up to 1 month. Thaw in the fridge before serving.
FAQs about No Bake Cheesecake Recipe
1. What is a no-bake cheesecake?
A no-bake cheesecake is a creamy dessert made without the need for an oven. It typically features a graham cracker crust and a rich, smooth filling made with cream cheese, sugar, and heavy cream or whipped topping.
2. How long does it take to set a no-bake cheesecake?
A no-bake cheesecake usually requires about 4–6 hours to set in the refrigerator. For the best results, leave it overnight for a firmer texture.
3. Can I use any crust for a no-bake cheesecake?
Yes! While graham cracker crusts are classic, you can experiment with crushed cookies, digestive biscuits, or even a nut-based crust for added flavor and texture.
4. Can I make a no-bake cheesecake without gelatin?
Absolutely! Many recipes rely on whipped cream or cream cheese to stabilize the filling. For a firmer consistency, you can still use gelatin, but it’s optional.
5. How long does a no-bake cheesecake last in the fridge?
A no-bake cheesecake can last for up to 4–5 days when stored in an airtight container in the refrigerator. Make sure to cover it to retain its freshness.
6. Can I freeze a no-bake cheesecake?
Yes, you can freeze a no-bake cheesecake. Wrap it tightly in plastic wrap and aluminum foil, and it will keep well for up to 2 months. Thaw in the refrigerator before serving.
7. What toppings go well with a no-bake cheesecake?
Popular toppings include fresh fruit, fruit compotes, chocolate drizzle, caramel sauce, or crushed cookies. Get creative to suit your taste preferences!
Conclusion
A no-bake cheesecake is the ultimate dessert for anyone seeking a stress-free yet show-stopping treat. With its creamy texture, crunchy crust, and customizable flavors, it’s bound to become a favorite in your recipe collection. Gather your ingredients, follow this guide, and enjoy every bite of your homemade masterpiece!


