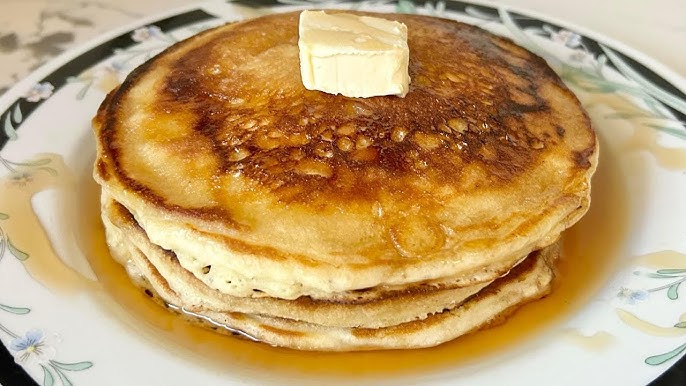
Buttermilk Pancake Recipe: There’s nothing quite like waking up to the smell of fresh, homemade buttermilk pancakes sizzling on the griddle. These pancakes are a breakfast classic for a reason—they’re fluffy, flavorful, and oh-so-comforting.
Whether you’re preparing a special weekend breakfast or just craving a stack of golden perfection, this guide will walk you through the process step by step.
Get ready to impress your family or guests with pancakes that taste even better than your favorite diner’s!
Ingredients for Buttermilk Pancakes
Essential Ingredients
To make the fluffiest buttermilk pancakes, you’ll need:
- 2 cups of all-purpose flour: The base for your pancakes.
- 2 tablespoons of sugar: Adds a touch of sweetness.
- 2 teaspoons of baking powder: Helps create a light, airy texture.
- 1/2 teaspoon of baking soda: Reacts with buttermilk for extra fluff.
- 1/2 teaspoon of salt: Enhances flavor.
- 2 cups of buttermilk: Key for that signature tangy taste.
- 2 large eggs: Provides structure and richness.
- 1/4 cup of melted butter: Adds moisture and flavor.
Optional Add-Ins
Want to jazz up your pancakes? Add:
- Chocolate chips
- Blueberries
- Chopped nuts
Substitutions for Key Ingredients
No buttermilk? No problem! Substitute with:
- Milk + lemon juice or vinegar: Mix 2 cups of milk with 2 tablespoons of acid and let it sit for 5 minutes.
- Non-dairy milk alternatives: Almond or oat milk with a bit of vinegar works too.
Tools Needed for the Recipe
Cooking Tools
You’ll need a reliable non-stick skillet or griddle to cook the pancakes evenly.
Measuring Tools
Accurate measuring cups and spoons are essential for the perfect balance of ingredients.
Mixing Tools
A large mixing bowl, a whisk, and a spatula will make your prep work easier and less messy.
Step-by-Step Instructions
Step 1: Gather Your Ingredients
Before you start cooking, make sure all your ingredients are measured and ready to go. This simple step ensures you’re not scrambling for items mid-recipe.
Step 2: Mix the Dry Ingredients
In a large bowl, whisk together the flour, sugar, baking powder, baking soda, and salt. This ensures even distribution and prevents clumps.
Step 3: Combine Wet Ingredients
In a separate bowl, whisk the buttermilk, eggs, and melted butter until smooth. For best results, make sure the buttermilk and eggs are at room temperature.
Step 4: Blend Wet and Dry Ingredients
Slowly pour the wet mixture into the dry ingredients, gently folding them together with a spatula. Be careful not to overmix—small lumps are okay!
Step 5: Preheat the Pan
Heat a skillet or griddle over medium heat and lightly grease it with butter or cooking spray. Test the heat by sprinkling a few drops of water on the surface; they should sizzle gently.
Step 6: Pouring the Batter
Use a ladle or measuring cup to pour 1/4 cup of batter onto the hot skillet. Keep the pancakes spaced apart to avoid overlapping.
Step 7: Flipping the Pancakes
Wait until bubbles form on the surface and the edges look set, about 2-3 minutes. Flip the pancake and cook for another 2 minutes until golden brown.
Step 8: Keeping the Pancakes Warm
Place cooked pancakes on a baking sheet in a 200°F oven to keep them warm while you cook the remaining batter.
Common Mistakes to Avoid
- Overmixing the Batter: This activates the gluten in the flour, leading to dense, rubbery pancakes.
- Cooking at the Wrong Temperature: Too hot, and the outside burns before the inside cooks. Too cool, and the pancakes won’t brown properly.
- Skipping the Rest Period: Letting the batter sit for 5-10 minutes allows the ingredients to combine fully, resulting in lighter pancakes.
Tips for Fluffy Pancakes Every Time
Achieving cloud-like pancakes isn’t as tricky as it seems. A few tried-and-true tips can make all the difference:
- Use Fresh Ingredients: Baking soda and baking powder lose their effectiveness over time. Always use fresh ones for the best rise.
- Let the Batter Rest: Giving the batter 5-10 minutes to rest allows the gluten to relax and the leavening agents to activate, leading to fluffier pancakes.
- Don’t Overmix: Resist the urge to stir until smooth. A lumpy batter is your friend—it prevents tough, chewy pancakes.
- Flip at the Right Time: Wait until bubbles form and pop on the surface before flipping. This ensures the first side is perfectly cooked.
Variations of Buttermilk Pancakes
One of the best things about buttermilk pancakes is their versatility. You can easily customize them with different add-ins and flavors:
Blueberry Buttermilk Pancakes
Fresh or frozen blueberries add a fruity burst to each bite. Simply sprinkle a few onto the batter once it’s poured into the skillet.
Chocolate Chip Pancakes
For a sweeter twist, add chocolate chips directly into the batter. Semi-sweet or dark chocolate chips work best to balance the sweetness.
Banana Buttermilk Pancakes
Mash a ripe banana and fold it into the batter for natural sweetness and extra moisture. Top with banana slices for presentation.
Gluten-Free Buttermilk Pancakes
Swap the all-purpose flour for a 1:1 gluten-free baking mix. Ensure the mix contains xanthan gum for structure.
How to Store and Reheat Pancakes
If you’ve made a big batch of pancakes, don’t worry! They store beautifully for later enjoyment:
- Refrigerating: Place leftover pancakes in an airtight container and refrigerate for up to 3 days.
- Freezing: Lay the pancakes flat on a baking sheet to freeze, then transfer them to a zip-top bag. They’ll stay fresh for up to 2 months.
- Reheating: Use a toaster, microwave, or oven to reheat. To keep them fluffy, avoid over-microwaving and wrap them in a damp paper towel.
Nutritional Information
Curious about the calories and nutrients in your buttermilk pancakes? Here’s a rough breakdown per pancake (without toppings):
| Nutrient | Amount per Pancake |
|---|---|
| Calories | 150 |
| Protein | 4g |
| Carbohydrates | 20g |
| Fat | 5g |
| Fiber | 1g |
For a healthier alternative, you can reduce the sugar or use whole wheat flour.
FAQs about Buttermilk Pancake Recipe
1. Can I make buttermilk at home?
Yes! Mix 1 cup of milk with 1 tablespoon of lemon juice or white vinegar. Let it sit for 5-10 minutes until it curdles—it’s a great buttermilk substitute.
2. What’s the best substitute for buttermilk?
If you don’t have buttermilk, you can use yogurt thinned with a bit of water or milk, or try the homemade version mentioned above.
3. How do I prevent pancakes from sticking to the pan?
Always preheat your skillet and lightly grease it with butter or oil. Using a non-stick skillet also makes a huge difference.
4. Can I prepare the batter in advance?
It’s not recommended because the leavening agents begin working immediately. If you must, store it for no more than an hour in the fridge.
5. What’s the trick to perfectly round pancakes?
Use a ladle or squeeze bottle to pour the batter. Start from the center and let the batter spread naturally for a perfect circle.
Conclusion
Buttermilk pancakes are the ultimate comfort food—easy to make, endlessly customizable, and absolutely delicious. By following these steps, tips, and tricks, you can create pancakes that rival any diner’s. Whether you’re serving them plain with syrup or loading them with toppings, every bite will be a slice of breakfast heaven.
So grab your skillet, whip up that batter, and enjoy a stack of fluffy, golden-brown perfection today!


