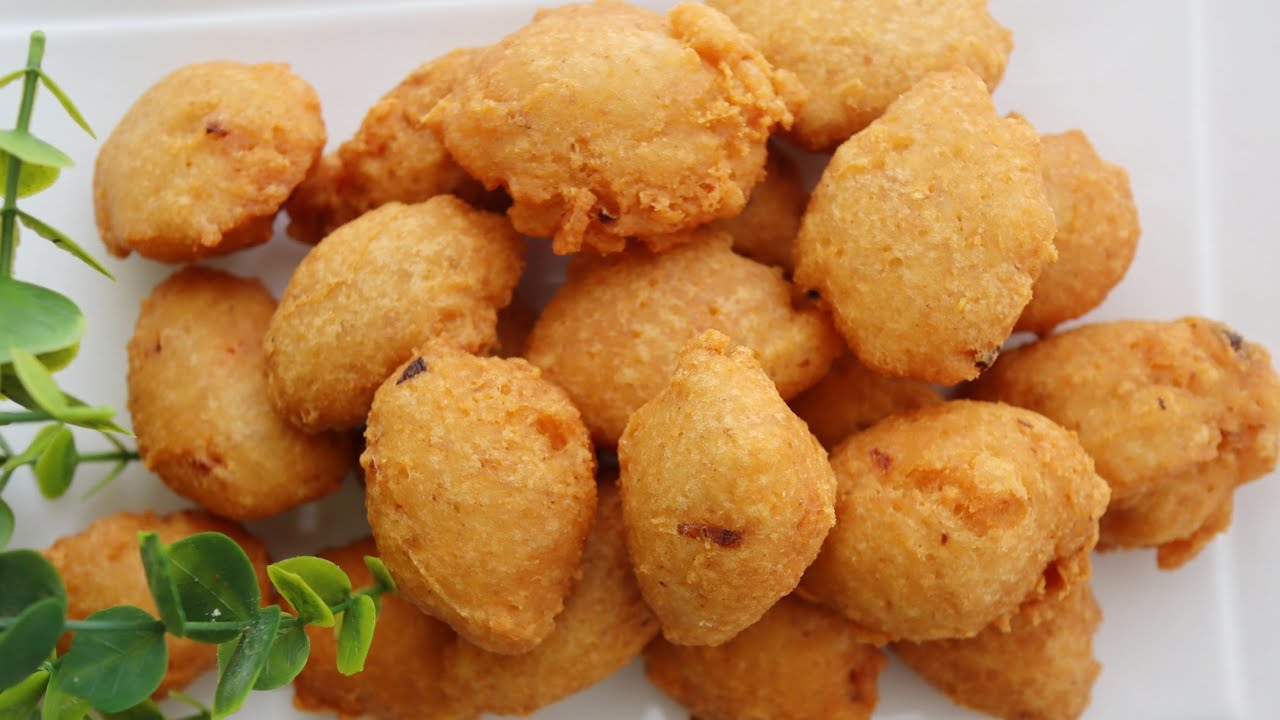
Akara is one of Nigeria’s most loved traditional foods, known for its crispy exterior, soft fluffy centre, and rich bean flavour. Also called bean cakes, bean fritters, or black-eyed pea fritters, Akara is commonly enjoyed for breakfast, as a snack, or as a filling street food served with bread, pap, custard, or a hot beverage.
A good Akara recipe is surprisingly simple. The secret lies in using properly peeled beans, controlling the amount of water added during blending, incorporating enough air into the batter, and frying at the correct temperature. When these steps are followed carefully, we can produce Akara that is beautifully golden on the outside while remaining light, tender, and well-seasoned inside.
In this guide, we explain how to make Nigerian Akara from scratch, including the essential ingredients, preparation method, frying techniques, serving ideas, storage tips, and common mistakes to avoid.
What Is Akara?
Akara is a traditional West African fritter prepared mainly from peeled beans, particularly black-eyed peas or brown beans. The beans are soaked, peeled, blended with peppers and onions, seasoned, whipped, and fried in hot oil until golden brown.
In Nigeria, Akara is especially popular as a breakfast food. It is frequently served with ogi or pap, bread, custard, or other simple accompaniments. Fresh Akara is also widely sold by roadside vendors, restaurants, markets, and local food sellers.
Although Akara requires only a few basic ingredients, the preparation technique makes a significant difference. A batter that contains too much water can produce flat or oily Akara, while properly aerated batter gives us the fluffy texture associated with excellent homemade bean cakes.
Ingredients for Making Akara
Before we begin frying, we need a simple combination of fresh ingredients that gives the Akara its characteristic flavour and texture.
Essential Akara Ingredients
- 2 cups black-eyed peas or Nigerian brown beans
- 1 medium onion
- 1–2 fresh peppers, depending on preferred heat level
- 1 red bell pepper, optional
- Salt to taste
- A small amount of water for blending
- Vegetable oil or another suitable frying oil
We can adjust the quantity of peppers according to personal preference. Some versions of Nigerian Akara contain only beans, onion, pepper, and salt, while others include additional seasonings.
The most important rule is to avoid adding excessive water while blending. We need a thick bean batter, not a watery mixture.
How to Peel Beans for Akara
Properly peeled beans contribute significantly to the smooth texture and attractive appearance of Akara.
We begin by placing the beans in a large bowl and covering them with water. After soaking them briefly, we rub the beans firmly between our palms. This loosens the skins from the beans.
We then add more water and gently separate the floating skins from the heavier beans. The process can be repeated several times until most of the skins have been removed.
Another convenient method is to pulse the dry beans briefly in a blender before soaking. This can help break the skins, making them easier to wash away.
The beans do not necessarily need to be absolutely spotless, but removing most of the skins helps us achieve smoother and lighter Akara.
How to Make Akara Step by Step
Once our beans are peeled and rinsed, we can prepare the batter and begin frying.
1. Soak the Peeled Beans
After peeling, we allow the beans to soak briefly in clean water. This softens them and makes blending easier.
We then drain the beans thoroughly before transferring them to the blender.
2. Blend the Beans
We add the drained beans, onion, and fresh peppers to a blender.
We blend everything until we obtain a smooth, thick paste. Only a small quantity of water should be added when necessary to help the blender move.
The consistency is extremely important. If our batter becomes too watery, it may spread excessively when dropped into the oil and absorb more oil during frying.
A properly blended Akara mixture should be thick enough to hold its shape on a spoon.
3. Whip the Akara Batter
We transfer the blended mixture into a large bowl.
Next, we beat or whisk the batter vigorously for several minutes. This important step incorporates air into the mixture and helps create light and fluffy Akara.
We can use a wooden spoon, whisk, hand mixer, or stand mixer.
As air enters the batter, we may notice that the mixture becomes slightly lighter and increases in volume.
4. Add Salt and Final Seasoning
After whipping the batter, we add salt to taste and mix gently.
Adding the salt shortly before frying is a common approach because we want to preserve the light consistency we have developed while whisking.
At this point, we can also mix in a small amount of finely chopped onion or pepper if we want additional texture.
How to Fry Akara Perfectly
Frying temperature plays a major role in determining whether Akara becomes crispy, fluffy, greasy, or burnt.
We pour enough oil into a deep frying pan or pot and heat it over medium heat. The oil should be sufficiently hot before we begin adding the batter.
To test the temperature, we can drop a tiny amount of batter into the oil. It should rise and begin sizzling without burning immediately.
Using a tablespoon, small scoop, or our fingers where appropriate, we carefully drop portions of batter into the hot oil.
We should avoid overcrowding the pan because adding too many pieces simultaneously lowers the oil temperature and can cause the Akara to absorb excessive oil.
We fry the Akara until the underside turns golden brown, then turn each piece so that the opposite side cooks evenly.
Once both sides are golden brown and crisp, we remove the Akara from the oil using a slotted spoon.
We place the freshly fried bean cakes on paper towels or a draining rack to remove excess oil.
How to Make Akara Fluffy and Crispy
The difference between ordinary Akara and excellent Akara often comes down to technique.
Use Minimal Water When Blending
The Akara batter should remain thick. Excessive water produces a loose mixture and can prevent the fritters from developing the desired round shape.
Whip the Batter Properly
Whipping incorporates air into the bean mixture. This is one of the most important techniques for creating soft, airy Akara rather than dense bean cakes.
Heat the Oil Correctly
Oil that is too cold can make Akara greasy. Oil that is excessively hot can burn the exterior before the centre cooks properly.
We therefore maintain a steady medium frying temperature.
Fry in Small Batches
Overcrowding reduces the oil temperature. Frying fewer pieces at once gives each Akara enough space to cook evenly.
Use Fresh Beans
Good-quality beans provide better flavour and texture. Beans that have been stored incorrectly for long periods may require more soaking and can be harder to blend smoothly.
Common Akara Mistakes to Avoid
Although the recipe is straightforward, several small mistakes can affect the final result.
One common problem is adding too much water. A watery mixture may spread immediately in the oil rather than forming compact bean fritters.
Another problem is failing to whip the batter. Without sufficient aeration, Akara can become heavy and dense.
We should also avoid frying in oil that has not reached the appropriate temperature. Cold oil encourages excessive absorption, while overly hot oil creates Akara that appears done outside but remains undercooked inside.
Adding too much batter to the frying pan simultaneously is another mistake. Small batches provide more consistent results.
Finally, we should taste and adjust our seasonings carefully. Beans have a mild flavour, so proper amounts of onion, pepper, and salt help bring the dish to life.
What to Eat With Akara
One reason Akara remains such a popular Nigerian food is its versatility. It can be eaten alone or combined with several traditional breakfast foods.
Popular Foods to Serve With Akara
- Pap or ogi
- Fresh bread
- Custard
- Garri
- Tea or coffee
- Fresh pepper sauce
- Oatmeal or other breakfast cereals
One of the most familiar combinations is Akara and pap. The crispy bean fritters complement the smooth texture of pap beautifully.
Akara and bread is another popular option. We can place the bean cakes inside soft bread to create a filling and satisfying meal.
Can We Make Akara Without Pepper?
Yes. Pepper provides heat and additional flavour, but it is not compulsory.
If we are preparing Akara for children or anyone who prefers mild food, we can reduce the amount of fresh pepper or leave it out completely.
Onion, beans, and salt can still produce tasty Akara. However, peppers add depth and contribute to the familiar flavour associated with many Nigerian Akara recipes.
Can We Make Akara Without Peeling the Beans?
It is technically possible to blend beans with some of their skins remaining, but traditional Akara is generally better when most of the skins have been removed.
Peeling gives the batter a smoother consistency and helps us achieve a lighter texture.
If speed is important, we can use already peeled beans where available. This greatly reduces preparation time without changing the basic cooking process.
How to Know When Akara Is Properly Cooked
Properly fried Akara should have an evenly golden-brown exterior and a firm but tender centre.
When we break one open, the inside should appear cooked, fluffy, and slightly moist without showing raw bean batter.
If the outside darkens very quickly while the centre remains uncooked, the oil is probably too hot. We can reduce the heat slightly before frying the next batch.
If the Akara sits in the oil for too long without browning, the oil may not be hot enough.
How to Store Leftover Akara
Akara tastes best when served freshly fried, but leftovers can be stored for later.
We first allow the Akara to cool completely. We then place it inside an airtight food container and refrigerate it.
When ready to eat, we can reheat the Akara using an oven or air fryer to restore some of its crispness. A microwave can also warm it, although the exterior may become softer.
For the best flavour and texture, we should avoid leaving cooked Akara exposed at room temperature for extended periods.
Tips for Preparing Akara Ahead of Time
If we want to reduce preparation work in the morning, we can peel the beans beforehand and store them appropriately in the refrigerator or freezer.
We can also prepare portions of peeled beans in advance, making it easier to blend only the amount needed.
However, once the batter has been whipped and seasoned, frying it promptly usually gives us the best texture.
Freshly prepared batter retains the air needed to create fluffy Akara.
Why Homemade Akara Is Worth Making
Making Akara at home allows us to control the quality of the beans, amount of pepper, salt level, frying oil, portion size, and overall freshness.
We can prepare it mild or spicy, make smaller pieces for snacks, or larger fritters for breakfast.
Homemade Akara also gives us the opportunity to serve the bean cakes immediately after frying, when the outside is wonderfully crisp and the centre is still warm and fluffy.
With only a few inexpensive ingredients, we can prepare a satisfying Nigerian meal suitable for breakfast, brunch, snacks, or family gatherings.
Best Serving Tips for Nigerian Akara
Akara should ideally be served while still warm. This is when the contrast between the crispy exterior and fluffy centre is most enjoyable.
For a traditional breakfast, we can pair freshly fried Akara with warm pap. For something more filling, we can serve it with fresh bread and a hot drink.
Those who enjoy spicy foods can add fresh pepper sauce on the side. However we choose to serve it, the key is enjoying the Akara as fresh as possible.
FAQs about Akara Recipe
What is Akara?
Akara is a popular West African snack made from peeled beans blended with peppers, onions, and seasonings, then deep-fried until golden and crispy. It is especially popular in Nigeria.
What type of beans is best for Akara?
Black-eyed peas or Nigerian brown beans work well for making Akara. The beans should be soaked and peeled before blending for the best texture.
How do we make Akara fluffy?
To make fluffy Akara, we should blend the beans with minimal water and whisk the batter thoroughly before frying. This helps incorporate air into the mixture.
Why does my Akara absorb too much oil?
Akara may absorb excess oil when the frying oil is not hot enough or when the batter contains too much water. Maintain medium-high heat while frying.
Can we make Akara without peeling the beans?
Yes, but peeling the beans produces a smoother, lighter, and more traditional Akara texture. Unpeeled beans may create a darker and slightly coarser result.
Can Akara batter be stored overnight?
Fresh batter generally gives the best results. However, we can refrigerate the batter in an airtight container and use it within a short period. Stir or whisk it again before frying.
What can we eat with Akara?
Akara pairs well with pap (ogi), bread, custard, oatmeal, or tea. It can be enjoyed for breakfast, as a snack, or as part of a light meal.
Why does my Akara fall apart while frying?
Akara may break apart if the batter is too watery or has not been whipped properly. A thick, airy batter holds its shape better in hot oil.
Conclusion
A traditional Akara recipe does not require complicated ingredients, but careful preparation makes all the difference. By peeling the beans properly, blending them with minimal water, whipping the batter until airy, and frying at the correct temperature, we can consistently prepare crispy Nigerian Akara with a soft and fluffy centre.
The combination of beans, onions, peppers, salt, and hot oil creates one of Nigeria’s most recognisable and satisfying traditional foods. Whether we serve our Akara with pap, bread, custard, tea, or enjoy it on its own, it remains a simple and delicious meal suitable for almost any occasion.
Once we master the consistency of the batter and control the frying temperature, making homemade Akara becomes straightforward. Fresh, golden, flavourful, and filling, these classic Nigerian bean fritters deserve a regular place on the breakfast table.