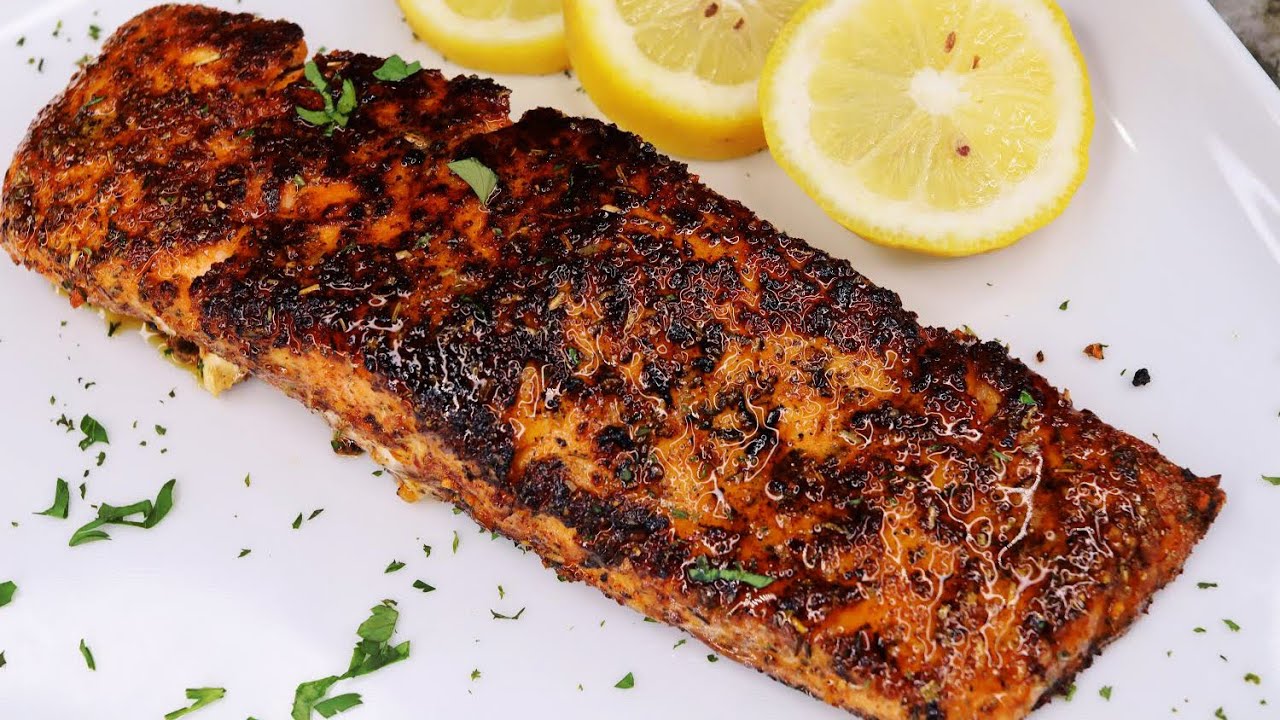
Few seafood dishes deliver the same balance of rich flavor, crisp texture, and effortless elegance as a perfectly cooked seared salmon recipe. With a golden crust on the outside and flaky, buttery flesh on the inside, seared salmon transforms a simple dinner into a restaurant-style experience at home.
Whether we are preparing a quick weeknight meal or serving guests a gourmet seafood entrée, mastering salmon searing techniques ensures consistent, delicious results every time. The key lies in choosing quality salmon, properly seasoning it, using the right skillet, and controlling heat with precision.
This complete guide covers everything needed to prepare the ultimate pan-seared salmon recipe, including ingredients, cooking techniques, flavor variations, serving ideas, and expert tips.
Why Seared Salmon Is One of the Best Seafood Dishes
Rich Flavor and Tender Texture
Salmon naturally contains healthy fats that keep the fish moist and flavorful while cooking. When seared correctly, the exterior becomes irresistibly crispy while the inside stays juicy and delicate.
Quick and Easy Preparation
A properly cooked salmon fillet can be ready in under 15 minutes, making it ideal for busy schedules without sacrificing flavor or quality.
Packed With Nutrition
Salmon is loaded with:
- Omega-3 fatty acids
- High-quality protein
- Vitamin D
- B vitamins
- Potassium
- Antioxidants
It is one of the healthiest proteins available while still tasting luxurious and satisfying.
Ingredients You’ll Need for Seared Salmon
To prepare the perfect Seared Salmon, we gather the following ingredients:
Main Ingredients
- 4 salmon fillets (skin-on preferred)
- 2 tablespoons olive oil
- 1 tablespoon unsalted butter
- 1 teaspoon sea salt
- 1 teaspoon black pepper
- 1 teaspoon garlic powder
- 1 teaspoon paprika
- 1 tablespoon lemon juice
- Fresh parsley for garnish
- Lemon wedges for serving
Optional Flavor Enhancers
- Fresh garlic cloves
- Fresh thyme
- Rosemary sprigs
- Honey
- Dijon mustard
- Chili flakes
- Cajun seasoning
Best Salmon to Use for Searing
Atlantic Salmon
Atlantic salmon is rich, buttery, and widely available. It works beautifully for beginners because of its higher fat content.
Sockeye Salmon
Sockeye salmon has a deeper red color and stronger flavor. It produces excellent texture when seared.
Coho Salmon
Coho salmon offers a lighter flavor and delicate texture while still crisping nicely in a hot skillet.
How to Prepare Salmon Before Cooking
Pat the Salmon Dry
Removing excess moisture is essential for achieving crispy skin and proper browning.
Use paper towels to thoroughly dry both sides of the fillet.
Bring to Room Temperature
Allow salmon to rest at room temperature for about 15 minutes before cooking. This promotes even cooking throughout the fillet.
Season Generously
Season both sides with salt, pepper, garlic powder, and paprika for balanced flavor and color.
Best Pan for Seared Salmon
Cast Iron Skillet
A cast iron skillet creates the best crust because it retains high heat evenly.
Stainless Steel Pan
Stainless steel also works exceptionally well for restaurant-style searing.
Avoid Nonstick for Maximum Crust
Nonstick pans may not achieve the same golden crust that cast iron or stainless steel delivers.
Step-by-Step Guide to Making Seared Salmon
Step 1: Prepare the Salmon
Pat the salmon fillets dry using paper towels. Season both sides with salt, black pepper, and a little garlic powder or paprika for extra flavor. Let the fish rest at room temperature for about 10 minutes before cooking.
Step 2: Heat the Pan
Place a non-stick or cast-iron skillet over medium-high heat. Add olive oil or butter and allow it to heat until shimmering. A hot pan helps create a crispy golden crust on the salmon.
Step 3: Sear the Salmon
Carefully place the salmon fillets skin-side down in the pan. Cook without moving them for about 4–5 minutes. This allows the skin to become crisp and prevents sticking.
Step 4: Flip and Finish Cooking
Gently flip the salmon using a spatula. Cook the other side for 2–4 minutes, depending on thickness. The salmon should look opaque and flaky while remaining juicy inside.
Step 5: Serve and Enjoy
Remove the salmon from the pan and let it rest for 1–2 minutes. Serve with lemon wedges, roasted vegetables, rice, or salad. Garnish with fresh herbs for a restaurant-style presentation.
How Long to Cook Seared Salmon
y=6+2x
As a general guide:
- Thin fillets: 3–4 minutes per side
- Medium fillets: 5–6 minutes skin side, 2–3 minutes after flipping
- Thick fillets: 6–7 minutes skin side, 3–4 minutes after flipping
The salmon should flake easily with a fork while remaining moist in the center.
How to Know When Salmon Is Done
Visual Signs
- Flesh becomes opaque
- Edges appear lightly golden
- Center remains slightly pink
Texture Test
The salmon should separate easily with a fork but still feel tender and juicy.
Common Mistakes to Avoid
Using Cold Salmon
Cold salmon cooks unevenly and may become dry externally before the center cooks.
Overcrowding the Pan
Leave enough space between fillets for proper searing.
Moving the Salmon Too Early
Allow the crust to form naturally before flipping.
Overcooking
Salmon continues cooking slightly after removal from heat. Avoid excessive cooking time.
Delicious Variations of Seared Salmon
Garlic Butter Seared Salmon
Add extra butter and minced garlic for rich flavor.
Honey Glazed Salmon
Brush salmon with honey during the final minute of cooking for sweet caramelization.
Cajun Seared Salmon
Use Cajun seasoning for bold Southern-inspired flavor.
Lemon Herb Salmon
Finish with fresh dill, parsley, and lemon zest.
Best Side Dishes for Seared Salmon
Perfect side dishes include:
- Garlic mashed potatoes
- Roasted asparagus
- Butter rice
- Steamed vegetables
- Caesar salad
- Quinoa
- Roasted sweet potatoes
- Creamy pasta
How to Store Leftover Salmon
Refrigeration
Store leftover salmon in an airtight container for up to 3 days.
Reheating
Reheat gently in a skillet over low heat to preserve moisture.
Avoid microwaving at high temperatures, which may dry out the fish.
Can You Freeze Seared Salmon?
Yes. Allow salmon to cool completely before freezing.
Wrap tightly and freeze for up to 2 months.
Thaw overnight in the refrigerator before reheating.
Health Benefits of Salmon
Excellent Protein Source
Salmon supports muscle growth and recovery with high-quality protein.
Heart-Healthy Omega-3s
Omega-3 fatty acids support cardiovascular health and brain function.
Supports Healthy Skin
Healthy fats and antioxidants contribute to glowing skin and overall wellness.
Tips for Restaurant-Quality Seared Salmon
Use Skin-On Fillets
The skin protects the fish and creates a crispy texture.
Preheat the Pan Thoroughly
High heat creates the signature golden crust.
Use Minimal Movement
Let the salmon naturally release from the skillet.
Finish With Butter
Butter basting creates incredible flavor and shine.
FAQs about Seared Salmon Recipe
1. How long should we sear salmon?
We should sear salmon for about 4–5 minutes on the skin side and 2–3 minutes on the other side, depending on thickness.
2. What is the best pan for seared salmon?
A cast-iron skillet or stainless-steel pan works best because it holds heat well and creates a crispy crust.
3. Should we cook salmon with the skin on?
Yes. Cooking salmon skin-side down first helps protect the fish, keeps it moist, and gives the skin a delicious crispy texture.
4. How do we know when salmon is done?
Salmon is done when it flakes easily with a fork and the center looks slightly opaque. For a juicy result, avoid overcooking it.
5. What can we serve with seared salmon?
We can serve seared salmon with rice, roasted vegetables, mashed potatoes, salad, lemon butter sauce, or garlic asparagus.
Final Thoughts
A perfectly executed seared salmon recipe combines crispy texture, rich buttery flavor, and tender flaky fish in every bite. With the right ingredients, proper heat control, and simple cooking techniques, we can consistently create restaurant-quality salmon at home in minutes.
Whether served with vegetables, rice, pasta, or fresh salad, pan-seared salmon remains one of the most versatile and impressive seafood dishes available. Once mastered, it quickly becomes a reliable favorite for elegant dinners, healthy meals, and unforgettable flavor.


