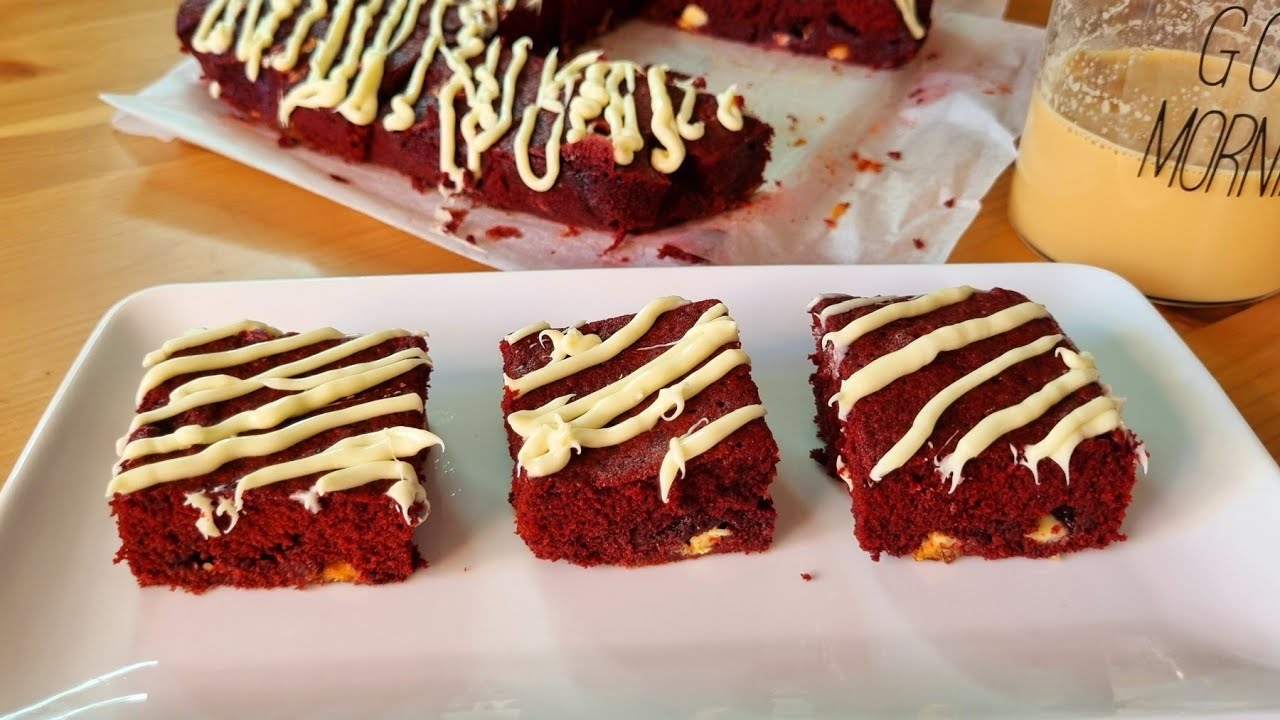
Red Velvet Brownies Recipe: Few desserts capture attention quite like rich, fudgy, and decadent red velvet brownies. Combining the iconic flavor of classic red velvet cake with the chewy texture of brownies creates a dessert that feels luxurious, indulgent, and unforgettable. These brownies are soft in the center, slightly crisp around the edges, and finished with a creamy topping that melts perfectly into every bite.
Whether we are preparing dessert for holidays, birthdays, family gatherings, or simply satisfying a chocolate craving, this recipe delivers bakery-quality results at home. The deep red color, subtle cocoa flavor, and velvety texture make these brownies stand out from ordinary chocolate desserts.
Why We Love Red Velvet Brownies
Red velvet brownies combine the best qualities of two beloved desserts. They are:
- Rich and fudgy
- Soft and chewy
- Beautifully vibrant
- Easy to prepare
- Perfect for celebrations
- Loaded with chocolate flavor
- Excellent for gifting and parties
Unlike traditional brownies, red velvet brownies have a smoother texture and a slightly tangy flavor that pairs perfectly with cream cheese frosting.
Ingredients You’ll Need
Before we begin baking, let’s gather all the ingredients needed for these irresistible brownies.
For the Red Velvet Brownies
- 1 cup unsalted butter
- 2 cups granulated sugar
- 4 large eggs
- 1 tablespoon vanilla extract
- 2 tablespoons red food coloring
- 1 tablespoon white vinegar
- 1/4 cup unsweetened cocoa powder
- 2 cups all-purpose flour
- 1/2 teaspoon salt
- 1 cup semi-sweet chocolate chips
For the Cream Cheese Frosting
- 8 oz cream cheese, softened
- 1/4 cup unsalted butter, softened
- 2 cups powdered sugar
- 1 teaspoon vanilla extract
Essential Kitchen Tools
To achieve the perfect texture and consistency, we recommend using:
- Mixing bowls
- Hand mixer or stand mixer
- Whisk
- Rubber spatula
- 9×13-inch baking pan
- Parchment paper
- Cooling rack
Step-by-Step Guide to Making Red Velvet Brownies
Step 1 – Prepare the Baking Pan
Preheat the oven to 350°F (175°C).
Line a 9×13-inch baking pan with parchment paper. Lightly grease the paper to prevent sticking and ensure easy removal after baking.
Proper preparation helps the brownies bake evenly and keeps the edges from becoming too dry.
Step 2 – Melt the Butter
In a medium saucepan over low heat, melt the butter completely.
Once melted, remove it from heat and allow it to cool slightly for a few minutes. Warm butter blends more smoothly with sugar and creates the perfect fudgy consistency.
Step 3 – Mix Sugar and Butter
Transfer the melted butter into a large mixing bowl.
Add the granulated sugar and whisk thoroughly until the mixture becomes glossy and smooth.
This process helps create the shiny brownie top everyone loves.
Step 4 – Add Eggs and Vanilla
Crack in the eggs one at a time, mixing thoroughly after each addition.
Add vanilla extract and continue whisking until the batter becomes creamy and well combined.
The eggs provide richness and structure while keeping the brownies soft and moist.
Step 5 – Create the Signature Red Velvet Flavor
Add the red food coloring, vinegar, and cocoa powder.
Mix carefully until the batter turns a deep, vibrant red color with no streaks remaining.
The cocoa powder gives the brownies their mild chocolate flavor while vinegar enhances the classic red velvet taste and texture.
Step 6 – Add Dry Ingredients
Sift together the flour and salt.
Gradually fold the dry ingredients into the wet mixture using a spatula. Stir gently until just combined.
Avoid overmixing the batter, as this can make the brownies dense and cakey instead of soft and fudgy.
Step 7 – Fold in Chocolate Chips
Add the semi-sweet chocolate chips and gently fold them throughout the batter.
The chocolate chips create gooey melted pockets of chocolate in every bite.
Step 8 – Spread Batter into Pan
Pour the batter into the prepared baking pan.
Use a spatula to spread it evenly into all corners of the pan.
Smooth the top for even baking and a professional-looking finish.
Step 9 – Bake the Brownies
Place the pan in the preheated oven and bake for 28 to 35 minutes.
To check doneness:
- Insert a toothpick into the center
- A few moist crumbs should remain
- Avoid overbaking
The brownies will continue to set as they cool.
Step 10 – Cool Completely
Remove the brownies from the oven and allow them to cool in the pan for at least 45 minutes.
Cooling is essential because warm brownies are fragile and can break apart easily.
How to Make Cream Cheese Frosting
No red velvet dessert feels complete without rich cream cheese frosting.
Step 1 – Beat Cream Cheese and Butter
In a large bowl, beat the softened cream cheese and butter together until smooth and fluffy.
Step 2 – Add Powdered Sugar
Gradually add powdered sugar while mixing continuously.
Beat until the frosting becomes creamy and thick.
Step 3 – Add Vanilla
Mix in the vanilla extract until fully incorporated.
The frosting should be smooth, spreadable, and silky.
Frosting the Brownies
Once the brownies are fully cooled:
- Spread the cream cheese frosting evenly across the top
- Use an offset spatula for smooth finishing
- Chill for 15 minutes before slicing for cleaner cuts
The creamy frosting balances the rich chocolate flavor perfectly.
Tips for Perfect Red Velvet Brownies
Use High-Quality Cocoa Powder
Good cocoa powder creates a deeper chocolate flavor and richer color.
Do Not Overmix
Overmixing develops excess gluten, which can make brownies tough instead of soft.
Use Room Temperature Ingredients
Room temperature eggs, butter, and cream cheese blend more smoothly and create better texture.
Avoid Overbaking
The secret to fudgy brownies is slightly underbaking them.
The center should still look soft when removed from the oven.
Chill Before Slicing
Refrigerating the brownies briefly helps create sharp, clean slices.
Creative Variations
Red Velvet Cheesecake Brownies
Swirl cheesecake batter into the brownie batter before baking for a stunning marbled effect.
White Chocolate Red Velvet Brownies
Replace semi-sweet chocolate chips with white chocolate chips for extra sweetness.
Nutty Red Velvet Brownies
Add chopped pecans or walnuts for crunch and texture.
Holiday Red Velvet Brownies
Decorate with festive sprinkles for Valentine’s Day, Christmas, or birthdays.
How to Store Red Velvet Brownies
At Room Temperature
Store unfrosted brownies in an airtight container for up to 3 days.
In the Refrigerator
Frosted brownies should be refrigerated and can stay fresh for up to 1 week.
Freezing Instructions
Wrap individual brownie slices tightly in plastic wrap and freeze for up to 3 months.
Thaw overnight in the refrigerator before serving.
Best Occasions for Red Velvet Brownies
These brownies are ideal for:
- Birthday parties
- Valentine’s Day
- Christmas dessert trays
- Bake sales
- Wedding dessert tables
- Family gatherings
- School events
- Weekend treats
Their vibrant appearance instantly makes dessert tables look elegant and festive.
What Makes Red Velvet Brownies Different?
Traditional brownies focus heavily on deep chocolate flavor, while red velvet brownies balance:
- Mild cocoa
- Vanilla richness
- Slight tanginess
- Velvety texture
- Cream cheese pairing
The result is a sophisticated dessert with both beauty and flavor.
Serving Suggestions
For an unforgettable dessert experience, serve red velvet brownies with:
- Vanilla ice cream
- Hot chocolate
- Fresh strawberries
- Whipped cream
- Chocolate drizzle
- Espresso coffee
These combinations elevate the flavor even further.
FAQs about Red Velvet Brownies Recipe
1. What makes red velvet brownies different from regular brownies?
Red velvet brownies have a mild cocoa flavor, a soft fudgy texture, and a beautiful red color. They are usually less chocolate-heavy than classic brownies and often pair well with cream cheese frosting.
2. Can we make red velvet brownies without food coloring?
Yes. We can skip the red food coloring, but the brownies will look more like cocoa brownies. The taste will still be delicious.
3. Why are my red velvet brownies dry?
They may be overbaked or made with too much flour. For fudgy brownies, we should bake just until the center is set and a toothpick comes out with moist crumbs.
4. Can we add cream cheese to red velvet brownies?
Yes. Cream cheese can be swirled into the batter or spread on top as frosting. It gives the brownies a richer, tangy flavor.
5. How should we store red velvet brownies?
We can store them in an airtight container at room temperature for 2 days or refrigerate them for up to 5 days. For longer storage, freeze them for up to 2 months.
Final Thoughts
Red velvet brownies deliver the perfect combination of rich chocolate flavor, soft fudgy texture, and creamy frosting. Their striking appearance and indulgent taste make them one of the most irresistible desserts we can prepare at home.
Whether served warm with ice cream or chilled for a dense bakery-style texture, these brownies always impress. With simple ingredients and easy preparation, this recipe guarantees delicious results every single time.


