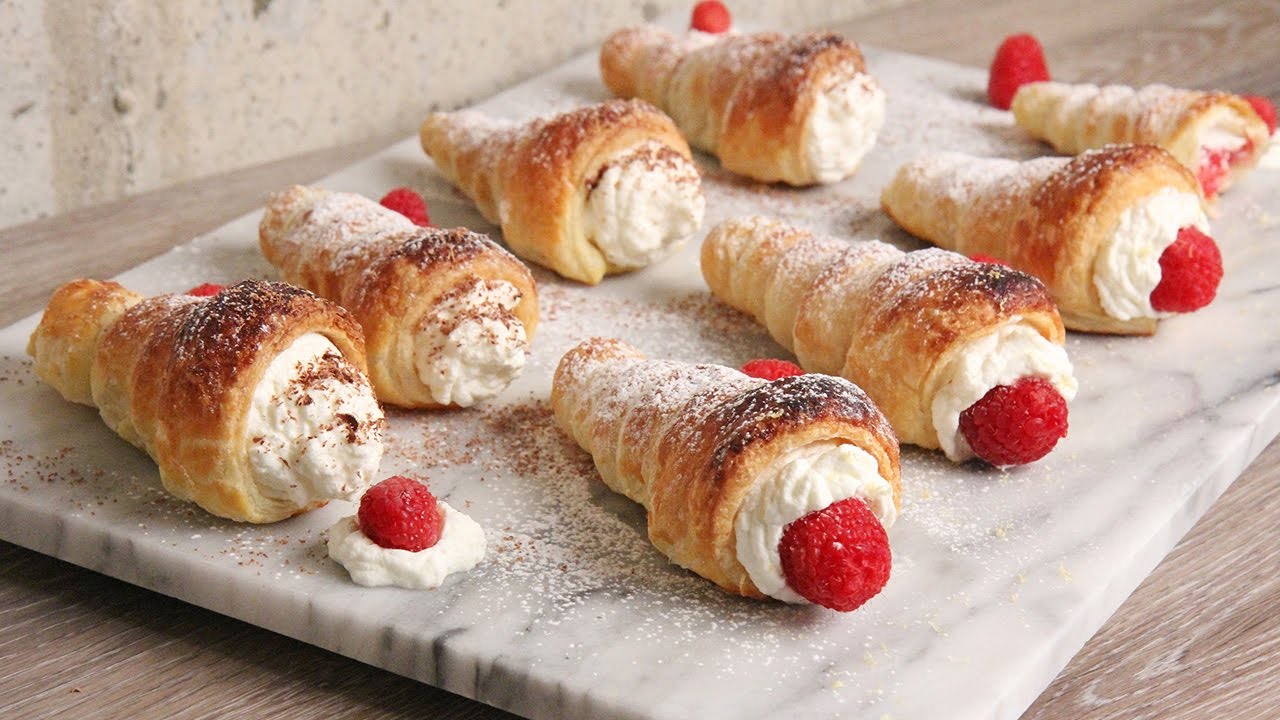
Cream Horns Recipe: Cream horns are one of the most elegant pastries we can make at home with surprisingly simple ingredients and a clear method. With their golden, flaky shell and light, creamy filling, they deliver the perfect contrast of texture and flavor. Whether we are preparing them for a dessert table, tea-time treat, holiday platter, or bakery-style weekend bake, this recipe creates cream horns that look refined and taste rich, crisp, and satisfying.
The beauty of this pastry lies in its balance. The outer shell should be buttery, crisp, and deeply golden, while the filling should be smooth, airy, and just sweet enough to complement the pastry without overwhelming it. When made correctly, every bite offers delicate crunch followed by a creamy finish. This guide covers everything needed to produce bakery-quality cream horns from scratch using a practical step-by-step method that works well in a home kitchen.
What Are Cream Horns?
Cream horns are pastries made by wrapping strips of dough around cone-shaped molds, baking them until puffed and golden, and filling the cooled shells with a sweet cream filling. They are often made with puff pastry, which gives them their signature flaky layers and delicate texture. The filling can vary, but the most popular options include whipped cream, custard cream, vanilla cream, or buttercream.
What makes cream horns especially appealing is their visual charm. Their shape feels classic and sophisticated, yet the recipe is accessible enough for home bakers. Once the shells are baked, they can be filled just before serving for the freshest result. This makes them ideal for entertaining, gifting, or preparing in stages.
Why This Cream Horns Recipe Works
This recipe works because it focuses on the essentials: cold pastry, proper wrapping technique, even baking, and a stable, fluffy filling. Using ready-made puff pastry saves time while still producing a beautifully layered result. The shells bake crisp and light, and the filling is smooth enough to pipe neatly while holding its shape inside the pastry.
Another advantage is flexibility. We can keep the flavors classic with vanilla cream, or elevate the pastry with chocolate, citrus zest, or a dusting of powdered sugar. The method remains reliable and repeatable, making it useful for both beginners and experienced bakers.
Ingredients You’ll Need
For the Pastry Shells
- 1 sheet puff pastry, thawed but still cold
- 1 large egg
- 1 tablespoon water
- 2 tablespoons granulated sugar for sprinkling, optional
For the Cream Filling
- 1 cup heavy whipping cream, very cold
- 4 ounces cream cheese, softened
- 1/3 cup powdered sugar
- 1 teaspoon vanilla extract
Optional Garnishes
- Powdered sugar for dusting
- Melted chocolate for dipping the edges
- Crushed nuts for extra texture
- Fresh berries for serving
Equipment Needed
- Cream horn molds or metal cone molds
- Baking sheet
- Parchment paper
- Rolling pin
- Sharp knife or pizza cutter
- Mixing bowls
- Electric mixer
- Piping bag or zip-top bag
How to Prepare the Puff Pastry Properly
The first rule for successful cream horns is keeping the puff pastry cold but pliable. Warm pastry becomes sticky and difficult to handle, while overly frozen pastry can crack. We want the dough cool enough to maintain its layers but soft enough to cut and wrap smoothly.
Lightly flour the work surface and unfold the pastry sheet. Roll it gently just enough to smooth the seams and create an even thickness. Avoid pressing too hard, because that can compress the layers and reduce the rise in the oven. Once flattened slightly, cut the pastry into long strips about 1 inch wide. Uniform strips help the cream horns bake evenly and create a tidy, professional look.
How to Shape Cream Horns
Lightly grease the cream horn molds to prevent sticking. Starting at the pointed end of the mold, wrap one strip of pastry around the cone in a spiral motion. Each new turn should slightly overlap the previous one so there are no gaps. This overlap is important because it helps the pastry hold its shape after baking.
Continue wrapping until the mold is nearly covered, leaving a small margin near the open end if necessary. Press the final edge gently to secure it. Place the wrapped molds seam-side down on the prepared baking sheet. Repeat with the remaining strips.
This shaping method creates the classic horn structure and ensures the shell stays intact when removed from the mold and filled later.
How to Egg Wash for a Golden Finish
In a small bowl, whisk together the egg and water to make an egg wash. Brush the pastry lightly and evenly. This step gives the shells their shiny golden color and improves the final presentation. For extra sweetness and a slight crunch, sprinkle a little granulated sugar over the top before baking.
The egg wash should be light, not heavy. Too much liquid can drip and interfere with the pastry layers. A thin coating is enough to create a glossy, rich finish.
Step-by-Step Guide for Cream Horns
Step 1: Preheat the Oven
Preheat the oven to 400°F (200°C). Line a baking sheet with parchment paper. A fully heated oven is essential for puff pastry because the heat activates the layers quickly and creates the rise that gives cream horns their delicate flakiness.
Step 2: Roll and Cut the Pastry
Place the thawed puff pastry on a lightly floured surface. Roll it gently to smooth it out, then cut it into even strips about 1 inch wide. Straight, even strips make the wrapping process cleaner and produce more consistent pastries.
Step 3: Wrap the Molds
Grease the cream horn molds lightly. Starting from the pointed end, wrap each pastry strip around the mold, overlapping slightly as you go. Secure the end gently and place each wrapped mold on the baking sheet.
Step 4: Brush with Egg Wash
Whisk the egg and water together, then brush the pastry shells lightly. Sprinkle with sugar if desired. This step helps develop a beautiful golden crust and adds a subtle sweetness.
Step 5: Bake Until Crisp and Golden
Bake for 15 to 20 minutes, or until the pastry is deep golden brown, puffed, and crisp. The exact time may vary depending on the oven and the size of the molds. Rotate the tray once if needed for even browning.
Step 6: Cool Before Removing
Let the baked pastry cool for several minutes on the tray. Then gently twist and slide each shell off the mold. If removed too early, the shell may tear or collapse. Cooling slightly helps the structure firm up.
Step 7: Prepare the Filling
In a mixing bowl, beat the softened cream cheese until smooth. Add the powdered sugar and vanilla extract, and mix until creamy. In a separate bowl, whip the cold heavy cream until stiff peaks form. Fold the whipped cream into the cream cheese mixture gently until the filling is light, smooth, and fully combined.
This filling is rich enough to hold its shape yet light enough to keep the pastry from feeling heavy. It pipes easily and offers a balanced sweetness that works perfectly with the flaky shell.
Step 8: Fill the Cream Horns
Transfer the filling to a piping bag fitted with a star tip or round tip. Pipe the cream into both ends of each shell, filling the center generously. Filling from both sides helps ensure the entire pastry is evenly filled.
Step 9: Finish and Serve
Dust the finished cream horns with powdered sugar just before serving. For extra decoration, dip the open edges in melted chocolate or garnish with crushed nuts. Serve fresh for the best texture and flavor.
Best Filling Tips for Cream Horns
A successful filling should be thick, smooth, and pipeable. If the filling is too loose, it may run out of the shells. If it is too stiff, it can feel dense and heavy. Using cold heavy cream and whipping it properly helps create the ideal airy texture.
The cream cheese in this filling improves stability and adds a subtle richness. It also helps the filling stay fresh and structured for longer, especially if the cream horns are being prepared for guests or an event.
How to Keep Cream Horns Crisp
The crisp texture of cream horns is one of their most important features. To preserve that texture, the shells should be cooled completely before filling. Moisture from warm pastry can soften the cream and make the shells lose their crispness faster.
For best results, store the baked shells and filling separately, then assemble shortly before serving. If already filled, they are best enjoyed the same day. This keeps the pastry flaky and the cream fresh.
Easy Flavor Variations
Cream horns can be adapted in many ways while keeping the same basic method.
Chocolate Cream Horns
Add 1 to 2 tablespoons cocoa powder to the filling or drizzle melted chocolate over the finished pastries.
Lemon Cream Horns
Add lemon zest and a small amount of lemon juice to the filling for a bright citrus flavor.
Vanilla Bean Cream Horns
Use vanilla bean paste instead of extract for a deeper, more luxurious vanilla taste.
Nutty Cream Horns
Dip the ends in melted chocolate and then into finely chopped pistachios, almonds, or hazelnuts.
Common Mistakes to Avoid
One of the most common mistakes is using pastry that is too warm. Warm dough becomes soft and difficult to wrap neatly. Another issue is underbaking. Puff pastry must bake until fully golden to become crisp; pale pastry often turns soft after cooling.
Overfilling can also create mess and reduce the neat appearance of the final dessert. A generous but controlled amount of cream gives the best result. Finally, filling the shells too far in advance can soften them. Fresh assembly always produces the most impressive texture.
Serving Ideas for Cream Horns
Cream horns are versatile enough to suit many occasions. They look beautiful on dessert trays, tea tables, party buffets, and holiday platters. They pair well with coffee, tea, hot chocolate, or chilled dessert drinks. For a plated dessert, they can be served with fresh berries, chocolate sauce, or fruit compote.
They also work well as part of a mixed pastry spread alongside éclairs, mini tarts, or butter cookies. Their shape adds visual interest and makes them stand out instantly.
Storage Tips
Unfilled pastry shells can be stored in an airtight container at room temperature for up to 2 days if the kitchen is cool and dry. The filling should be refrigerated and used within 2 to 3 days. Once filled, cream horns are best served the same day, though they can be refrigerated for several hours if needed.
If making them in advance, the most effective method is to bake the shells first, prepare the filling separately, and assemble just before presentation.
FAQs about Cream Horns Recipe
1. What are cream horns?
Cream horns are pastries made from flaky puff pastry or similar dough wrapped around cone-shaped molds and baked until golden. They are usually filled with sweet whipped cream, custard, or cream filling.
2. Do I need special molds to make cream horns?
Cream horn molds are helpful because they create the classic hollow cone shape. If you do not have them, some people make small foil cones as a substitute.
3. What kind of dough is best for cream horns?
Puff pastry is the most common choice because it bakes into light, crisp, flaky layers. It gives cream horns their classic texture.
4. What filling goes inside cream horns?
Popular fillings include whipped cream, pastry cream, buttercream, cream cheese filling, or custard. The filling can be simple or rich depending on your preference.
5. Can I fill them ahead of time?
You can, but they are usually best filled close to serving time. Filling them too early can make the pastry soften.
6. How do I keep cream horns crispy?
Bake them until fully golden and let them cool completely before filling. Storing the shells and filling separately also helps keep them crisp longer.
7. Can I dust them with sugar?
Yes. Many people finish cream horns with powdered sugar for a classic bakery-style look. Some also dip the ends in chocolate.
8. How should I store leftovers?
Store filled cream horns in the refrigerator because of the cream filling, and eat them within 1 to 2 days for the best texture. Unfilled shells can be kept in an airtight container at room temperature.
Final Thoughts
Cream horns combine classic pastry texture, light cream filling, and an elegant appearance in a dessert that feels far more complicated than it is. With cold puff pastry, careful wrapping, proper baking, and a smooth stable filling, we can create a dessert that looks bakery-made and tastes refined from the first bite to the last.
This cream horns recipe delivers exactly what we want: crisp golden layers, rich vanilla cream, and a polished finish suitable for everyday baking or special occasions. When made with attention to detail, cream horns become one of the most rewarding pastries to serve, share, and enjoy.