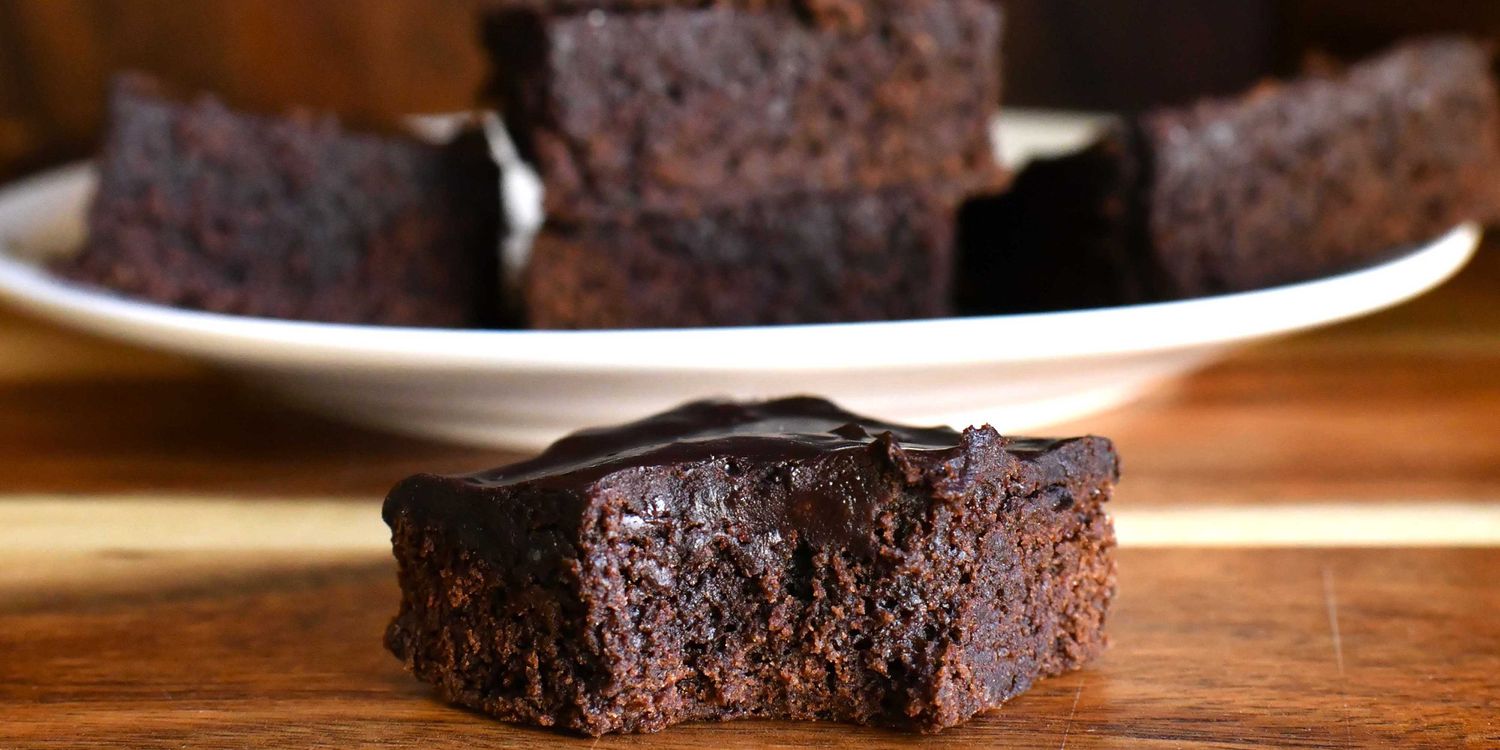
Cocoa Brownies Recipe: A great cocoa brownies recipe delivers everything a proper brownie should have: a deep chocolate flavor, a soft and fudgy center, a delicate crackly top, and rich, dense bites that feel indulgent from the first slice to the last. Cocoa brownies are especially loved because they rely on unsweetened cocoa powder instead of melted chocolate, which makes them simpler, faster, and more pantry-friendly without sacrificing flavor.
This recipe is designed for consistent results. We use the right balance of butter, sugar, eggs, flour, and cocoa powder to create brownies that are moist, glossy, and packed with chocolate intensity. The method is also straightforward, making it perfect for home bakers who want reliable results without unnecessary complications.
Whether these brownies are being made for a family dessert, a weekend treat, a party tray, or a quick chocolate craving, this method produces a batch that tastes classic, rich, and satisfying every single time.
Ingredients You’ll Need
To make a full tray of rich and delicious cocoa brownies, gather the following ingredients:
- 1 cup unsalted butter, melted
- 1 1/4 cups unsweetened cocoa powder
- 2 cups granulated sugar
- 1/2 cup brown sugar
- 4 large eggs
- 1 tablespoon vanilla extract
- 1 cup all-purpose flour
- 1/2 teaspoon salt
- 1 teaspoon espresso powder (optional, but excellent for deepening chocolate flavor)
- 1 cup chocolate chips or chocolate chunks (optional)
- 1/2 cup chopped walnuts or pecans (optional)
These ingredients work together to build the texture and flavor that define an excellent brownie. The butter adds richness, the cocoa powder provides the main chocolate base, and the mix of granulated sugar and brown sugar helps create both sweetness and moisture. Eggs hold everything together while also contributing to the glossy top.
Best Ingredient Tips for Rich Cocoa Brownies
Using quality ingredients makes a visible difference in the final result.
Choose a Good Cocoa Powder
The star of this recipe is the cocoa powder, so it should be fresh and flavorful. A high-quality unsweetened cocoa gives the brownies a bold chocolate taste and darker appearance. Natural cocoa works very well, though Dutch-process cocoa can also be used for a smoother, slightly milder finish.
Use Real Butter
Butter gives brownies a fuller flavor than oil alone. Melted butter also blends beautifully with cocoa powder, creating a rich base that helps the brownies stay soft and dense.
Do Not Skip the Vanilla
Even though brownies are all about chocolate, vanilla extract rounds out the flavor and makes the chocolate notes taste more complete.
Measure Flour Carefully
Too much flour can make brownies cakey and dry. For the best texture, spoon the flour into the measuring cup and level it off rather than scooping directly from the bag.
Kitchen Tools Needed
Before starting, prepare these basic tools:
- 8×8-inch or 9×9-inch baking pan
- Mixing bowls
- Whisk
- Rubber spatula
- Measuring cups and spoons
- Parchment paper
- Cooling rack
Lining the pan with parchment paper makes it easy to lift the brownies out cleanly and slice them neatly after cooling.
Step-by-Step Guide for Cocoa Brownies
Step 1: Prepare the Baking Pan and Oven
Preheat the oven to 350°F (175°C). Line your baking pan with parchment paper, leaving some overhang on the sides. Lightly grease the paper or spray it with nonstick cooking spray.
This step ensures the brownies release easily after baking and helps prevent sticking around the corners and edges. Preparing the pan first also allows the batter to go into the oven immediately once mixed, which supports even baking.
Step 2: Melt the Butter and Mix with Cocoa Powder
In a medium bowl, pour the melted butter over the cocoa powder. Whisk until the mixture becomes smooth, glossy, and lump-free. This stage creates a thick chocolate base that will carry the flavor throughout the brownies.
Mixing cocoa directly with warm butter helps bloom the cocoa, which strengthens the chocolate taste and gives the brownies a richer finish. If using espresso powder, stir it in here so it dissolves fully.
Step 3: Add the Sugars
Add the granulated sugar and brown sugar to the cocoa-butter mixture. Whisk thoroughly until well combined. The mixture may look thick and grainy at this stage, which is completely normal.
This part is important because sugar does more than sweeten. It also contributes to the shiny top and chewy texture. Taking the time to combine the sugars properly helps create a better structure in the finished brownies.
Step 4: Whisk in the Eggs and Vanilla
Add the eggs one at a time, whisking well after each addition. Then stir in the vanilla extract.
As the eggs are added, the batter will become smoother and glossier. This is a key sign that the brownie batter is developing properly. Whisking well at this stage helps incorporate air just enough to support structure while still preserving the dense texture brownies are known for.
The batter should now appear rich, thick, and silky.
Step 5: Fold in the Dry Ingredients
Add the all-purpose flour and salt to the bowl. Using a spatula, fold gently until the flour disappears. Do not overmix.
If using chocolate chips, chocolate chunks, or nuts, fold them in at the end. Overmixing once the flour is added can make the brownies firmer and tougher than desired. The batter should remain thick and luxurious.
This step is where brownie texture is protected. A light hand gives the best result.
Step 6: Spread the Batter into the Pan
Transfer the batter into the prepared pan and spread it evenly with a spatula. Smooth the surface gently so the brownies bake uniformly.
If desired, scatter a few extra chocolate chunks on top for a bakery-style finish. This not only improves the appearance but also adds pockets of melted chocolate across the surface.
Step 7: Bake Until Just Set
Place the pan in the preheated oven and bake for 28 to 35 minutes, depending on your oven and pan size.
The brownies are ready when:
- the top looks set
- the edges are slightly firm
- a toothpick inserted near the center comes out with moist crumbs, not wet batter
This is the most important baking rule for brownies: do not overbake. A little underdone is far better than overdone if a fudgy texture is the goal. Brownies continue to set as they cool, so pulling them out at the right time keeps them soft and rich.
Step 8: Cool Completely Before Slicing
Allow the brownies to cool fully in the pan. Then use the parchment overhang to lift them out and place them on a cutting board. Slice with a sharp knife.
Cooling matters because brownies firm up as they rest. Cutting them too early can cause them to fall apart or appear undercooked. For especially clean slices, chill them briefly before cutting and wipe the knife between each cut.
How to Get a Crackly Top on Cocoa Brownies
That signature shiny, crinkled top is one of the most desirable brownie features. To encourage it:
- whisk the eggs and sugar thoroughly
- use enough sugar
- mix the batter until glossy before adding flour
- bake in a properly preheated oven
The glossy surface forms when the sugar dissolves and rises during baking, creating a thin meringue-like layer. This detail gives homemade brownies a polished, professional appearance.
How to Make Brownies More Fudgy
For a deeply fudgy cocoa brownies recipe, focus on these points:
- use enough butter
- avoid too much flour
- do not overbake
- include chocolate chips for extra richness
- let the brownies cool fully for the final texture to settle
Fudgy brownies are dense, moist, and intensely chocolatey. This recipe is built around that style, making it especially appealing to anyone who prefers rich dessert bars over cake-like brownies.
Optional Add-Ins for Flavor Variation
A classic cocoa brownie is excellent on its own, but a few additions can create new flavor layers.
Chocolate Chips
Extra chocolate chips increase richness and create melted pockets throughout the brownies.
Walnuts or Pecans
Nuts add contrast, crunch, and a slightly roasted flavor that complements deep cocoa beautifully.
Sea Salt
A light sprinkle of flaky sea salt on top after baking sharpens the chocolate flavor and adds a refined finish.
Coffee Notes
A small amount of espresso powder does not make the brownies taste like coffee. It simply amplifies the chocolate.
Swirls
A swirl of peanut butter, cream cheese, or caramel can make the brownies feel more decadent and visually attractive.
Serving Ideas for Cocoa Brownies
These brownies can be served in many ways, depending on the occasion.
- Serve warm with vanilla ice cream
- Dust lightly with powdered sugar
- Drizzle with chocolate sauce
- Pair with coffee or milk
- Cut into bite-sized squares for dessert trays
- Top with whipped cream and berries for a plated dessert
Because brownies are rich and versatile, they work equally well as an everyday snack or a more elegant dessert presentation.
How to Store Brownies Properly
To keep brownies fresh and delicious:
- Store them in an airtight container at room temperature for up to 4 days
- Refrigerate for up to 1 week
- Freeze tightly wrapped brownies for up to 3 months
If freezing, slice them first so individual portions can be removed easily. Allow frozen brownies to thaw at room temperature or warm them slightly for a just-baked feel.
Common Mistakes to Avoid
Even a simple brownie recipe can go wrong if key details are overlooked.
Using Too Much Flour
This makes brownies dry and cakey instead of rich and dense.
Overbaking
The fastest way to ruin brownies is leaving them in the oven too long.
Skipping the Cooling Time
Warm brownies are tempting, but cooling gives them their final structure and best slicing texture.
Poor Cocoa Quality
Flat or stale cocoa powder produces brownies with weak flavor.
Overmixing the Batter
Too much mixing after adding flour can change the final texture and make the brownies less tender.
Why This Recipe Belongs in Every Baker’s Collection
A dependable cocoa brownies recipe is one of the most useful dessert recipes to keep on hand. It uses basic pantry ingredients, comes together quickly, and delivers dependable results with minimal effort. More importantly, it offers the kind of deep chocolate satisfaction people expect from a classic homemade brownie.
These brownies are rich without being complicated, elegant without being difficult, and flexible enough to suit both simple cravings and special moments. From the glossy top to the fudgy center, every part of the recipe is designed to produce flavor and texture that feel complete and memorable.
FAQs about Cocoa Brownies Recipe
1. What are cocoa brownies?
Cocoa brownies are brownies made with cocoa powder instead of melted baking chocolate. They are rich, chocolatey, and often easier to make with pantry ingredients.
2. Can I use natural or Dutch-process cocoa powder?
Yes, but the flavor may differ slightly. Natural cocoa powder has a sharper chocolate taste, while Dutch-process cocoa gives a smoother, darker flavor.
3. Why are my cocoa brownies dry?
Dry brownies usually happen from overbaking or adding too much flour. Measure carefully and remove them from the oven as soon as the center is just set.
4. How do I make cocoa brownies fudgy instead of cakey?
Use a bit more fat and less flour, and avoid overmixing the batter. Slightly underbaking them also helps create a fudgier texture.
5. Can I add chocolate chips or nuts?
Yes. Chocolate chips, walnuts, pecans, or even caramel bits can add extra flavor and texture to cocoa brownies.
6. How do I know when brownies are done?
Insert a toothpick near the center. A few moist crumbs are fine, but it should not come out with wet batter.
7. Can I make cocoa brownies ahead of time?
Yes. Brownies store well and often taste even better the next day after the flavors settle.
8. How should I store cocoa brownies?
Store them in an airtight container at room temperature for up to 3 days or in the refrigerator for up to a week. They can also be frozen for longer storage.
Conclusion
This cocoa brownies recipe proves that an outstanding brownie does not require complicated ingredients or advanced baking methods. With the right cocoa powder, a balanced mix of butter and sugar, and careful baking, it is possible to create brownies that are beautifully rich, soft in the center, and deeply chocolatey in every bite.
By following this step-by-step guide, we create brownies with a classic crackly top, a moist and fudgy texture, and a flavor strong enough to satisfy serious chocolate lovers. Whether served plain, dressed up with toppings, or shared at gatherings, these brownies remain a timeless dessert that always delivers.


