Chocolate Cocoa Icing Recipe: There’s something timeless about a rich chocolate cocoa icing recipe. It’s the kind of kitchen classic that never really goes out of style, because it can instantly turn a simple cake, a tray of brownies, or even a batch of plain cupcakes into something that feels special.
You do not need expensive ingredients, complicated techniques, or professional-level experience to make it work. That’s one of the biggest reasons this icing remains a favorite for home bakers.
It is simple enough for beginners, but reliable and delicious enough that experienced bakers keep coming back to it. When you want deep chocolate flavor without melting bars of chocolate or dealing with fussy steps, cocoa icing steps in like a dependable friend.
What Makes Cocoa Icing Different From Chocolate Frosting
At first glance, chocolate cocoa icing and chocolate frosting sound like the same thing. In everyday conversation, most people use the terms interchangeably, and that is completely understandable. Still, there are a few practical differences worth knowing, especially if you want the texture of your dessert to come out exactly right. Cocoa icing is usually made with cocoa powder, butter, powdered sugar, milk, and a flavoring like vanilla. Chocolate frosting can be similar, but it may also include melted chocolate, cream cheese, or heavy cream for a richer, denser finish. That one change can affect the flavor, texture, and even how the topping behaves once it is on the cake.
Cocoa icing often has a lighter, more whipped texture when properly beaten. It spreads easily and can be made in minutes, which makes it ideal for home baking. Chocolate frosting made with melted chocolate tends to feel heavier and more luxurious, almost like the difference between a soft blanket and a weighted one. Both are delicious, but they serve slightly different purposes. If you want something fast, smooth, and deeply chocolatey without extra fuss, icing made from cocoa powder is usually the better fit. It gives you that classic bakery-style topping with less effort and fewer ingredients.
The flavor is different too. Cocoa powder brings a clean, focused chocolate punch. Melted chocolate adds fat and sweetness along with the chocolate taste, which can sometimes mute the sharp richness people love in cocoa-based recipes. That is why many bakers turn to a simple chocolate cocoa icing recipe when they want control and clarity in flavor. It is straightforward, dependable, and easier to tweak. Want it darker? Add more cocoa. Need it softer? Add a splash of milk. Prefer it less sweet? Adjust the sugar carefully. Cocoa icing gives you room to move, and that’s exactly why it deserves a permanent place in your recipe collection.
Ingredients You’ll Need
Before you dive into the method, it helps to have every ingredient ready and measured. That one habit makes baking feel less chaotic and gives much better results. Nothing throws off momentum like realizing halfway through that the butter is still cold or the powdered sugar is clumped in the bag. For a classic chocolate cocoa icing recipe, the ingredients are refreshingly simple, and there is a good chance you already have most of them in your kitchen. Even better, each ingredient has a clear job, so once you understand what each one does, you can tweak the recipe with confidence.
Here is the ingredient list you’ll need for a smooth, rich, and spreadable icing:
- 1/2 cup unsalted butter, softened
- 2/3 cup unsweetened cocoa powder
- 3 cups powdered sugar
- 1/3 cup milk
- 1 teaspoon vanilla extract
- Pinch of salt
This combination creates an icing that lands right in the sweet spot between fluffy and fudgy. The butter brings richness and body. The cocoa powder delivers the chocolate flavor. The powdered sugar sweetens while also helping create structure. The milk loosens the mixture so it becomes spreadable, and the vanilla extract rounds everything out with a warm, bakery-style flavor. The tiny pinch of salt might seem small, but it matters more than people realize. It sharpens the chocolate taste and keeps the sweetness from becoming overwhelming.
The beauty of these ingredients is that they are familiar, budget-friendly, and easy to work with. This isn’t one of those recipes that sends you searching for obscure items or specialty products. It is approachable and forgiving, which makes it perfect whether you are baking for a family gathering, a school celebration, or just because a Tuesday felt like it needed cake. Once these ingredients are lined up on the counter, you are already halfway to a delicious result.
Core Ingredients for the Best Chocolate Cocoa Icing
Every ingredient in this recipe plays a specific role, and understanding that makes a huge difference when you are trying to get the texture just right. Start with softened butter. Not melted, not cold from the fridge, but properly softened. When the butter is at the right temperature, it creams smoothly and helps create that luscious texture people expect from good icing. If the butter is too cold, your icing may look lumpy. If it is melted, the whole mixture can become greasy and loose. Think of softened butter as the foundation of the house. If the foundation is off, everything else becomes harder to fix.
Next comes unsweetened cocoa powder, the ingredient that gives the icing its identity. This is where the bold chocolate flavor comes from, so quality really matters. A better cocoa powder usually means a richer and more satisfying result. Then you have powdered sugar, which sweetens the icing while also helping it hold its structure. Granulated sugar will not give you the same smoothness, so this is one of those moments where the right ingredient really matters. Powdered sugar blends in quickly and helps the icing become soft and spreadable instead of grainy.
The liquid part is usually milk, and this is what helps control texture. Add too little and the icing can feel stiff and difficult to spread. Add too much and you can end up with a thin glaze instead of a proper icing. That is why it is best to add milk gradually. Vanilla extract may sound like a background ingredient, but it gives the chocolate a more rounded, complete flavor. Without it, the icing can taste a bit flat. Finally, a pinch of salt acts like a quiet hero. It does not call attention to itself, but it improves everything around it. Together, these ingredients create a balanced icing that is easy to make, easy to use, and genuinely hard to resist.
Optional Add-Ins to Customize the Flavor
One of the most fun things about a homemade chocolate cocoa icing recipe is how easy it is to customize. Once you have the base recipe down, you can treat it like a blank canvas and add little twists that match the dessert you’re making. A touch of espresso powder, for example, does not make the icing taste like coffee. Instead, it deepens the chocolate flavor and makes it taste richer and more intense. It is a bit like turning up the contrast on a photo. Everything becomes more vivid without changing the whole picture.
You can also add a few drops of peppermint extract if you want a mint-chocolate version for holiday cakes or cupcakes. Just be careful, because peppermint is strong and can quickly take over. A small amount goes a long way. Another easy variation is using heavy cream instead of milk for a slightly richer, silkier icing. Some bakers love adding a spoonful of melted peanut butter or hazelnut spread for extra depth. These ingredients can make the icing feel a little more indulgent and pair beautifully with vanilla or banana cakes.
Even spices can play a role. A pinch of cinnamon adds warmth, while a tiny bit of chili powder can create a subtle, grown-up chocolate kick. You can also brighten the flavor with a little orange zest, which gives chocolate an elegant twist that feels surprisingly fresh. These optional additions are helpful because they let you adapt the icing to different moods and occasions. Some days you want classic and comforting. Other days you want something a little unexpected. That flexibility is part of what makes cocoa icing such a smart recipe to keep around. It is simple at its core, but it never has to be boring.
Tools That Make the Process Easier
You do not need a fancy kitchen setup to make excellent chocolate cocoa icing, but a few basic tools can make the process smoother and more consistent. The first tool worth mentioning is a large mixing bowl. It sounds obvious, but trying to make icing in a bowl that is too small is like trying to fold laundry in a shoebox. Powdered sugar has a way of puffing everywhere, and extra space helps you mix more comfortably. A roomy bowl gives you control and keeps the process less messy.
A hand mixer or stand mixer is especially helpful because it beats air into the icing and gives it that smooth, fluffy texture. You can make it by hand with a whisk or wooden spoon, but it takes more effort and the final texture may not be quite as light. Then there is the often-overlooked hero: a fine-mesh sieve. Sifting cocoa powder and powdered sugar before mixing helps prevent lumps, and that step can be the difference between silky icing and one that feels slightly gritty. It only takes a minute, but it saves frustration later.
You’ll also want measuring cups and spoons, because baking is less forgiving than cooking. Eyeballing ingredients might work for soup, but icing behaves better when you measure properly. A rubber spatula is useful for scraping down the sides of the bowl so everything blends evenly. And if you plan to decorate cupcakes or pipe swirls, keep a piping bag and tip nearby. None of these tools are extravagant, but together they make the recipe feel easy instead of awkward. Good tools do not replace skill, but they definitely remove a lot of small annoyances from the process. That means you get to focus on the part that really matters: making icing that tastes fantastic.
How to Choose the Right Cocoa Powder
Cocoa powder is the backbone of this recipe, so choosing the right one matters more than people sometimes realize. Walk down the baking aisle and you will usually see at least two main types: natural cocoa powder and Dutch-processed cocoa powder. Natural cocoa powder has a brighter, slightly sharper chocolate flavor and tends to be lighter in color. Dutch-processed cocoa powder is treated to reduce acidity, which gives it a darker color and a smoother, more mellow taste. Both can work in icing, but they create slightly different results.
If you want a classic, familiar chocolate flavor that feels nostalgic and balanced, natural cocoa powder is a great choice. If you want a darker, more dramatic icing with a smoother edge, Dutch-processed cocoa is often preferred. It is a bit like choosing between milk paint and velvet curtains. Both are attractive, but they create a different mood. For many people, the best choice simply comes down to taste preference. The nice thing about icing is that it is more forgiving than cakes that rely on chemical reactions, so you have room to experiment.
Quality matters too. Cheap cocoa powder can taste dusty or flat, while a better one offers a richer aroma and deeper flavor. When you open the container, it should smell unmistakably chocolatey. That scent is usually a good clue about what your icing will taste like. You also want to make sure the cocoa is unsweetened, since sweetened cocoa mixes are designed for drinks and will throw off the balance of the recipe. A good cocoa powder turns ordinary icing into something memorable. It is the difference between “that was nice” and “wow, can I have another piece?” When the main flavor of the recipe comes from one ingredient, it deserves a little extra attention.
Step-by-Step Guide for Chocolate Cocoa Icing
Step 1 – Gather and Measure Everything First
Set out all your ingredients before you begin, including butter, cocoa powder, powdered sugar, milk, and vanilla extract. Measuring everything first makes the process easier and helps the icing come together smoothly. It also prevents mistakes while mixing.
Step 2 – Sift the Dry Ingredients
Sift the cocoa powder and powdered sugar into a bowl. This removes lumps and helps create a smoother icing. Well-sifted dry ingredients blend more easily into the butter for a softer final texture.
Step 3 – Cream the Butter Until Smooth
Place softened butter in a mixing bowl and beat it until smooth and creamy. This step creates the rich base of the icing and helps make it light and easy to spread. Scrape down the sides of the bowl if needed.
Step 4 – Add Cocoa and Sugar Gradually
Add the sifted cocoa powder and powdered sugar a little at a time while mixing on low speed. Mixing gradually helps prevent spills and ensures the ingredients combine evenly. Continue until the mixture starts to come together.
Step 5 – Pour in Milk and Vanilla
Add the milk and vanilla extract to the bowl. These ingredients help loosen the icing and improve its flavor. Mix gently at first, then increase the speed once everything is combined.
Step 6 – Beat Until Light, Smooth, and Spreadable
Beat the icing for a few minutes until it becomes smooth, fluffy, and creamy. This step gives the icing a lighter texture and makes it easier to spread over cakes, cupcakes, or brownies.
Step 7 – Adjust the Texture if Needed
If the icing is too thick, add a little more milk, one small spoonful at a time. If it is too thin, add a little more powdered sugar. Once the texture is just right, the chocolate cocoa icing is ready to use.
Common Mistakes to Avoid
Even simple recipes have a few traps, and chocolate cocoa icing is no exception. One of the most common mistakes is using butter that is too cold or too melted. Cold butter makes the icing lumpy, while melted butter can make it greasy and loose. Another frequent issue is skipping the sifting step. It might save a minute, but it can leave you fighting dry clumps of cocoa and sugar long after the mixer is on. Small shortcuts often create bigger problems later.
Adding all the powdered sugar at once is another classic misstep. It makes the mixture harder to control and usually leads to a cloud of sugar floating through the kitchen. Then there is the issue of over-thinning. People sometimes add too much milk too quickly, and suddenly the icing goes from spreadable to runny. That is why slow adjustments matter so much. In icing, a tablespoon can feel like a big leap.
Another mistake is under-mixing or over-mixing. Under-mixed icing may look dull, uneven, or gritty. Over-mixed icing is less common, but it can sometimes become too airy or lose a bit of that rich body. The best approach is to mix until smooth and fluffy, then stop once you’ve reached the right texture. Finally, some bakers forget to taste before using it. That little pause matters. Maybe it needs a pinch more salt, a touch more vanilla, or just a tiny extra splash of milk. A quick taste check helps you catch those final adjustments before the icing hits the cake. Avoiding these common mistakes makes the whole process feel easier, and it increases the chances that your finished dessert looks and tastes exactly the way you hoped.
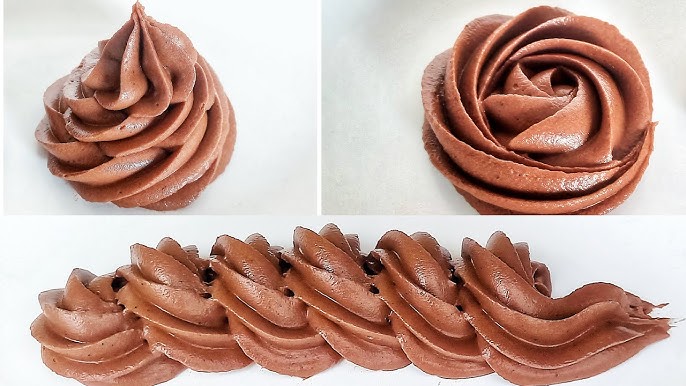
Best Consistency for Cakes, Cupcakes, and Brownies
One of the smartest things you can learn about chocolate cocoa icing is that the “perfect” consistency depends on what you are putting it on. For a layer cake, the icing should be soft and spreadable but still able to hold shape between layers. You want it to glide across the cake without dragging crumbs everywhere. If it is too stiff, spreading becomes a battle. If it is too loose, it can slide around and make the cake unstable.
For cupcakes, especially if you want to pipe decorative swirls, the icing should be thicker. It needs enough structure to hold its shape once it leaves the piping tip. In that case, slightly less milk or a little more powdered sugar usually helps. Brownies are different again. Many people prefer a softer icing for brownies, one that spreads easily over the surface and sets with a smooth finish. That texture feels casual, rich, and just a little indulgent, which suits brownies perfectly.
This is why the adjustment stage matters so much. You are not just making icing in the abstract. You are making icing for a purpose. Picture how you want it to behave. Should it sit in beautiful swirls? Should it spread in thick swoops? Should it settle into a smooth layer? Once you know the answer, you can guide the recipe toward that texture. This makes the recipe far more useful because it becomes adaptable rather than rigid. One bowl of icing can be tuned to suit many desserts, and that kind of flexibility is what makes a recipe worth keeping.
Easy Flavor Variations to Try
Once you know the basic recipe, you can start playing with flavor in ways that keep things interesting without making the process more difficult. A simple way to deepen the chocolate taste is adding 1/2 teaspoon espresso powder. It will not make the icing taste like coffee, but it will give the chocolate a richer edge. For a fresh holiday version, try a few drops of peppermint extract. For something warmer and a little unexpected, a pinch of cinnamon or even a touch of cardamom can make the icing feel cozy and special.
Another fun option is a salted chocolate icing variation. Add a tiny bit more salt, then sprinkle flaky sea salt on top after frosting the dessert. That sweet-salty contrast is hard to resist. You can also add orange zest for a chocolate-orange version that feels elegant without being complicated. If you love nutty desserts, a spoonful of peanut butter or hazelnut spread blended into the icing creates a richer, more layered flavor.
These variations work because the base recipe is sturdy. It is like a plain black jacket that can be styled in different ways depending on the occasion. You do not need to reinvent the whole thing. Just add one thoughtful touch and the icing takes on a new personality. That is part of what makes this recipe so valuable. It can stay classic when you want comfort, or it can bend toward something more playful when the dessert calls for it. A good recipe gives you reliability. A great recipe gives you room to experiment.
How to Store Chocolate Cocoa Icing Properly
If you have leftover icing, storing it properly keeps it fresh and easy to use later. Place it in an airtight container and refrigerate it. It will usually keep well for about 3 to 5 days. The butter in the icing will firm up in the fridge, so do not be surprised if it looks too stiff when you first take it out. That is normal. Let it sit at room temperature for a while, then beat it again briefly to restore the texture.
If you need to store it longer, you can freeze it in a well-sealed container for up to 2 months. When ready to use, thaw it in the refrigerator overnight and then let it come closer to room temperature before re-whipping. That freshens the texture and helps bring back the creamy consistency. It is a little like fluffing a pillow after it has been compressed. The structure is still there; it just needs a bit of help returning to form.
One thing to avoid is leaving the icing uncovered, even for a short time. Exposure to air can dry the surface and create a crust that is difficult to mix back in smoothly. If the icing seems slightly dry after storage, a teaspoon of milk and a quick mix usually solves the problem. Proper storage means you can make the icing ahead of time or save leftovers without wasting them. That makes this recipe even more practical, especially during busy baking seasons when every small bit of prep you can do in advance feels like a gift.
Serving Ideas and Best Dessert Pairings
This easy chocolate cocoa icing is incredibly versatile, which is one of the best reasons to keep it in your regular baking rotation. It pairs beautifully with vanilla cake, where the contrast between light cake and rich chocolate topping feels classic and comforting. It is also fantastic on yellow cake, chocolate cupcakes, banana cake, and zucchini cake. That last pairing surprises some people, but the mild sweetness of zucchini cake works wonderfully with chocolate icing. It is one of those combinations that sounds humble but tastes like a secret worth sharing.
Brownies are another obvious and excellent match. Spread a soft layer of cocoa icing over cooled brownies and you instantly get something that feels bakery-worthy. It also works well as a filling between cake layers or sandwiched between cookies. For a less traditional option, try it on graham crackers or spread a little on a homemade muffin when you want to turn an ordinary snack into a dessert. This icing is flexible enough to handle both casual and celebratory moments.
What makes it especially appealing is how it bridges the gap between everyday and special occasion baking. It is simple enough to make on a weeknight, but rich enough to serve at birthdays, family dinners, and holiday gatherings. That range is rare. Some recipes feel too plain for celebrations; others feel too fussy for ordinary days. This one sits comfortably in the middle. It gives desserts a finished, polished feel without demanding a lot from the baker. And really, that is what a great icing should do: make your dessert feel complete.
FAQs about Chocolate Cocoa Icing Recipe
1. What is chocolate cocoa icing?
Chocolate cocoa icing is a sweet, smooth topping made with cocoa powder, butter, powdered sugar, milk, and vanilla. It is commonly used to frost cakes, cupcakes, brownies, and other baked treats.
2. Why should I sift the cocoa powder and powdered sugar?
Sifting helps remove lumps and makes the icing smoother. It also helps the dry ingredients blend more evenly into the butter.
3. Can I use milk instead of cream?
Yes, milk works very well in chocolate cocoa icing. It helps create a smooth and spreadable texture without making the icing too heavy.
4. How do I make the icing thicker?
Add more powdered sugar, a little at a time, until the icing reaches your desired consistency. Chilling it briefly can also help it firm up.
5. How do I make the icing thinner?
Add a small amount of milk, one spoonful at a time, and mix well. This helps loosen the icing without making it too runny.
6. Can I use this icing for piping?
Yes, if the icing is thick enough, it can be used for piping decorations onto cakes or cupcakes. Adjust the texture before using.
7. How do I store chocolate cocoa icing?
Store it in an airtight container in the refrigerator for up to 5 days. Before using, let it come to room temperature and beat it again for the best texture.
8. Can I freeze chocolate cocoa icing?
Yes, it can be frozen in a sealed container for up to 2 months. Thaw it in the refrigerator, then whip it again before use.
9. Why is my icing grainy?
Grainy icing can happen if the powdered sugar or cocoa was not sifted well or not fully mixed. Beating it longer usually helps make it smoother.
Conclusion
This recipe works because it is reliable. It gives you strong chocolate flavor, a smooth texture, and plenty of flexibility depending on whether you are frosting cakes, cupcakes, or brownies. It also leaves room for creativity, from peppermint and espresso to orange zest and sea salt. Once you have made it a couple of times, it stops feeling like just another recipe and starts becoming one of those dependable kitchen habits you can pull out whenever dessert needs a little help.
The best part is that it invites confidence. You do not need advanced baking skills to make it well. You just need the right ingredients, a clear step-by-step method, and a little patience. Whether you are baking for a celebration or simply craving something chocolatey and homemade, this icing delivers exactly what you want: comfort, richness, and that unmistakable sense that dessert is about to be very, very good.


