Chili Cheese Dip Recipe: There are party foods, and then there are the dishes people crowd around before the game even starts. Chili cheese dip belongs in that second category. It is warm, rich, creamy, bold, and just messy enough to feel fun. The magic of this recipe is that it tastes like comfort food turned into a scoopable snack. You get the hearty punch of chili, the smooth pull of melted cheese, and the kind of savory depth that makes people keep going back for “just one more chip.” It is the culinary version of a favorite hoodie—familiar, dependable, and impossible to ignore.
This guide is built to help you make a professional-style chili cheese dip recipe at home without overcomplicating the process. You will find a clear ingredient list, practical tips, and a true step-by-step method that explains not just what to do, but why each step matters. That matters because anyone can dump ingredients in a pan, but a really great dip needs balance. You want it creamy, not greasy. Thick, not stiff. Flavorful, not flat. Once you understand those small details, you can make a dip that tastes like it came from a sports bar kitchen, only fresher and better suited to your taste.
What Makes a Great Chili Cheese Dip
A great chili cheese dip recipe is all about balance. That sounds simple, but this is where many homemade versions go sideways. Some turn out too thick and heavy, almost like a casserole trying to pass as dip. Others become oily and broken, with cheese separating into an unappetizing slick on top. The best version sits right in the middle. It should be thick enough to cling to a chip, but smooth enough to scoop easily. Think of it like a good conversation at a party—rich, lively, and never awkwardly stiff.
Flavor balance matters just as much as texture. A good chili cheese dip needs salt, savory depth, a mild kick of spice, and enough creaminess to keep everything from tasting too aggressive. The chili should not bulldoze the cheese, and the cheese should not smother the chili. When those two parts work together, the result tastes layered rather than one-note. A little garlic powder, onion powder, or diced green chiles can quietly lift the whole dish without making it overly complicated. That is the secret many people miss: small additions often do more than flashy ingredients.
Temperature control also plays a huge role. Cheese is moody. Push it too hard over high heat and it can become grainy or greasy. Warm it gently and it melts into something glossy and inviting. Chili behaves the same way in a different sense. If it is too watery, the dip thins out and loses body. If it is too dense, the whole thing becomes heavy. That is why building the dip step by step matters. You are not just melting ingredients together. You are managing moisture, fat, and flavor so the final bowl feels smooth, warm, and irresistible. Once you understand that, you stop making average dip and start making the kind people ask you to bring again.
Ingredients You’ll Need
Here is the full Ingredients You’ll Need list so you can prepare everything before you start cooking. This version gives you a rich, creamy, scoopable dip with enough flavor to stand out without becoming too spicy for a crowd.
Core Ingredients
For the dip:
- 2 cups shredded cheddar cheese
- 1 cup shredded Monterey Jack cheese
- 1 can chili with beans or no beans (about 15 ounces)
- 4 ounces cream cheese, softened
- 1/2 cup milk
- 1 tablespoon butter
- 1/2 teaspoon garlic powder
- 1/2 teaspoon onion powder
- 1/4 teaspoon smoked paprika
- 1 small jalapeño, finely diced (optional for mild heat)
- Salt, to taste
- Black pepper, to taste
These ingredients build the base of the dip. The cheddar cheese brings sharp, classic flavor. Monterey Jack helps create that stretchy, creamy texture people love. Cream cheese acts like the glue that keeps the dip smooth and luscious. The milk adjusts consistency so the dip stays scoopable rather than stiff. The can of chili gives the dish its hearty body and meaty flavor. Even the seasonings play an important role, because cheese alone can be rich but flat, and the chili may not carry enough complexity by itself.
Optional Add-Ins and Toppings
- Diced green onions
- Extra sliced jalapeños
- Crumbled cooked beef or sausage
- Diced tomatoes
- Chopped cilantro
- Hot sauce
- Sour cream
- Black olives
- Crushed tortilla chips for texture
Optional ingredients are where you get to make the dip your own. Think of the base recipe as a strong canvas. Toppings and mix-ins can shift it in a smoky, spicy, fresh, or extra-meaty direction depending on your crowd. A spoonful of sour cream adds cool contrast. A splash of hot sauce sharpens the flavor quickly. Chopped cilantro or green onion cuts through richness and gives the dip a fresher finish. You do not need everything, but having a few finishing ingredients nearby makes the dip feel more complete and restaurant-worthy.
Kitchen Tools for Easy Prep
One reason this step-by-step chili cheese dip recipe feels approachable is that the equipment list is refreshingly simple. You do not need a stand mixer, a food processor, or any fancy kitchen gadgets that eat up half your counter space. This is a dish built for real kitchens and real schedules. A medium saucepan or skillet, a sturdy spoon or spatula, measuring cups, and a knife for chopping toppings are enough to get the job done. If you have those basics, you are already most of the way there.
That said, the choice of pan can change the cooking experience more than people expect. A heavy-bottomed saucepan or deep skillet is ideal because it distributes heat more evenly. Cheese can be a little dramatic when exposed to direct high heat, and thin pans tend to create hot spots that cause scorching or separation. Using a pan with some weight is like giving your dip a smoother road to travel on. The ingredients melt gradually, combine more evenly, and are easier to control. That leads to a silkier result and fewer last-minute rescues.
A whisk can also help early in the process, especially when combining cream cheese, milk, and butter into a smooth base. After that, a silicone spatula or wooden spoon works well for folding in the shredded cheese and chili without making a mess. If you are serving the dip at a party, a small slow cooker or mini warmer is a smart bonus tool. Chili cheese dip tastes best warm, and keeping it gently heated prevents it from thickening too much over time. That means the first scoop and the last scoop stay equally inviting. It is a small detail, but one that makes homemade dip feel polished and well planned.
How to Choose the Best Cheese
Cheese is the star player here, so picking the right one matters more than almost anything else in the recipe. When people imagine a perfect chili cheese dip, they usually picture a thick, shiny, velvety bowl with a little stretch on the spoon and lots of savory depth. That picture depends heavily on the cheese blend. The wrong cheese can leave the dip grainy, oily, or oddly stiff. The right blend creates a smooth, creamy texture that feels indulgent without becoming heavy. In other words, the cheese does not just add flavor. It controls the entire personality of the dip.
For this recipe, cheddar and Monterey Jack make an excellent team. Cheddar brings the familiar bite people expect from a cheese dip, while Monterey Jack melts more smoothly and softens the sharpness. Cheddar alone can sometimes be a bit stubborn when melted, especially if heated too quickly. Monterey Jack helps relax the mixture and gives it a softer, creamier body. It is like pairing a bold lead singer with a strong backup vocalist. One gives character, the other gives balance, and together they sound better than either one alone.
You can also experiment with small additions if you want to vary the flavor. Pepper Jack introduces more spice. A little smoked gouda adds depth and a subtle campfire note. Processed melting cheeses create an extra-smooth finish, though some people prefer the more natural flavor of a shredded blend with cream cheese. No matter which route you choose, remember this simple rule: the best cheese for dip is not always the strongest-tasting cheese. It is the one that melts cleanly, blends easily, and supports the chili instead of fighting it. That is the difference between a dip that feels professionally made and one that tastes like a rushed afterthought.
Block Cheese vs Pre-Shredded Cheese
This is one of those small kitchen decisions that can quietly affect the final result. Block cheese usually melts better than pre-shredded cheese, and if you want a smoother chili cheese dip, shredding your own cheese is worth the extra minute or two. Pre-shredded cheese often contains anti-caking agents that help the shreds stay separate in the bag. Helpful in packaging, sure. Less helpful in a silky dip. Those extra coatings can interfere with melting and leave the texture slightly grainy or less cohesive.
That does not mean pre-shredded cheese is unusable. It can still work, especially if you are in a hurry and pairing it with cream cheese and milk, which help smooth things out. But if you are aiming for the best possible texture, freshly shredded cheese gives you more control and a cleaner melt. The difference is not always dramatic, but it is noticeable—especially when the dip cools slightly and you want it to remain creamy instead of turning clumpy. Freshly grated cheese behaves more naturally in the pan, which is exactly what you want.
There is also a flavor benefit. Cheese from a block tends to taste fresher and fuller, especially sharper cheddars. Since the ingredient list in this recipe is fairly simple, every ingredient has a louder voice. Better cheese means better overall flavor. So if you have a box grater and a couple of extra minutes, grab the block cheese. It is a small move that makes the finished dip feel smoother, richer, and more deliberate.
Picking the Right Chili
The chili you choose shapes the body, flavor, and texture of the entire dish. That may sound obvious, but it is easy to focus so much on the cheese that the chili becomes an afterthought. In reality, the chili is the backbone of the dip. It brings meatiness, seasoning, and structure. A bland chili will make the whole dish taste flat, no matter how much cheese you add. A watery chili can thin out the dip and make it feel sloppy. A thick, flavorful chili gives the cheese something strong to cling to, creating that perfect hearty scoop.
When choosing chili, think about your audience and the style you want. For a classic crowd-pleaser, a canned beef chili with a mild spice level works well. It is convenient, consistent, and easy to adjust with extra seasonings. If you prefer a more textured dip, chili with beans can add heartiness and make the bowl feel more filling. If you want a smoother, more traditional dip texture, bean-free chili often blends more seamlessly with the cheese. Neither option is wrong. It simply depends on whether you want more body or a silkier finish.
Also pay attention to salt and spice. Some canned chilis are already heavily seasoned, so it is smart to taste before adding much extra salt. Others may need support from garlic powder, onion powder, paprika, or diced jalapeños. This is where the recipe becomes more than a formula. You are tuning the flavor like a musician tuning strings before a performance. A little adjustment can sharpen the whole dish. The goal is not just chili plus cheese. The goal is a dip where each bite feels full, savory, creamy, and alive.
Homemade Chili vs Canned Chili
Choosing between homemade chili and canned chili comes down to time, control, and the kind of flavor you want. Homemade chili gives you total freedom. You control the meat, beans, spice level, thickness, and seasoning. That means you can tailor the dip exactly to your taste. Want it smoky? Add chipotle. Want it rich and beefy? Brown the meat deeply and simmer longer. Homemade chili can make the dip feel especially special, particularly if you already have leftovers in the fridge.
Canned chili, though, is the weeknight hero. It is fast, convenient, and surprisingly effective in a dip because it is already cooked down and compact in flavor. Since the cheese, cream cheese, and seasonings add extra richness anyway, canned chili often performs better in this setting than people expect. It is also practical for parties, where speed and reliability matter. Open, heat, mix, and you are nearly there. That kind of efficiency is hard to beat when you are juggling other dishes.
The best choice depends on the situation, not some strict kitchen rule. Homemade chili gives a more custom result, while canned chili offers speed and consistency. Both can produce an excellent dip if the texture is right and the flavor is balanced. This recipe is designed to work with either, so you are not boxed into one approach. That flexibility is part of what makes this dish so useful. It can be a quick last-minute snack or a more thoughtful from-scratch appetizer, and both paths can lead to a seriously satisfying bowl.
Step-by-Step Guide for Chili Cheese Dip
Step 1: Prep Your Ingredients
Gather all your ingredients before you start. Measure the cheese, chili, milk or cream, and any seasonings you plan to use. If needed, shred the cheese for smoother melting and chop any garnish such as green onions, jalapeños, or parsley.
Step 2: Build the Cheese Base
Place a saucepan or skillet over low to medium heat and add the cheese with a splash of milk or cream. Stir gently as it begins to melt. If using cream cheese or a cheese sauce base, add it first so it softens properly and creates a smooth foundation.
Step 3: Add the Chili and Seasonings
Once the cheese base is smooth, stir in the prepared chili. Add seasonings such as garlic powder, onion powder, black pepper, or a little paprika if desired. Mix well so the chili is evenly combined with the melted cheese.
Step 4: Melt, Stir, and Balance the Texture
Continue cooking over low heat, stirring often to prevent sticking or burning. If the dip becomes too thick, add a little more milk or cream until it reaches your preferred consistency. Let everything heat through until the dip is rich, creamy, and fully blended.
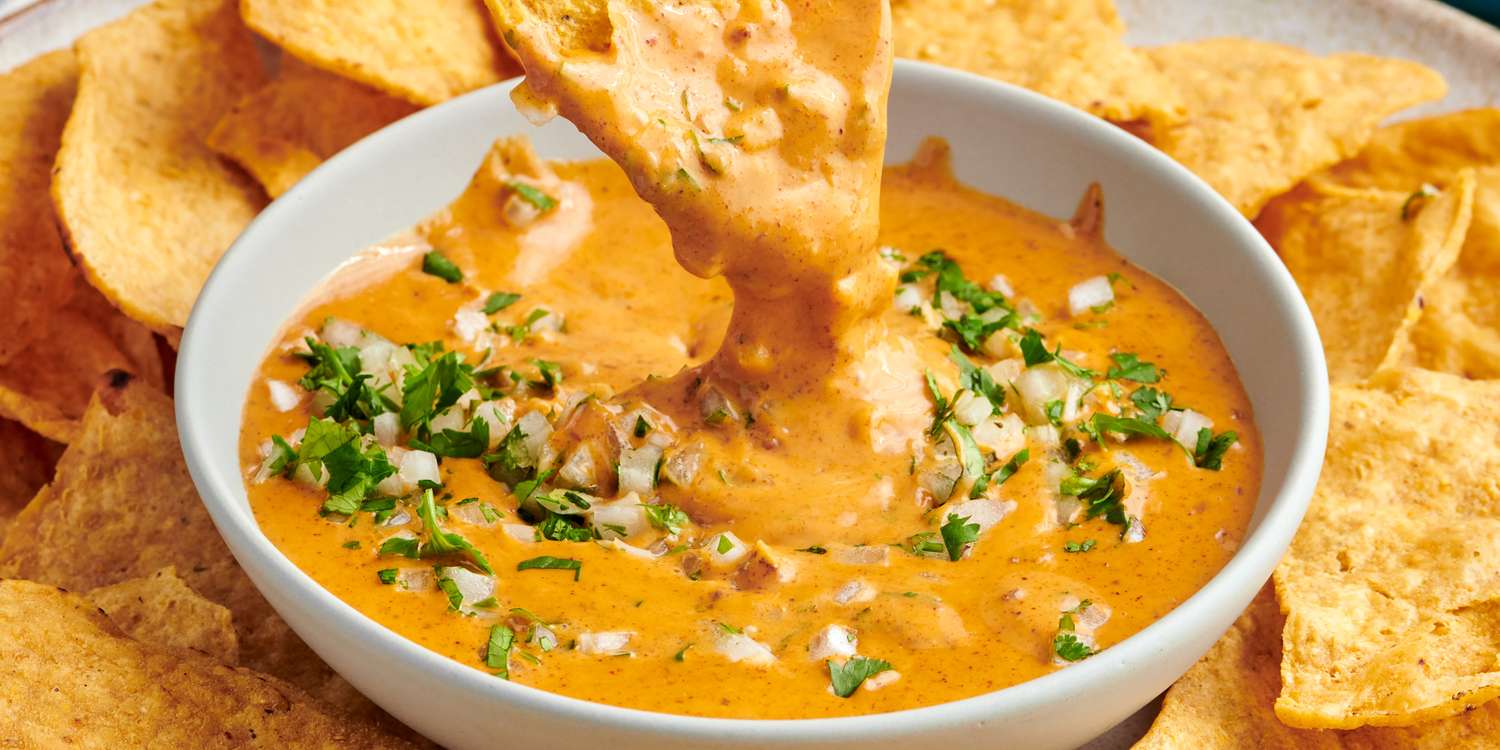
Step 5: Finish, Garnish, and Serve
Remove the dip from the heat and transfer it to a serving bowl if desired. Garnish with chopped green onions, diced jalapeños, extra shredded cheese, or a sprinkle of chili flakes. Serve warm with tortilla chips, crackers, toasted bread, or vegetable sticks.
Serving Ideas and Pairings
A bowl of chili cheese dip can absolutely stand on its own, but the right pairings turn it from a simple appetizer into the centerpiece of the snack table. Tortilla chips are the obvious classic, and for good reason. Their salty crunch plays beautifully against the warm, creamy dip. But this recipe is more versatile than many people realize. It also pairs well with pretzels, toasted bread rounds, soft breadsticks, French fries, and even sliced bell peppers if you want something fresh and crunchy beside all that richness.
This dip also works beyond the usual chip-and-dip setup. Spoon it over baked potatoes, drizzle it onto nachos, layer it into loaded fries, or use it as a topping for hot dogs and burgers. It can even become part of a casual dinner if you serve it with a tray of roasted vegetables, grilled sausage slices, or mini quesadillas. That is one reason it remains such a favorite. It is not stuck in one lane. A good chili cheese dip can be a snack, a party dish, or a comfort-food shortcut depending on how you serve it.
For drinks and sides, crisp and simple usually wins. Sparkling water with lime, cold soda, iced tea, or a light citrus drink can help cut through the richness. Fresh salsa, guacamole, or a cool sour cream-based dip also work well on the same table because they offer contrast. Rich foods need supporting players that lighten the mood a little. Think of this dip as the loud, charismatic guest at the party. It shines brightest when surrounded by a few quieter companions that let its flavor stand out without overwhelming the room.
FAQs about Chili Cheese Dip Recipe
1. What is chili cheese dip?
Chili cheese dip is a warm, creamy dip made by combining melted cheese with chili. It is rich, savory, and popular as a party snack or appetizer.
2. What type of cheese works best?
Cheddar, Monterey Jack, mozzarella, or processed cheese all work well. A mix of cheeses can give the dip better flavor and a smoother texture.
3. Can I use canned chili?
Yes, canned chili is a quick and convenient option. Homemade chili also works well if you want a fresher, more customized flavor.
4. How do I keep the dip smooth?
Melt the cheese over low heat and stir often. Adding a little milk or cream helps keep the texture smooth and prevents it from becoming too thick.
5. Can I make chili cheese dip spicy?
Yes, you can add jalapeños, chili flakes, hot sauce, or spicy chili to increase the heat level.
6. What can I serve with chili cheese dip?
It pairs well with tortilla chips, crackers, toasted bread, pretzels, or fresh vegetable sticks.
7. Can I make it ahead of time?
Yes, you can prepare it ahead and reheat it gently before serving. Stir well and add a splash of milk if it thickens too much.
8. How do I store leftovers?
Store leftover chili cheese dip in an airtight container in the refrigerator for up to 3 days. Reheat slowly on the stove or in the microwave.
9. Can I use a slow cooker?
Yes, a slow cooker is a great option for keeping chili cheese dip warm and smooth during parties or gatherings.
Conclusion
The biggest lesson in this guide is that the little details matter. Softening the cream cheese, melting the cheese gradually, managing the heat, and adjusting the final texture all make a real difference. These are not fussy chef tricks. They are practical choices that help the dip stay smooth, flavorful, and easy to scoop. Once you understand those steps, the recipe becomes more than a set of instructions. It becomes something you can confidently make your own.
So whether you use canned chili for speed or homemade chili for a more personal touch, this dip delivers the same promise: warm comfort, bold flavor, and the kind of snack people gather around without needing an invitation. Keep the ingredients simple, respect the heat, and serve it hot. That is how you make a professional-style chili cheese dip that tastes every bit as satisfying as it sounds.


