Cheesecake Crust Recipe: A cheesecake can have the creamiest filling in the world, but if the crust is weak, soggy, bland, or crumbly in the wrong way, the whole dessert loses its magic. The crust is not just a base that holds the filling.
It is the first layer of flavor, the textural contrast that makes each bite feel complete, and the foundation that keeps everything together from the first slice to the last forkful. Think of it like the frame around a beautiful painting.
You may come for the filling, but the crust shapes the entire experience.
What Makes the Best Cheesecake Crust
The best cheesecake crust is all about balance. It should hold together firmly enough to support the filling, but still break apart with a pleasant bite when you cut into it. If it is too dry, it crumbles into dust. If it is too wet with butter, it can turn greasy or dense. The sweet spot is a texture that feels like damp sand before pressing. That simple comparison helps more than any fancy kitchen language. You want the mixture to clump when squeezed, not drip or scatter.
Flavor matters just as much as structure. Many people assume cheesecake crust is supposed to fade into the background, but that is not really true. A great crust should quietly add warmth, sweetness, and a toasted note that lifts the whole dessert. Graham cracker crumbs are popular because they bring a slightly honeyed, nutty taste that pairs naturally with cream cheese filling. Butter adds richness, sugar sharpens the sweetness and improves caramelization, and optional ingredients like cinnamon or vanilla can add depth without overcomplicating things.
Texture is the final key. A perfect crust is neither rock-hard nor soft like cake. It should have a gentle crispness, especially around the edges, while staying tender enough to cut cleanly. That is why the ratio of crumbs to butter matters so much. Too much butter makes the crust heavy and oily. Too little leaves it fragile. The best crust also depends on proper pressing. You are not trying to build a brick wall. You are simply creating an even layer that is compact enough to hold together. Once you understand these little details, making the best cheesecake crust stops feeling intimidating and starts feeling almost effortless.
Ingredients You’ll Need
Here is the clear and essential list of Ingredients You’ll Need for a classic cheesecake crust recipe:
- 1 ½ cups graham cracker crumbs
- 5 tablespoons melted unsalted butter
- 2 tablespoons granulated sugar
- 1 tablespoon brown sugar (optional, for deeper flavor)
- Pinch of salt
- ½ teaspoon cinnamon (optional)
- ½ teaspoon vanilla extract (optional, especially for no-bake crusts)
These ingredients create a crust that is buttery, lightly sweet, easy to press, and sturdy enough for both baked and chilled cheesecakes. The beauty of this ingredient list is its simplicity. You do not need specialty items or complicated techniques to make a crust that tastes bakery-quality. Most of these ingredients are probably already in your kitchen, which makes this recipe both practical and reliable.
The base of the crust is the crumb component, usually graham crackers, because they offer a mild sweetness and a texture that blends smoothly when crushed. The butter acts like the glue, binding the crumbs together so the crust can hold its shape after baking or chilling. Sugar is not just there for sweetness. It also helps with flavor development and gives the crust a subtle caramelized finish, especially in baked cheesecakes. The pinch of salt may seem tiny, but it sharpens every other flavor and keeps the crust from tasting flat.
Optional ingredients let you make the crust feel more homemade and distinctive. Brown sugar adds a slight molasses note that works beautifully with vanilla and cream cheese. Cinnamon can give the crust warmth, especially for fall-style cheesecakes or spiced desserts. Vanilla adds aroma and softness to the flavor profile. The beauty of this list is that it is flexible, but the core formula stays dependable. Once you understand these ingredients, you can customize your crust with confidence instead of guessing your way through the recipe.
Graham Cracker Crumbs
Graham cracker crumbs are the heart of the classic cheesecake crust, and for good reason. They strike that ideal balance between sweetness, crunch, and mild flavor. They do not overpower the cheesecake filling, but they also do not disappear. Instead, they create a comforting, familiar taste that works with almost any cheesecake style, from plain vanilla to strawberry swirl to chocolate or pumpkin. That versatility is exactly why graham crackers have become the standard choice in so many kitchens.
You can use store-bought graham cracker crumbs or crush whole graham crackers yourself. Crushing them at home often gives a fresher flavor and better control over texture. A food processor makes quick work of the job, but a sealed zip-top bag and rolling pin also do the trick. The key is consistency. Large chunks can make the crust uneven and harder to slice, while crumbs that are too powdery can pack down too tightly. You want fine crumbs with just a tiny bit of texture left in them, almost like coarse sand.
One helpful detail many people overlook is measuring after crushing. If you use whole crackers, crush them first and then measure out the crumbs. This gives you a more accurate result and keeps the crust ratio balanced. If the crumb amount is off, the butter ratio gets thrown off too, and suddenly the crust is either too greasy or too dry. It sounds small, but in baking, small details act like dominoes. Get this part right, and the rest of the recipe becomes much easier. A good cheesecake crust really does begin with the right crumb texture and amount.
Melted Butter
If graham cracker crumbs are the body of the crust, melted butter is the glue that holds everything together. Without enough butter, the crust will feel dry and fragile. With too much, it turns heavy, greasy, and sometimes even slides around in the pan. That is why butter needs to be measured carefully instead of poured in by instinct. In a cheesecake crust, butter is doing more than adding richness. It is creating structure and helping the crumbs bond into a sliceable foundation.
Unsalted butter is usually the better choice because it gives you more control over the overall flavor. Salted butter can work in a pinch, but since different brands vary in saltiness, the final taste can become unpredictable. Melting the butter first is important because it coats the crumbs more evenly than softened butter ever could. Once mixed in, every crumb should look slightly moistened, not soaked. The mixture should hold together when pressed between your fingers, like damp beach sand that is ready to become a sandcastle.
Butter also plays a major role in flavor. It adds the richness that makes the crust taste homemade rather than dry or stale. When baked, it helps the sugar and crumbs develop a warm, toasted aroma that makes the whole cheesecake smell irresistible. Even in a no-bake crust, butter creates that satisfying firmness once chilled. It is one of those ingredients that seems simple, but it quietly does a lot of heavy lifting. In a way, butter is the backstage crew of the cheesecake world. You may not always notice it directly, but nothing works right without it.
Sugar
Sugar may seem like a small player in a cheesecake crust, but it does far more than sweeten the crumbs. A modest amount of granulated sugar helps build flavor, improves texture, and gives the crust a more polished finish. It creates a subtle contrast to the tangy cheesecake filling, which is exactly what makes each bite feel balanced instead of overly rich. Without sugar, the crust can taste flat and slightly bland, even if the filling is excellent.
Granulated sugar is the most common choice because it blends easily with the crumbs and supports a crisp finish when baked. Some bakers also add a spoonful of brown sugar for extra depth. That little addition can make the crust taste warmer and more complex, with a slight caramel note that pairs especially well with vanilla, cinnamon, pumpkin, pecan, or chocolate cheesecakes. It is not required, but it is a smart upgrade if you want the crust to feel a little more special without changing the whole recipe.
The amount of sugar should stay moderate. This is where restraint matters. Too little, and the crust lacks personality. Too much, and it becomes overly sweet or can harden more than expected after baking. Cheesecake is already a rich dessert, so the crust should support, not overwhelm. Think of sugar here as seasoning rather than the headline ingredient. It is like adding just enough light to a room so everything looks better. You may not notice it first, but if it is missing, something feels off. That is exactly the role sugar plays in a well-made cheesecake crust.
Optional Flavor Boosters
Once you have the basic crust formula down, optional flavor boosters are where you can bring in personality. These extras are not necessary for the crust to work, but they can elevate the flavor from standard to memorable. A small amount of cinnamon adds warmth and makes the crust feel cozier, especially for seasonal cheesecakes like apple, pumpkin, or caramel. A splash of vanilla gives the crumbs a softer, sweeter aroma that rounds out the butter and sugar beautifully.
A pinch of salt is another tiny addition that makes a surprisingly big difference. It does not make the crust salty. It simply sharpens the butter, wakes up the sweetness, and keeps the flavor from tasting dull. In baking, salt often acts like a spotlight. It helps everything else shine more clearly. Even if your crust is simple, that little pinch can make it taste more complete and balanced. It is one of those details people may not identify, but they definitely notice when the dessert tastes especially good.
Other optional add-ins can work too, depending on the cheesecake style. Nutmeg, finely chopped nuts, cookie crumbs, cocoa powder, or even a touch of espresso powder can be used in certain variations. The trick is not to overload the crust. It still needs to support the filling rather than compete with it. A cheesecake crust works best when it feels intentional and subtle, not loud. These boosters should act like background music, adding atmosphere without drowning out the main melody. Used wisely, they can turn a basic cheesecake crust into something that tastes homemade, thoughtful, and beautifully layered.
Tools That Make the Job Easier
A cheesecake crust does not require a kitchen full of expensive gadgets, but a few simple tools can make the process smoother and more accurate. At the most basic level, you need a mixing bowl, measuring cups or spoons, and something to crush the crackers. A food processor is fast and efficient, especially if you want very even crumbs, but it is not essential. A zip-top bag and rolling pin work perfectly well and often feel more approachable for everyday home baking.
You will also need a spoon, spatula, or fork for mixing the crumbs with the melted butter and sugar. The goal is to make sure every crumb is evenly coated, so using a tool that can scrape the bowl well is helpful. For pressing the crust into the pan, many bakers use the bottom of a measuring cup or a flat-bottomed glass. This helps create a smooth, even layer without compacting the crust too aggressively. Your hands can help too, especially when shaping the crust up the sides of the pan, but a flat tool gives a cleaner finish.
The springform pan is another important part of the process, especially for traditional cheesecakes. It allows you to remove the cheesecake cleanly without damaging the crust. Parchment paper on the base can also help with easy release. None of these tools are flashy, but together they reduce mess, improve consistency, and make the recipe feel easier from start to finish. Good baking often comes down to small practical choices, not dramatic ones. When you have the right tools nearby, the crust comes together with less guesswork and a lot more confidence.
Choosing the Right Pan
The pan you use can influence the shape, thickness, and overall success of your cheesecake crust more than many people realize. A springform pan is the most popular choice because it has removable sides, which makes it far easier to release a delicate cheesecake without cracking the edges or breaking the crust. For most classic cheesecakes, a 9-inch springform pan is the standard size, and the ingredient amounts listed earlier are well suited for that format.
Using the right pan size matters because the crust thickness changes if the pan is too large or too small. In a larger pan, the crust may spread too thin and become fragile. In a smaller pan, it can become overly thick and dense. A cheesecake crust should feel supportive, not bulky. Ideally, the base should be thick enough to hold the filling and give a satisfying bite, while still letting the cheesecake remain the star. A pan that is the right size helps you hit that balance naturally without having to overthink the proportions.
It also helps to line the bottom of the pan with parchment paper before pressing in the crust. That extra step can make serving much easier later, especially if you want clean slices and easy transfer. If you are making mini cheesecakes, muffin tins with liners can work beautifully, though the pressing technique changes slightly. At its core, choosing the right pan is about giving your crust the best environment to succeed. Baking is a little like architecture. Even the prettiest design struggles if the foundation and structure are not chosen well from the start.
Step-by-Step Guide for Cheesecake Crust
Step 1: Prepare Your Ingredients
Gather your graham cracker crumbs or biscuit crumbs, melted butter, and sugar before you begin. Measure everything accurately so the crust has the right texture and holds together well. Having the ingredients ready makes the process faster and smoother.
Step 2: Crush the Crumbs Properly
If you are not using ready-made crumbs, crush the crackers or biscuits into fine, even pieces. You can do this with a food processor or by placing them in a sealed bag and rolling over them with a rolling pin. Fine crumbs create a more even and compact crust.
Step 3: Mix the Crumbs, Sugar, and Butter
Place the crumbs in a bowl, add the sugar, and pour in the melted butter. Stir until the mixture looks like wet sand and all the crumbs are evenly coated. This step is important because it helps the crust stick together once pressed into the pan.
Step 4: Press the Crust into the Pan
Pour the crumb mixture into your cheesecake pan or pie dish. Use the back of a spoon, a flat-bottomed cup, or your fingers to press it down firmly and evenly across the base. Press slightly up the sides as well if your recipe calls for it.
Step 5: Pre-Bake or Chill the Crust
For a baked cheesecake, place the crust in a preheated oven for a few minutes until lightly set and fragrant. For a no-bake cheesecake, chill the crust in the refrigerator until firm. Both methods help create a stable base for the filling.
Step 6: Cool Before Adding Filling
Allow the crust to cool completely before adding the cheesecake filling. A hot or warm crust can melt the filling and affect the final texture. Once cooled, your crust is ready for the next step.
Common Mistakes to Avoid
Even a simple cheesecake crust recipe can go wrong if a few common mistakes sneak in. One of the biggest is using the wrong crumb-to-butter ratio. Too little butter leaves the crust dry and crumbly, while too much makes it greasy and overly compact. Many people assume adding extra butter will make the crust hold together better, but often it does the opposite. It can weigh the crumbs down and create a heavy texture that does not slice cleanly.
Another frequent problem is uneven pressing. If the crust is thick in one section and thin in another, the finished cheesecake will not bake or serve evenly. Thin areas can break apart, and thick ones can become too hard. Rushing through this step is a mistake because the shape of the crust really does matter. The same goes for skipping the pre-bake or chill time. A crust that has not had time to set will be far more likely to crumble when the filling is added or when the cheesecake is sliced.
Overprocessing the crumbs is another issue that people rarely talk about. When the crumbs become too powdery, the crust can feel dense rather than pleasantly crisp. Also, forgetting the pinch of salt or using stale crackers can leave the crust tasting dull even if the texture is right. A good cheesecake crust depends on more than just following ingredients. It relies on attention to detail. Avoiding these mistakes is not about perfectionism. It is about making sure all the simple parts of the recipe work together instead of quietly pulling against each other.
Baked vs No-Bake Cheesecake Crust
A baked cheesecake crust and a no-bake cheesecake crust may look similar, but they behave a little differently. The baked version has a deeper flavor and a firmer texture because the heat helps toast the crumbs and set the butter-sugar mixture more fully. This gives the crust a slight crispness and makes it particularly good at standing up to dense fillings like classic New York cheesecake. It also tends to slice more cleanly, especially if the cheesecake is chilled properly before serving.
A no-bake crust, on the other hand, relies entirely on the butter firming up in the refrigerator or freezer. That makes it softer and a little more delicate, though still delicious when made well. This version works beautifully for chilled cheesecakes, mousse-style desserts, or summer recipes when you do not want to turn on the oven. Some people even prefer the softer texture because it blends more gently with lighter fillings. It is less about one being better and more about choosing the right style for the dessert you are making.
The good news is that the core ingredient formula stays mostly the same. The main difference is in the setting method. If you want more structure and a toasted flavor, go baked. If you want simplicity and a softer bite, go no-bake. It is a bit like choosing between toasted bread and soft fresh bread for a sandwich. Both can be excellent, but they create a different eating experience. Understanding that difference helps you match the crust to the cheesecake instead of treating all recipes like they should behave exactly the same way.
Easy Variations to Try
Once you are comfortable with the classic version, trying cheesecake crust variations can make your desserts feel fresh and creative without changing the basic technique. One of the easiest swaps is using digestive biscuits, vanilla wafers, shortbread cookies, or crushed chocolate cookies in place of graham crackers. Each one changes the flavor profile slightly. Vanilla wafers make the crust taste lighter and sweeter, while chocolate cookies create a richer, more dramatic base for chocolate or peanut butter cheesecakes.
You can also add texture with finely chopped nuts like pecans, almonds, or walnuts. Just be careful not to overdo it, since too many nuts can make the crust harder to press and slice. Spices are another simple upgrade. Cinnamon, nutmeg, ginger, or cardamom can all bring warmth depending on the style of cheesecake you are making. For citrus cheesecakes, a little lemon or orange zest in the crust can add brightness that ties the dessert together beautifully. These small details can make a homemade cheesecake taste more layered and intentional.
The best part about variations is that they keep the crust interesting while still feeling approachable. You are not reinventing the recipe. You are just changing the accent. That is why crust customization is so satisfying. It gives you room to match the base to the filling, the season, or the occasion. A classic crust is always a safe choice, but exploring a few easy changes can turn a good cheesecake into one that feels personal and memorable.
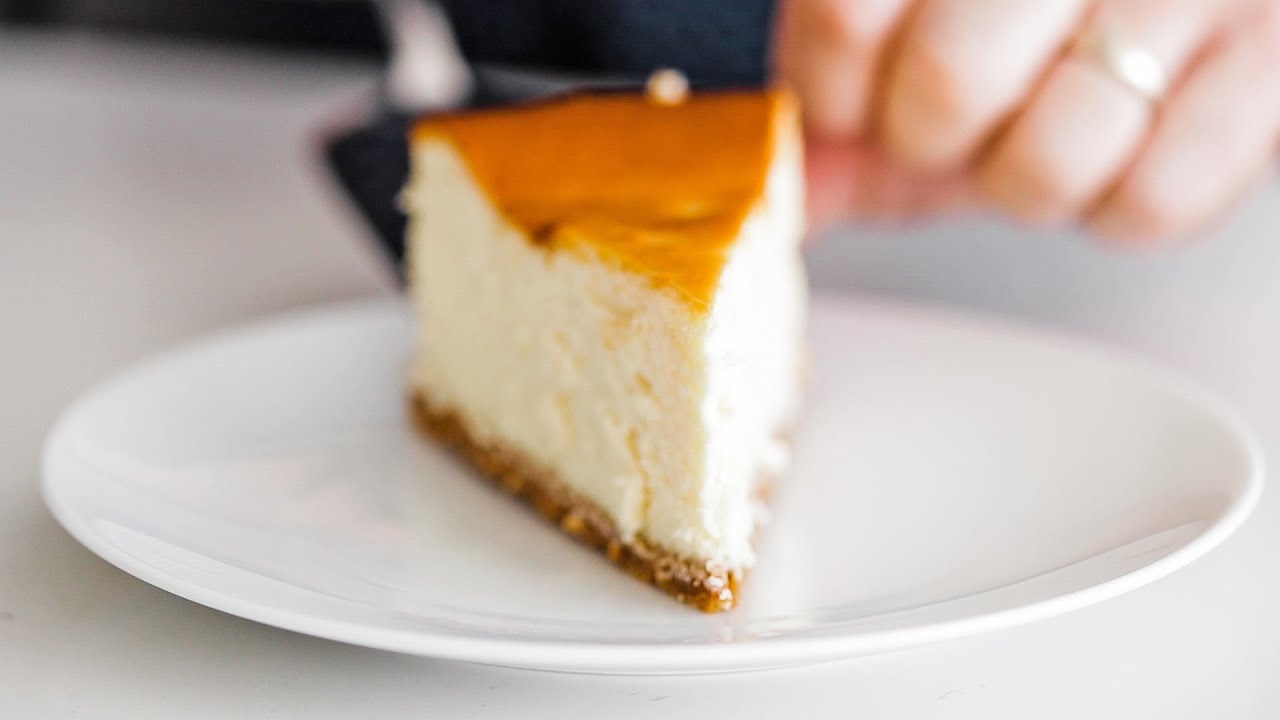
How to Know Your Crust Is Perfect
A perfect cheesecake crust gives clear signs before you even cut into the cheesecake. First, it should look even and well-shaped in the pan, with no greasy pooling and no dry patches. After baking, it should have a light golden tone and a buttery aroma. After chilling, it should feel firm and stable rather than loose or fragile. These visual and textural clues tell you a lot about whether the crust was mixed and pressed correctly.
When sliced, a great crust should hold together neatly under the filling without crumbling into a mess. It should separate from the pan base cleanly, especially if parchment was used. On the fork, it should feel tender with a slight bite, not sandy or rock-hard. Flavor-wise, the crust should taste buttery, lightly sweet, and balanced, supporting the cheesecake rather than overpowering it. You should notice it, but it should still feel like part of the whole dessert rather than a separate snack attached to the bottom.
The simplest test of all is how it feels in the mouth. A perfect crust gives a satisfying contrast to the creamy filling. It is the moment where smooth meets crisp, rich meets light crunch. That contrast is what makes cheesecake so addictive. If your crust provides that clean, buttery finish without falling apart or tasting greasy, you have done it right. It may seem like a humble layer, but when it is made properly, it quietly becomes one of the best parts of the dessert.
Storage and Make-Ahead Tips
A cheesecake crust is wonderfully make-ahead friendly, which makes it a smart choice for entertaining or holiday baking. You can prepare the crust a day or two in advance and keep it covered in the refrigerator until you are ready to add the filling. If the crust has already been baked, let it cool completely first before covering it. This prevents trapped steam from softening the texture. Keeping it well covered also protects it from absorbing fridge odors, which can dull the fresh buttery flavor.
For longer storage, the crust can also be frozen. Once pressed into the pan, wrap it tightly with plastic wrap and then a layer of foil. It can usually hold up well in the freezer for several weeks. When you are ready to use it, let it thaw briefly in the refrigerator or at room temperature before filling, depending on the cheesecake recipe. This is especially helpful during busy baking seasons when spreading out the workload can make the whole process feel much easier.
Even leftover baked cheesecake crust scraps can be useful. They can be sprinkled over parfaits, yogurt, or ice cream for extra crunch. That is part of the charm of a good crust recipe. It is simple, forgiving, and easy to work into your schedule. Make-ahead baking often feels like a secret weapon, and cheesecake crust fits that category beautifully. It gives you one less thing to rush through on the day you want to serve dessert, which means better results and a calmer kitchen.
Serving Tips for the Best Texture
Serving cheesecake well starts with respecting the crust. Even the best crust can seem disappointing if the cheesecake is sliced too early, served too cold, or handled roughly. For clean slices, use a sharp knife dipped in warm water and wiped dry between cuts. This helps glide through the crust and filling without dragging crumbs through the creamy interior. It may sound like a small step, but it makes a big difference in presentation and texture.
Temperature matters too. A cheesecake served straight from the refrigerator can have a crust that feels firmer than intended, especially if it was baked. Letting the cheesecake sit for a few minutes before slicing can soften the texture slightly and make the flavors feel fuller. Not warm, just less icy-cold. That small pause allows the butter in the crust to relax a bit, which often improves the bite. It is similar to how butter on toast tastes better when it has had a moment to melt in.
If you are topping the cheesecake with fruit, sauces, or whipped cream, try to add them in a way that does not soak the crust too much during storage. Wet toppings left on for too long can slowly soften the edges, especially on no-bake crusts. Serve thoughtfully, slice carefully, and the crust will reward you with the kind of bite that makes people go quiet for a second after the first forkful. That is usually a pretty good sign dessert has gone exactly right.
FAQs about Cheesecake Crust Recipe
1. What is the best crust for cheesecake?
The most popular cheesecake crust is made with graham cracker crumbs, sugar, and melted butter. It gives a sweet, buttery base that pairs well with many cheesecake flavors. You can also use digestive biscuits, vanilla wafers, or crushed cookies for a different taste.
2. Why is my cheesecake crust falling apart?
A crust usually falls apart when there is not enough butter to hold the crumbs together or when it was not pressed firmly into the pan. The crumbs should feel like wet sand before being added to the pan. Chilling or pre-baking the crust also helps it set properly.
3. Should cheesecake crust be baked first?
It depends on the recipe. For a baked cheesecake, pre-baking the crust often helps it become firmer and slightly crisp. For a no-bake cheesecake, chilling the crust is usually enough to help it hold its shape.
4. Can I make cheesecake crust without graham crackers?
Yes, you can use other options like digestive biscuits, vanilla cookies, shortbread, or even chocolate cookies. The method stays almost the same. Just crush them finely and mix with butter and sugar.
5. How thick should a cheesecake crust be?
A cheesecake crust should be thick enough to support the filling without overpowering it. In most cases, a thin to medium layer pressed evenly across the bottom works best. If it is too thick, it may become heavy and hard to cut.
6. Can I prepare cheesecake crust ahead of time?
Yes, cheesecake crust can be made ahead and stored in the refrigerator before adding the filling. This is helpful when planning desserts in advance. Just keep it covered so it stays fresh and does not absorb other odors.
Conclusion
The ingredient list is refreshingly simple, which is part of what makes this recipe so useful. Graham cracker crumbs, melted butter, sugar, and a few optional flavor boosters come together quickly, but when handled well, they create a base that tastes polished and professional. That is the beauty of baking. The smallest details often shape the biggest results. A crust that looks humble at first can completely transform the final dessert.
Whether you are making your first cheesecake or trying to improve the crust on one you already love, this method gives you a dependable foundation. Once you master the basics, you can experiment with cookie swaps, spices, nuts, and other variations without losing confidence. A strong crust is more than a bottom layer. It is the quiet support system that makes every creamy, rich bite of cheesecake feel complete.