Canning Dill Pickle Recipe: There’s something almost magical about opening a jar of homemade dill pickles in the middle of winter and hearing that satisfying pop. It’s like summer whispering back to you. If you’ve ever tasted a freshly canned pickle made from crisp cucumbers and fragrant dill, you already know the difference.
Store-bought pickles can be good, sure—but homemade ones? They’re on another level entirely. When you make your own, you control every ingredient that goes into the jar. No unnecessary preservatives, no artificial flavors, and no mystery additives. Just clean, simple, bold flavors.
Making homemade dill pickles isn’t just about food. It’s about flavor, tradition, savings, and pride. And once you taste your first batch, you’ll wonder why you didn’t start sooner.
Taste, Freshness, and Control Over Ingredients
Flavor is where homemade dill pickles truly shine. When you use fresh cucumbers—preferably the same day they’re picked—you lock in a level of crispness and brightness that mass-produced pickles simply can’t replicate. Commercial brands often process cucumbers days after harvesting, which impacts texture. When you’re in charge, you decide when those cucumbers hit the brine.
Control over ingredients is another huge advantage. Many store-bought pickles contain calcium chloride, artificial coloring, or high-fructose corn syrup. When canning at home, you decide exactly what goes into the jar. Want organic vinegar? Use it. Prefer natural sea salt without additives? Go for it. Avoiding anti-caking agents in salt is especially important in pickling because they can cloud the brine and affect quality.
There’s also room for creativity while staying safe. You can add mustard seeds, peppercorns, coriander, or extra garlic to elevate flavor. According to food preservation specialists, maintaining the correct vinegar-to-water ratio ensures safety while still allowing for flavor experimentation through dry spices and herbs.
The result? A jar that tastes vibrant, balanced, and deeply aromatic. When you bite into a homemade dill pickle, you get a snap, a burst of tang, and a fresh herbal note from the dill. It’s not just salty and sour—it’s layered and complex. That’s the beauty of controlling your own ingredients.
Cost-Effectiveness and Long-Term Storage Benefits
Let’s talk numbers for a moment. A single jar of premium artisanal dill pickles can cost anywhere from $6 to $10 in many grocery stores. When you break down the cost of cucumbers, vinegar, salt, and dill—especially if bought in season or grown at home—you’ll find that making your own can significantly reduce expenses per jar.
Buying cucumbers in bulk during peak season is key. Farmers’ markets often sell pickling cucumbers at lower prices when supply is high. Canning allows you to preserve that abundance instead of letting it go to waste. You’re essentially capturing summer’s harvest and extending it for months.
Shelf stability is another powerful benefit. Properly processed dill pickles can last up to one year when stored in a cool, dark place. That means fewer emergency grocery runs and always having a flavorful side dish ready. Think about burgers, sandwiches, charcuterie boards, or even chopped pickles in potato salad—your pantry becomes a treasure chest of ready-to-use ingredients.
There’s also food security to consider. Knowing how to preserve food means you’re less dependent on fluctuating grocery prices or supply chain disruptions. It’s an old-school skill that feels surprisingly modern in today’s world.
Homemade canning combines savings, sustainability, and preparedness into one simple kitchen process. And once you build a small stockpile of gleaming jars on your shelf, you’ll feel that quiet confidence that comes from being prepared.
Essential Equipment for Canning Dill Pickles
Before diving into the actual pickling process, let’s make sure your kitchen is properly equipped. Canning isn’t complicated, but it does require specific tools to ensure food safety. Using the right equipment reduces the risk of spoilage and ensures your dill pickles stay safe and delicious for months.
At the heart of the process is a water bath canner or a large, deep stockpot with a rack. This allows jars to be fully submerged in boiling water, which is necessary for proper processing. The rack prevents jars from sitting directly on the bottom of the pot, where intense heat could cause cracking.
You’ll also need mason jars designed specifically for canning. These jars are built to withstand high temperatures. Pair them with new lids each time you can. The sealing compound on lids is designed for one-time use to ensure an airtight seal.
A jar lifter is essential for safely removing hot jars from boiling water. Trust me, trying to grip a slippery, boiling-hot jar with regular tongs is not a risk worth taking. A canning funnel helps you pour brine neatly into jars without spilling, while a bubble remover or non-metallic spatula helps release trapped air.
Investing in proper tools makes the process smoother, safer, and far less stressful. Think of it as setting up your workshop before starting a project. When everything is within reach, the entire experience feels organized and manageable.
Basic Canning Tools You Must Have
The must-have tools for canning dill pickles include:
- Water bath canner or deep stockpot
- Canning jars (pint or quart size)
- New lids and screw bands
- Jar lifter
- Canning funnel
- Large pot for brine
- Clean kitchen towels
Each tool plays a specific role in maintaining safety. For example, the water bath canner ensures jars reach the necessary temperature to destroy harmful bacteria. According to USDA guidelines, proper water bath processing is essential for high-acid foods like pickles.
Skipping proper equipment might seem harmless, but safe canning depends on consistency and precision. Using jars not designed for canning can result in breakage. Reusing lids can cause seal failure. These small details matter.
Think of these tools as your insurance policy. They protect your food, your effort, and your time. Once you have them, you can reuse most of them for years, making future batches even easier.
Optional Tools That Make the Process Easier
Once you’ve mastered the basics of home canning dill pickles, you might find yourself wanting a few extra tools that make the entire process smoother and more efficient. While these aren’t strictly required, they can significantly reduce stress—especially if you’re planning to can multiple batches during peak cucumber season.
A magnetic lid lifter is one of those small tools that makes a big difference. Instead of fumbling with hot lids in simmering water, you can easily lift them out and place them onto jars without contamination. It’s quick, clean, and surprisingly satisfying to use. Another helpful tool is a jar rack with handles, which allows you to lower and lift several jars at once in your water bath canner. If you’re processing large quantities, this saves both time and effort.
A digital kitchen thermometer can also be useful. While water bath canning relies on boiling temperatures, monitoring your brine temperature ensures consistency before pouring it into jars. Precision adds confidence. There’s also the headspace measuring tool, which helps ensure you leave the correct space between the brine and the jar lid—usually ½ inch for dill pickles. Proper headspace is critical for achieving a secure vacuum seal.
Lastly, consider a produce scrub brush specifically for cleaning cucumbers. Even if they look clean, garden-fresh cucumbers often carry soil residue. Thorough washing prevents contamination and improves quality.
Think of these optional tools like upgrading from a basic toolkit to a professional one. You can absolutely build a house with the essentials—but better tools make the job easier, faster, and more enjoyable.
Ingredients You’ll Need for Classic Dill Pickles
Let’s get to the heart of the matter—the ingredients. Great dill pickles start with simple, high-quality components. There’s no long, complicated list here. In fact, the beauty of a classic canning dill pickle recipe lies in its simplicity.
List of Ingredients You’ll Need
- 4 pounds fresh pickling cucumbers (4–6 inches long)
- 4 cups distilled white vinegar (5% acidity)
- 4 cups water
- ¼ cup pickling salt (non-iodized, no anti-caking agents)
- 8 cloves garlic, peeled
- 8 fresh dill heads or 4 tablespoons dill seeds
- 2 teaspoons black peppercorns
- 2 teaspoons mustard seeds (optional)
- ½ teaspoon red pepper flakes (optional, for mild heat)
That’s it. Nothing artificial. Nothing unnecessary. Just bold, natural ingredients working together.
The cucumbers are the star of the show. Always choose firm, blemish-free pickling cucumbers. Avoid waxed cucumbers, as the wax prevents proper brine penetration. Freshness is critical—ideally within 24 hours of harvesting.
Distilled white vinegar ensures consistent acidity, which is essential for food safety. The standard 5% acidity level is required for safe preservation. Never dilute vinegar beyond recommended ratios.
Pickling salt differs from table salt because it contains no iodine or anti-caking agents, which can cause cloudy brine and affect flavor.
Fresh dill provides that signature herbal aroma. Garlic adds depth, while spices like mustard seeds and peppercorns create complexity.
When you combine these ingredients correctly, you create a brine that preserves, flavors, and transforms ordinary cucumbers into crisp, tangy perfection.
Choosing the Best Cucumbers
Not all cucumbers are created equal. If you want crisp, crunchy dill pickles, selecting the right variety makes all the difference. Look specifically for pickling cucumbers, often labeled as Kirby or gherkin cucumbers. These are shorter, thicker, and have bumpy skin. That bumpy texture actually helps absorb brine more effectively.
Size matters more than most beginners realize. Smaller cucumbers—about 4 to 6 inches long—produce firmer pickles. Oversized cucumbers often contain more seeds and softer flesh, which can lead to mushy results. You want cucumbers that feel dense and firm when squeezed.
Freshness directly impacts texture. According to food preservation experts, cucumbers begin losing moisture immediately after harvesting. The longer they sit, the softer they become. If you can’t can them immediately, store them in the refrigerator and process within 24–48 hours.
Before pickling, always trim about 1/16 inch from the blossom end. This small step removes enzymes that can soften pickles over time. It might seem minor, but it makes a noticeable difference in crunch.
Choosing the right cucumbers is like choosing the right foundation for a house. Everything else builds on this one decision. Get this step right, and you’re already halfway to perfect dill pickles.
The Importance of Vinegar, Salt, and Fresh Dill
When it comes to safe canning, the vinegar-to-water ratio isn’t just about flavor—it’s about preservation. The acidity level must remain high enough to prevent harmful bacteria growth. That’s why you should always use vinegar labeled with 5% acidity and avoid experimenting with dilution ratios beyond tested guidelines.
Salt also plays a functional role beyond taste. Pickling salt helps draw moisture from cucumbers, allowing the brine to penetrate deeply. Using table salt with iodine can darken pickles and cloud brine. Stick with pure pickling salt for best results.
Fresh dill delivers the signature flavor profile. Dill heads provide stronger flavor than dried weed, though both can work. The aromatic oils in dill infuse into the brine during processing, creating that unmistakable scent when you open a jar.
Garlic and spices are flexible, but vinegar and salt ratios are not. Think of vinegar and salt as the structural beams of your pickle recipe—remove or weaken them, and the entire system fails. Keep them consistent, and you ensure safety and flavor in every bite.
Preparing Your Cucumbers for Canning
Preparation might seem straightforward, but it’s where texture is won or lost. Start by washing cucumbers thoroughly under cold running water. Use a vegetable brush to remove dirt, especially around bumps.
After washing, trim the blossom ends as mentioned earlier. You can leave cucumbers whole for spears or slice them into halves or rounds depending on preference. Uniform size ensures even brining.
For extra crunch, some home canners soak cucumbers in ice water for 2–4 hours before packing. This step hydrates the cucumbers and can improve firmness.
Careful preparation ensures your pickles maintain structure during processing. Skipping small steps here often leads to disappointing texture later.
Preparing the Brine for Dill Pickles
The brine is where science meets flavor. Combine 4 cups vinegar, 4 cups water, and ¼ cup pickling salt in a large stainless steel pot. Bring the mixture to a rolling boil, stirring until the salt fully dissolves.
Maintaining the correct 1:1 vinegar-to-water ratio is critical. This balance provides sufficient acidity while preventing overwhelming sourness. Once boiling, reduce heat slightly but keep the brine hot until ready to pour.
Hot brine poured over packed cucumbers helps initiate heat penetration during processing. Timing matters here—don’t let the brine cool significantly before use.
The brine acts as both protector and flavor carrier. It’s the invisible force that transforms raw vegetables into preserved delicacies.
Sterilizing Jars and Lids Properly
Clean jars are non-negotiable in safe food preservation. Wash jars in hot, soapy water and rinse thoroughly. Keep them hot until ready to use, either in simmering water or a warm oven.
Lids should be simmered gently—not boiled—to soften sealing compound. Proper sterilization reduces contamination risk and improves sealing reliability.
Food safety organizations emphasize that improper sterilization is one of the leading causes of home canning failure. Taking ten extra minutes here can save an entire batch.
Step-by-Step Guide to Canning Dill Pickles
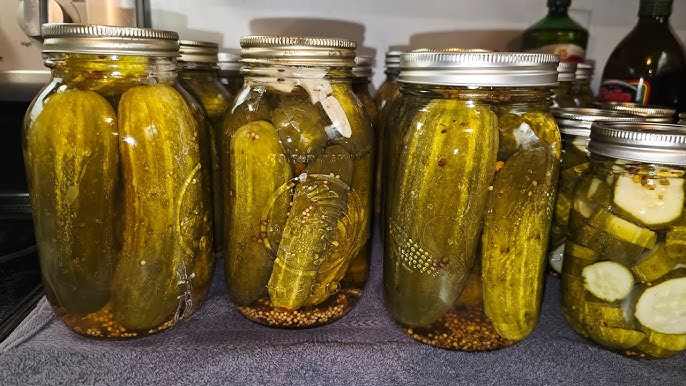
Step 1 – Packing the Jars
Place garlic cloves, dill, and spices at the bottom of each hot jar. Pack cucumbers tightly but without crushing. Leave ½ inch headspace.
Tight packing prevents floating and maximizes jar space. Think of it like assembling a puzzle—everything should fit snugly.
Step 2 – Adding the Brine
Pour hot brine over cucumbers, maintaining ½ inch headspace. Use a funnel to prevent spills.
Proper coverage ensures even preservation and prevents discoloration above the liquid line.
Step 3 – Removing Air Bubbles and Sealing
Slide a non-metallic spatula along jar sides to release trapped air. Wipe rims clean. Place lids and screw bands fingertip tight.
Air bubbles can interfere with sealing. This step ensures vacuum formation during cooling.
Step 4 – Water Bath Processing
Place jars in boiling water, ensuring they are covered by at least 1 inch of water. Process for 10–15 minutes (adjust for altitude if necessary).
Processing time ensures safety and shelf stability. Once complete, remove jars and let cool undisturbed for 12–24 hours.
Cooling, Checking Seals, and Storage
As jars cool, you’ll hear that satisfying popping sound. After 24 hours, check seals by pressing the lid center—it should not flex.
Store sealed jars in a cool, dark place for up to one year. Proper storage preserves flavor and texture.
How Long to Wait Before Eating Your Pickles
Patience pays off. While you can technically open jars after 24 hours, flavor develops best after 2–4 weeks. This allows full brine penetration.
Waiting might be hard, but the improved taste is worth it.
Common Mistakes to Avoid When Canning Pickles
Avoid using low-acid vinegar, table salt, or overripe cucumbers. Don’t skip processing time. Never alter vinegar ratios.
Consistency equals safety.
Variations of Dill Pickle Recipes
Spicy Garlic Dill Pickles
Add extra garlic cloves and 1 teaspoon red pepper flakes per jar. The heat balances the vinegar tang beautifully.
Sweet and Tangy Dill Pickles
Add 1–2 tablespoons sugar per brine batch. This creates a mild sweetness without overpowering dill flavor.
FAQs about Canning Dill Pickle Recipe
1. What vinegar should I use for canning dill pickles?
Use commercially bottled vinegar that is 5% acidity (svinegar because the acidity can be unknown, which affects safety.
2. Can I dilute the vinegar to make pickles less sour?
Don’t dilute the vinegar unless a tested recipe tells you to. If you want a milder taste, it’s safer to adjust sugar or add flavorings, not reduce the vinegar strength.
3. Why do recipes say to cut off the blossom end of cucumbers?
Tested dill-pickle directions often tell you to remove a thin slice from the blossom end because it can contribute to soft pickles.
4. Do I have to process dill pickles in a canner?
Yes. For shelf-stable pickles, use a boiling-water canner (or follow a tested process). Processing helps prevent spoilage and ensures jars seal safely.
5. How long do home-canned dill pickles last?
Stored in a cool, dark place, quality is best within about 1 year. Refrigerate after opening and use within a few weeks for best crunch and flavor.
Conclusion
Canning dill pickles is a rewarding blend of tradition, science, and flavor. With the right ingredients, proper technique, and attention to safety, you can create crisp, tangy pickles that rival any gourmet brand. Once you master the process, your pantry becomes a reflection of your skill and care. Homemade dill pickles aren’t just preserved cucumbers—they’re jars of craftsmanship waiting to be opened.