Tonkotsu Broth Recipe: If you’ve ever sat down at a ramen shop, lifted a spoonful of cloudy white broth to your lips, and thought, “How is this even possible?” — welcome to the world of tonkotsu broth. This isn’t just soup. It’s a labor of love, a test of patience, and honestly, a bit of kitchen magic.
Tonkotsu broth originates from Fukuoka, Japan, and it’s famous for its rich, creamy, pork-forward flavor. Unlike clear broths such as shoyu or shio ramen, tonkotsu is bold, opaque, and unapologetically hearty. It’s made by boiling pork bones at a high heat for hours — sometimes up to 12 or more — until the collagen, marrow, and fat break down and emulsify into a silky, milky liquid.
But here’s the thing: it’s not complicated. It just takes time and intention. If you can boil water, skim foam, and keep an eye on a pot, you can make authentic tonkotsu broth at home.
Why has it become so popular worldwide? Because it hits every craving note. It’s savory. It’s comforting. It’s deeply satisfying. It wraps around your taste buds like a warm blanket on a cold day.
In this guide, you’ll learn exactly how to make professional-quality tonkotsu broth step by step — from selecting bones to achieving that signature creamy texture. Whether you’re a home cook or an aspiring ramen chef, this recipe will elevate your noodle game permanently.
Ready to turn your kitchen into a ramen shop? Let’s get started.
The Science Behind Creamy Tonkotsu Broth
Let’s talk about what actually makes tonkotsu broth so creamy. Spoiler alert: there’s no cream involved. That luxurious texture comes purely from science — specifically collagen, fat, marrow, and emulsification.
When pork bones (especially femurs, neck bones, and trotters) are boiled aggressively for hours, something incredible happens. The collagen inside connective tissues breaks down into gelatin. At the same time, marrow and fat release into the water. With a rolling boil — not a gentle simmer — these components emulsify, meaning they blend together into a stable mixture.
Think of it like making a vinaigrette. Oil and vinegar don’t mix unless you shake them vigorously. Tonkotsu works the same way. The constant, strong boil acts as the “shake,” forcing fat and water to combine into that creamy white liquid.
This is also why the broth turns milky instead of clear. It’s not about adding dairy or thickening agents. It’s about mechanical emulsification. Tiny fat particles disperse throughout the broth, reflecting light and giving it that iconic cloudy appearance.
Another key factor? Time. You can’t rush tonkotsu. Collagen needs hours to break down fully. This slow transformation is what gives the broth its body and lip-coating richness.
Understanding the science makes the process less intimidating. You’re not just boiling bones — you’re extracting flavor, unlocking gelatin, and creating a natural emulsion.
Once you grasp this, everything else becomes easier. Control the boil. Be patient. Let chemistry do the heavy lifting.
Ingredients You’ll Need
Before we dive into the step-by-step process, let’s gather everything you need. Tonkotsu broth keeps its ingredient list surprisingly simple, but each component plays a crucial role.
Core Ingredients
- 4–5 pounds pork bones (femur, neck bones, trotters, or a mix)
- 1 pound pork fat (optional but recommended for richness)
- 1 large onion, halved
- 1 whole head of garlic, sliced in half crosswise
- 2-inch piece of ginger, sliced
- 2–3 green onions
- Water (enough to fully cover bones)
That’s it. No fancy spices. No complicated seasoning. Tonkotsu broth is all about pork purity.
Optional Flavor Enhancers
- Dried shiitake mushrooms
- Kombu (dried kelp)
- Extra garlic cloves for stronger aroma
Traditional tonkotsu focuses heavily on pork, but some variations incorporate subtle umami boosters.
Choosing the Right Bones
This is where quality matters. You want bones rich in collagen and marrow. Here’s a quick breakdown:
| Bone Type | Benefit |
|---|---|
| Femur Bones | High marrow content |
| Neck Bones | Meat for extra flavor |
| Trotters (Feet) | Extremely high collagen |
| Back Bones | Balanced meat and bone |
A mix works best. If possible, ask your butcher to cut the bones into smaller pieces. This exposes more marrow and speeds up extraction.
Ingredient Substitutions
- No pork fat? The broth will still work but may be slightly lighter.
- No green onions? Regular scallions work fine.
- No fresh ginger? Powdered is not ideal — stick to fresh.
Keep it simple. The magic is in the process, not a long ingredient list.
Essential Equipment for Making Tonkotsu Broth
Making tonkotsu broth doesn’t require professional kitchen tools, but having the right equipment makes the process smoother and more efficient.
Large Stockpot (At Least 8–12 Quarts)
This is non-negotiable. You need space for bones and vigorous boiling. A cramped pot restricts movement and can prevent proper emulsification. Stainless steel or heavy-bottomed pots work best because they distribute heat evenly.
If you’re serious about ramen, investing in a 12-quart stockpot is a game-changer.
Pressure Cooker (Optional Shortcut)
While traditional tonkotsu requires 10–12 hours of boiling, a pressure cooker can reduce cooking time to about 3–4 hours. However, some purists argue the flavor development isn’t quite as deep. It’s a trade-off between time and tradition.
Fine Mesh Strainer
After hours of boiling, you’ll need to strain the broth to remove bone fragments and aromatics. A sturdy fine mesh strainer ensures a smooth final product.
Skimmer or Large Spoon
During the initial boiling phase, impurities rise to the surface. A skimmer makes removal easy and keeps the broth clean-tasting.
Storage Containers
Tonkotsu broth stores beautifully. Use airtight containers or freezer-safe bags for portioning.
Preparation is half the battle. Once your equipment is ready, the real transformation begins.
Preparing the Pork Bones
This step separates amateur broth from restaurant-quality tonkotsu. Proper bone preparation removes impurities and ensures a clean, rich flavor instead of a funky or bitter one.
Step 1: Soaking the Bones
Place the pork bones in a large container and cover with cold water. Let them soak for at least 8–12 hours (overnight is ideal). This draws out excess blood, which can cloud flavor.
Change the water once or twice during soaking if possible.
Step 2: Parboiling
Drain the soaked bones and transfer them to a large pot. Cover with fresh water and bring to a rolling boil for 10–15 minutes.
You’ll notice gray foam and scum rising to the top. That’s exactly what we want to remove.
Step 3: Scrubbing Clean
Drain the pot completely. Rinse the bones under cold running water. Use your hands or a brush to scrub away any dark residue or coagulated blood.
This might seem tedious, but it makes a massive difference. Clean bones equal clean-tasting broth.
Now your bones are ready for the real boil — the long, transformative process that creates authentic tonkotsu broth.
We’re just getting started.
Step-by-Step Guide to Making Tonkotsu Broth
Now comes the heart of the process — the transformation. This is where patience meets technique. You’ve cleaned your bones. Your pot is ready. Now we build that rich, milky, restaurant-quality tonkotsu broth.
Step 1: Start with a Clean, Fresh Boil
Place your cleaned pork bones back into the large stockpot. Add enough fresh cold water to fully cover the bones by at least 2–3 inches. Turn the heat to high and bring it to a vigorous boil — not a gentle simmer.
This is critical. Tonkotsu requires a rolling boil. Think bubbling, churning, active movement. The agitation helps release marrow, fat, and collagen into the water.
Once it reaches a strong boil, keep it there.
Step 2: Maintain a Rolling Boil for Hours
Unlike delicate broths that whisper on low heat, tonkotsu demands intensity. Keep the broth boiling hard for 10–12 hours. Yes, that long. During this time:
- Water will evaporate — add hot water as needed to keep bones submerged.
- The liquid will gradually turn from clear to cloudy.
- Fat will emulsify into the broth.
Do not lower the heat to a simmer. A simmer won’t create the creamy emulsification we’re after.
Step 3: Add Aromatics at the Right Time
After about 6 hours of boiling, add your aromatics:
- Onion halves
- Garlic (cut side down)
- Ginger slices
- Green onions
Adding them too early can make the broth bitter. Adding them later preserves sweetness and aroma.
Step 4: Final Emulsification Boost
Toward the final hour, you can increase the heat slightly to intensify the boil. Some chefs even use a handheld blender to blend part of the broth (with bones removed) to maximize creaminess. This step is optional but powerful.
Step 5: Strain the Broth
Once the broth looks opaque and creamy — almost like thin milk — turn off the heat. Carefully strain through a fine mesh sieve into another large container.
Press lightly on solids to extract extra liquid, but don’t mash aggressively. You want smoothness, not grit.
What you’re left with is liquid gold — a thick, rich, porky masterpiece.
Pro Tips for Achieving the Perfect Milky Texture
Want that ultra-creamy, ramen-shop consistency? These professional tips make all the difference.
Keep the Boil Aggressive
This cannot be overstated. If the broth isn’t moving, it isn’t emulsifying. The constant agitation breaks fat into tiny droplets that suspend in the liquid.
If it looks calm, turn up the heat.
Always Add Hot Water
When topping off evaporated liquid, use boiling or very hot water. Adding cold water drops the temperature and interrupts emulsification.
Use a Mix of Bones
Trotters provide collagen. Femurs provide marrow. Neck bones add meat flavor. A blend creates balance and body.
Blend for Extra Creaminess
Some chefs remove bones at the end and use an immersion blender for 30–60 seconds. This breaks down remaining marrow and boosts opacity.
Don’t Salt the Broth
Tonkotsu broth is usually unsalted. Seasoning happens later with tare (concentrated seasoning sauce). Salting early limits flexibility.
Think of the broth as a blank canvas — rich but neutral.
Common Mistakes to Avoid
Even experienced cooks slip up. Here’s what can ruin your tonkotsu and how to avoid it.
Mistake 1: Simmering Instead of Boiling
This is the biggest error. A gentle simmer makes clear broth, not creamy tonkotsu.
Mistake 2: Skipping the Cleaning Step
Failing to soak and scrub bones results in strong, unpleasant flavors. Clean bones equal clean broth.
Mistake 3: Adding Aromatics Too Early
Onions and garlic boiled for 12 hours turn bitter. Add them halfway through.
Mistake 4: Not Topping Up Water
Letting bones stick out above the waterline leads to uneven extraction. Keep everything submerged.
Mistake 5: Overseasoning
Remember — the broth is only one component of ramen. Let tare control the salt level.
Avoid these, and you’re already ahead of most home cooks.
How to Store and Freeze Tonkotsu Broth
Made a big batch? Perfect. Tonkotsu stores beautifully.
Refrigeration
- Cool completely before storing.
- Keep in airtight containers.
- Lasts 3–4 days in the fridge.
You’ll notice a thick gelatin texture once chilled. That’s a good sign. It means collagen extraction was successful.
Freezing
- Portion into freezer-safe bags or containers.
- Freeze up to 3 months.
- Leave headspace for expansion.
Reheating Tips
Reheat gently over medium heat while stirring. If it looks separated, whisk or blend briefly to re-emulsify.
The broth should return to its creamy consistency once heated.
Nutritional Benefits of Tonkotsu Broth
Tonkotsu is indulgent, but it also carries nutritional value.
Rich in Collagen
Long boiling extracts gelatin, which supports:
- Joint health
- Skin elasticity
- Gut lining support
Protein Content
Bone marrow and meat contribute protein, making it more satisfying than lighter broths.
Caloric Considerations
Yes, it contains fat. But fat carries flavor and promotes satiety. Moderation is key.
Think of tonkotsu as comfort food with structure — hearty, nourishing, and deeply satisfying.
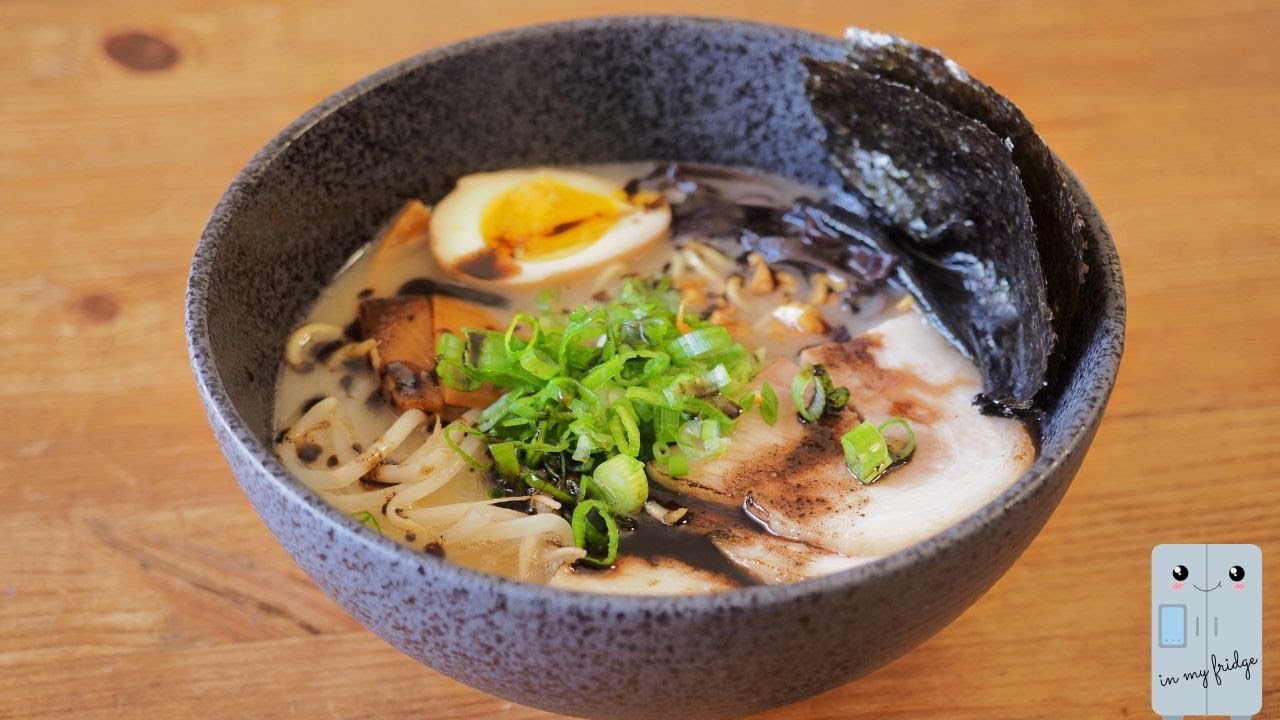
How to Use Tonkotsu Broth in Ramen
The broth alone is powerful, but ramen is about balance.
Build Your Bowl Like a Pro
- Add tare (soy sauce base or salt base) to bowl.
- Pour in hot tonkotsu broth.
- Add cooked ramen noodles.
- Top with garnishes.
Best Toppings
- Chashu pork
- Soft-boiled marinated egg
- Wood ear mushrooms
- Green onions
- Nori
- Chili oil
Best Noodles
Thin, straight noodles work best. They hold up to rich broth and cook quickly.
Every bowl becomes customizable. The broth is your foundation.
Flavor Variations You Can Try
Once you master classic tonkotsu, experimentation becomes fun.
Spicy Tonkotsu
Add chili paste or spicy miso for heat.
Black Garlic Oil (Mayu)
Burn garlic in oil until blackened, then drizzle over ramen for smoky depth.
Miso Tonkotsu
Blend miso paste with tare for added umami and body.
Garlic-Forward Version
Add roasted garlic toward the end for a sweeter, deeper aroma.
Small tweaks create entirely new experiences.
Serving Suggestions and Pairings
A bowl of tonkotsu ramen is satisfying alone, but pairing enhances the experience.
Side Dishes
- Gyoza (pan-fried dumplings)
- Edamame
- Seaweed salad
Beverages
- Cold Japanese beer
- Green tea
- Light sake
Keep it simple. Let the broth shine.
FAQs about Tonkotsu Broth Recipe
1. Why is my tonkotsu broth not milky?
This usually means the broth wasn’t boiled hard enough. Tonkotsu requires a strong, rolling boil to emulsify fat and collagen into the liquid. A gentle simmer will not produce the signature milky color.
2. Can I make tonkotsu in a pressure cooker?
Yes. A pressure cooker can significantly reduce cooking time to about 3–4 hours. While convenient, traditional stovetop boiling often develops slightly deeper flavor due to longer exposure and evaporation.
3. Do I need pork trotters?
They’re not mandatory, but highly recommended. Pork trotters are rich in collagen, which gives tonkotsu its thick body and creamy mouthfeel. You can combine them with marrow or neck bones for best results.
4. Can I freeze tonkotsu broth?
Absolutely. Let the broth cool completely, then store it in airtight containers. It freezes well for up to 3 months without losing quality.
5. Why does the broth turn gelatinous when cold?
This is a good sign. The gelatinous texture comes from collagen extracted during cooking. Once reheated, the broth will return to a smooth liquid consistency.
Conclusion
Tonkotsu broth isn’t fast food. It’s slow food. It demands patience, attention, and a willingness to let time work its magic. But the reward? A deeply rich, creamy broth that transforms a simple bowl of noodles into something unforgettable.
From selecting the right bones to maintaining that essential rolling boil, every step contributes to the final flavor. Skip nothing. Respect the process. Trust the science.
Once you taste homemade tonkotsu, store-bought versions simply won’t compare. The depth, the texture, the richness — it’s all worth the wait.
Now it’s your turn. Fire up that pot and start boiling.


