Strawberry Tart Recipe: There’s something magical about biting into a strawberry tart. The combination of a buttery, crisp crust, creamy vanilla pastry filling, and the natural sweetness of fresh strawberries is simply irresistible.
In this step-by-step guide, we’ll walk you through every detail, from making the crust to arranging the strawberries just right. If you’re a beginner baker, don’t worry—we’ve got you covered with clear instructions and helpful tips at every stage.
Ready to bake like a pro? Let’s dive in.
What Is a Strawberry Tart?
A strawberry tart is a classic French dessert made up of three main components: a crisp tart shell (usually pâte sucrée), a smooth pastry cream (crème pâtissière), and a fresh strawberry topping. Sometimes it’s finished with a light glaze for shine and a little extra sweetness.
Unlike pies, tarts are typically made with a richer, sweeter crust and are baked in a shallow tart pan with removable bottoms for easy release. This dessert is loved for its elegant appearance and fresh, fruity flavor. It’s perfect for spring and summer, but honestly, it’s a hit year-round.
Why You’ll Love This Recipe
There are so many reasons to fall in love with this strawberry tart recipe. Here are just a few:
- Easy to follow: No advanced techniques needed—just basic baking skills.
- Visually stunning: Those glossy, vibrant strawberries make it look like it came from a pastry shop.
- Customizable: You can switch up the fruit, the cream, or even the crust.
- Make-ahead friendly: You can prep most parts in advance.
- Crowd-pleaser: From family dinners to dinner parties, this tart never disappoints.
Whether you’re trying to impress guests or just want a weekend baking project, this tart delivers on both flavor and looks.
Essential Tools You’ll Need
Before diving into the baking, let’s make sure your kitchen is ready. Here’s what you’ll need to get started:
- Tart Pan: Preferably one with a removable bottom for easy unmolding.
- Rolling Pin: For rolling out the tart dough evenly.
- Mixing Bowls: For preparing the dough and cream.
- Whisk: Essential for making lump-free pastry cream.
- Saucepan: For cooking the pastry cream.
- Spatula: For scraping and spreading.
- Fine Mesh Sieve: Optional, but useful for straining pastry cream.
- Pastry Brush: For glazing the tart with jam or syrup.
- Knife or Mandoline: For slicing strawberries neatly.
Having these tools at the ready will make the whole process smoother and more enjoyable.
Ingredients You’ll Need
Let’s talk ingredients. This tart is made from scratch using fresh, simple ingredients. Here’s what you’ll need for each layer:
For the Tart Crust:
- 1 1/4 cups (160g) all-purpose flour
- 1/4 cup (30g) powdered sugar
- 1/2 cup (115g) unsalted butter, cold and cubed
- 1 egg yolk
- 1–2 tablespoons ice-cold water
- Pinch of salt
For the Pastry Cream:
- 2 cups (480ml) whole milk
- 1/2 cup (100g) granulated sugar
- 4 egg yolks
- 1/4 cup (30g) cornstarch
- 1 tsp vanilla extract or 1 vanilla bean
- 2 tablespoons unsalted butter
For the Topping:
- 1–1.5 lbs fresh strawberries, hulled and halved
- 2 tablespoons apricot jam or neutral jelly (for glazing)
- 1 tablespoon water
Fresh ingredients = best results. If strawberries aren’t in season, you can mix in other berries or stone fruits too.
How to Choose the Best Strawberries
The strawberries are the star of this tart, so choosing the right ones makes all the difference. Here’s what to look for:
- Bright Red Color: The deeper the red, the sweeter the strawberry.
- No White Tips: A white tip means the berry was picked too early.
- Fragrance: A sweet smell is a good sign of ripe, flavorful berries.
- Firm, Not Mushy: Soft spots mean they’re overripe or starting to go bad.
- In-Season Is Best: Peak season is late spring to early summer for most regions.
Wash them gently just before using, and pat them dry thoroughly. Water on the fruit can ruin the glaze and make your tart soggy.
Step-by-Step Guide to Making Strawberry Tart
Let’s break this recipe down into bite-sized steps so nothing feels overwhelming. We’ll start with the crust, move on to the pastry cream, and finish with assembly and decoration.
1. Make the Tart Crust
Step 1: Prepare the Dough
In a large mixing bowl, whisk together the flour, powdered sugar, and a pinch of salt. Add in the cold, cubed butter and cut it in using your fingers or a pastry cutter until it resembles coarse breadcrumbs. Stir in the egg yolk and just enough ice water to bring the dough together.
Form it into a disk, wrap in plastic wrap, and refrigerate for at least 30 minutes. Chilling helps prevent shrinking and keeps it flaky.
Step 2: Roll and Shape
On a lightly floured surface, roll out the chilled dough into a 10–11 inch circle, about 1/8 inch thick. Carefully place it into your tart pan, pressing it into the edges and trimming the excess. Prick the bottom with a fork to prevent bubbling.
Step 3: Blind Bake
Preheat the oven to 375°F (190°C). Line the tart shell with parchment paper and fill with pie weights or dried beans. Bake for 15 minutes, remove the weights, and bake for another 10 minutes or until golden brown. Let it cool completely.
2. Make the Pastry Cream
Here comes the creamy heart of your tart—the pastry cream. Silky, rich, and full of vanilla flavor, it complements the sweetness of the strawberries perfectly.
Step 4: Heat the Milk
Pour the milk into a medium saucepan. If you’re using a vanilla bean, split it and scrape the seeds into the milk, then toss in the pod as well. Heat the milk over medium heat until it just starts to steam—don’t let it boil.
Step 5: Whisk the Egg Mixture
While the milk is heating, whisk the egg yolks, sugar, and cornstarch in a mixing bowl until it becomes pale and slightly thickened. This helps ensure your cream is super smooth and free of lumps.
Step 6: Temper the Eggs
Now for the important part—tempering. Slowly pour about 1/3 of the hot milk into the egg mixture, whisking constantly. This warms up the eggs gently so they don’t scramble when cooked.
Step 7: Thicken the Cream
Pour the egg mixture back into the saucepan with the remaining milk. Cook over medium heat, whisking constantly, until the mixture thickens and starts to bubble. This usually takes about 4–5 minutes.
Once thickened, remove from the heat and whisk in the butter and vanilla extract (if not using a bean). Transfer to a bowl, cover with plastic wrap directly touching the surface to prevent a skin from forming, and chill in the fridge for at least 1 hour.
3. Assemble the Tart
You’ve done the hard work. Now comes the fun part—putting it all together.
Step 8: Spread the Pastry Cream
Once the tart crust is completely cool and your pastry cream is chilled and set, spoon the cream into the crust. Use a spatula to smooth it into an even layer, going all the way to the edges.
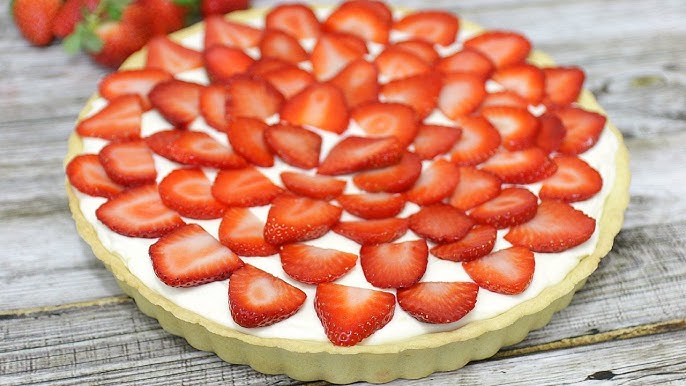
Step 9: Add the Strawberries
Now, arrange your sliced or halved strawberries on top of the cream. You can go for a decorative spiral pattern, rings, or just keep it rustic—whatever fits your style. Try to place the largest pieces in the center and fan outward.
Step 10: Glaze for Shine
To get that glossy bakery look, warm your apricot jam and water together until liquid. Strain it if needed. Use a pastry brush to gently coat the tops of the strawberries. This adds shine and helps preserve the fruit.
Now place the tart in the fridge for at least 30 minutes before serving to allow everything to set nicely.
Tips for a Perfect Strawberry Tart
- Chill every component: Cold dough, cold cream, cold tart shell—this keeps your tart from becoming soggy or collapsing.
- Don’t overwork the crust: Handle it just enough to bring it together. Overmixing creates a tough base.
- Use fresh, ripe fruit: Don’t compromise on this. The better the strawberries, the better the tart.
- Let your tart rest before serving: Giving it some fridge time helps meld all the flavors together.
- Use a removable bottom pan: Makes it easier to remove the tart without breaking the crust.
These little tips can turn a good tart into a great one.
Common Mistakes to Avoid
- Burning the crust: Watch closely during the second bake—once the weights are removed, the crust can brown quickly.
- Undercooking the pastry cream: Make sure it thickens on the stove or it’ll be runny in the tart.
- Not chilling the dough: This leads to shrinkage during baking.
- Soggy bottom: Always cool the crust before adding filling, and don’t overload it with too much cream or watery fruit.
- Unripe strawberries: They look pretty but taste bland. Go for flavor first.
Make-Ahead and Storage Tips
Want to break this into manageable parts? No problem.
- Crust: Can be made and blind-baked up to 2 days in advance. Store in an airtight container at room temp.
- Pastry Cream: Make it a day ahead and store in the fridge.
- Assembled Tart: Best eaten the same day, but will keep in the fridge for up to 2 days.
Just know that the longer it sits, the softer the crust will become due to the moisture from the cream and fruit.
Variations You Can Try
Want to mix things up? Try one of these delicious spins:
- Mixed Berry Tart: Add raspberries, blueberries, and blackberries for a colorful twist.
- Chocolate Pastry Cream: Stir in melted chocolate at the end of the cream-making process for a decadent version.
- Nutty Crust: Add almond flour to your crust for extra richness.
- Citrus Glaze: Mix lemon or orange zest into your glaze for a zippy flavor boost.
Each variation brings a new personality to the classic tart, making it a dessert you’ll never get tired of.
Nutritional Information (Estimated per Slice)
| Component | Amount |
|---|---|
| Calories | 280–320 |
| Carbs | 38g |
| Sugars | 22g |
| Fat | 15g |
| Protein | 4g |
| Fiber | 2g |
Note: These values are estimates and vary based on portion size and exact ingredients.
Pairing Suggestions
Wondering what to serve with your tart? Here are a few tasty ideas:
- Coffee or espresso: Cuts through the sweetness and balances the flavors.
- Champagne or Prosecco: A sparkling option for celebrations.
- Lemon sorbet: For a bright and citrusy contrast.
- Vanilla whipped cream: Light and fluffy addition for extra indulgence.
FAQs about Strawberry Tart Recipe
1. Can I use frozen strawberries for this tart?
Fresh is best, but if using frozen, thaw and drain them well to avoid excess moisture.
2. How long will the tart last in the fridge?
Up to 2 days, though it’s best enjoyed within the first 24 hours for peak freshness.
3. Can I use a store-bought crust?
Yes, if you’re short on time. Just blind bake it according to package instructions.
4. How do I prevent the crust from getting soggy?
Cool the crust completely before adding cream, and make sure your strawberries are dry.
5. Can I make this tart vegan?
You can! Use plant-based butter, dairy-free milk, and a vegan custard recipe in place of the pastry cream.
Conclusion
Making a strawberry tart from scratch might seem intimidating at first, but once you try it, you’ll see it’s all about layering simple elements into one beautiful dessert. From the crisp shell to the creamy filling and that bright, fresh fruit on top—it’s a harmony of flavors and textures that’s hard to beat.
So next time strawberries are in season, skip the grocery store pastries and make this one at home. You’ll not only impress your guests but also yourself.


