St. Louis-Style Ribs Recipe: There’s nothing quite like the flavor-packed experience of biting into a perfectly cooked rack of St. Louis-style ribs. Known for their meaty texture, balanced marbling, and straight cut, these ribs are a barbecue favorite.
Whether you’re a pitmaster-in-training or a home cook who loves a good weekend cookout, this guide will walk you through every single step to achieving rib perfection—from selecting your meat to serving it on the plate.
Get your tongs ready—this one’s going to be finger-lickin’ good.
What Are St. Louis-Style Ribs?
St. Louis-style ribs are pork spare ribs that have been trimmed into a rectangular shape by removing the sternum bone, cartilage, and rib tips. What’s left is a uniform slab that cooks more evenly and is easier to eat. These ribs have more fat and connective tissue than baby back ribs, which makes them incredibly flavorful when cooked slowly over low heat. Their shape and meatiness make them the go-to choice for BBQ competitions and family cookouts alike.
You can think of St. Louis ribs as the perfect middle ground—less curved than baby back ribs but leaner and more manageable than full spare ribs. The flavor? Deep, porky, and perfect for smoke absorption.
Why Choose St. Louis-Style Ribs?
Why are so many barbecue pros and backyard chefs obsessed with this cut? Simple:
- Flavor: The extra fat and marbling make them naturally juicy.
- Shape: Their rectangular cut makes for an even cook and a beautiful presentation.
- Versatility: Whether you’re smoking, grilling, or oven-roasting, these ribs perform.
- BBQ-Friendly: The meat holds up to bold dry rubs, heavy smoke, and tangy sauces.
Once you’ve had these ribs slow-cooked to perfection, with a sticky glaze and tender pull, it’s hard to go back.
Difference Between St. Louis-Style and Baby Back Ribs
People often confuse the two, but they’re quite different:
| Feature | St. Louis-Style Ribs | Baby Back Ribs |
|---|---|---|
| Cut | Lower portion of the rib cage | Upper portion (near the spine) |
| Shape | Rectangular and flat | Curved |
| Fat Content | Higher, more marbling | Leaner |
| Flavor | Rich and porky | Mild |
| Cook Time | Slightly longer | Shorter |
| Meatiness | Meatier with more connective tissue | Less meat but more tender |
If you love juicy, flavorful bites and don’t mind a bit of chew, St. Louis-style ribs are your best bet.
Best Time to Make These Ribs
There’s no wrong time for BBQ, but these ribs shine in:
- Summer cookouts
- Fourth of July celebrations
- Father’s Day meals
- Tailgating parties
- Weekend backyard hangs
They’re also great for meal prepping and can be reheated easily.
List of Ingredients You’ll Need
Getting the flavors right starts with the right ingredients. Here’s what you’ll need:
Dry Rub Ingredients
- 1/4 cup brown sugar
- 2 tbsp smoked paprika
- 1 tbsp chili powder
- 1 tbsp black pepper
- 1 tbsp salt
- 1 tbsp garlic powder
- 1 tbsp onion powder
- 1/2 tsp cayenne pepper (optional, for heat)
Barbecue Sauce Options
- Your favorite store-bought sauce OR
- Homemade BBQ sauce:
- 1 cup ketchup
- 1/4 cup apple cider vinegar
- 1/4 cup brown sugar
- 1 tbsp Worcestershire sauce
- 1 tsp smoked paprika
- Salt and pepper to taste
Optional Add-ons
- Apple juice or apple cider (for spritzing)
- Mustard (as a binder before applying the rub)
- Aluminum foil or butcher paper (for wrapping)
Tools and Equipment You’ll Need
Here’s what will make the job easier:
- Charcoal grill, smoker, or oven
- Meat thermometer
- Tongs
- Aluminum foil
- Basting brush
- Sharp knife
- Cutting board
- Spray bottle for apple juice
How to Select the Best Ribs at the Store
Don’t just grab the first pack you see. Look for:
- Even thickness: Avoid ribs that are thick on one end and thin on the other.
- Good marbling: A little fat = a lot of flavor.
- No tears or discoloration: The meat should be pinkish-red, not gray or dry-looking.
- Bone visibility: Bones should be visible but not sticking out.
How to Prepare the Ribs
Removing the Membrane
That tough, silvery membrane on the bone side? It’s gotta go. Use a butter knife to lift it, grab with a paper towel, and pull.
Trimming Excess Fat
Use a sharp knife to remove large chunks of fat or hanging bits of meat. The goal is a smooth, uniform slab.
Step-by-Step Guide to Cooking St. Louis-Style Ribs
Let’s break down the process into foolproof steps:
Step 1: Prepping the Ribs with a Dry Rub
Remove the membrane from the back of the ribs for better tenderness. Pat the ribs dry, then coat generously with a dry rub made from salt, brown sugar, paprika, black pepper, garlic powder, and onion powder. Massage the rub into both sides.
Step 2: Letting the Ribs Marinate
Wrap the ribs tightly in plastic wrap or place in a covered container. Refrigerate for at least 2 hours, or overnight for deeper flavor. This allows the seasoning to penetrate the meat.
Step 3: Preheating Your Grill or Smoker
Preheat your grill or smoker to 110–120°C (225–250°F). Set it up for indirect heat. If smoking, add wood chunks or chips (apple or hickory work well).
Step 4: Cooking Low and Slow
Place the ribs bone-side down over indirect heat. Cook for about 2½–3 hours, maintaining steady temperature. The meat should slowly tenderize and pull back slightly from the bones.
Step 5: Wrapping the Ribs in Foil (Texas Crutch Method)
Wrap the ribs tightly in foil with a splash of apple juice, broth, or butter. Return to the grill and cook for another 45–60 minutes. This step locks in moisture and speeds up tenderness.
Step 6: Adding the Sauce
Unwrap the ribs carefully and place them back on the grill. Brush generously with barbecue sauce. Cook uncovered for 20–30 minutes, allowing the sauce to set without burning.
Step 7: Finishing the Ribs
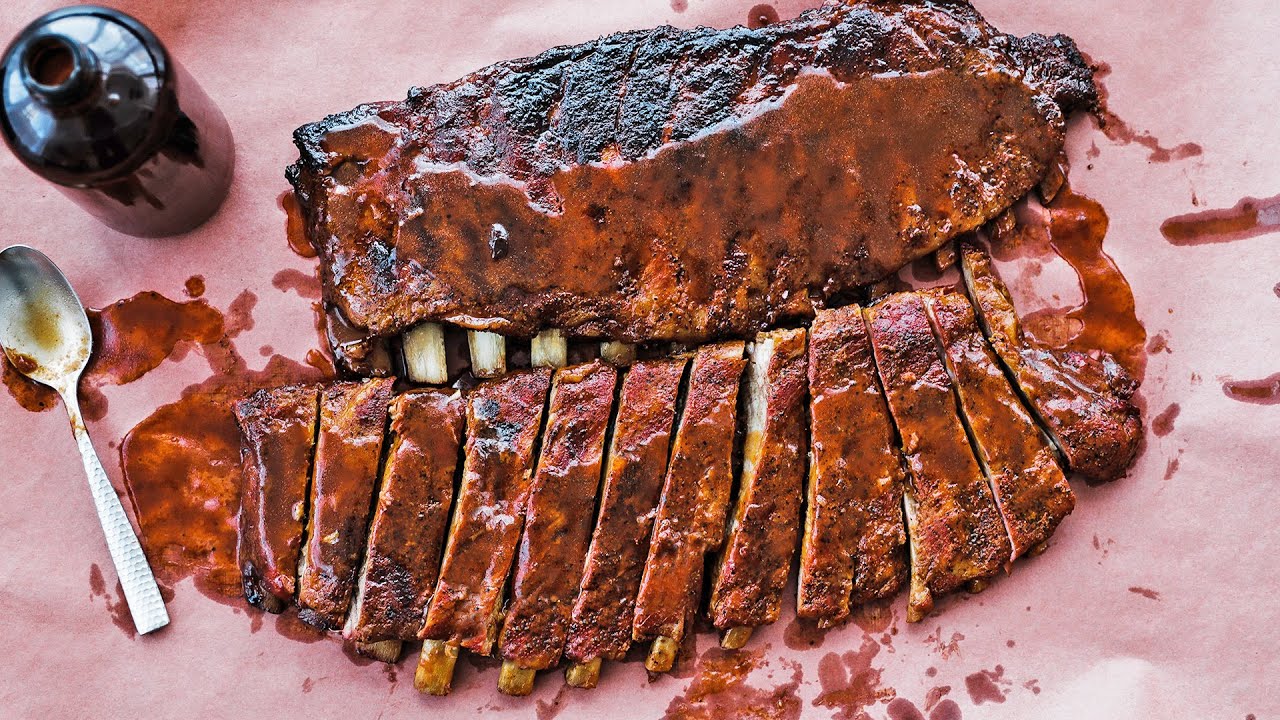
Increase heat slightly for the final few minutes to caramelize the sauce. The ribs are done when tender, glossy, and the meat easily pulls from the bone. Rest for 10 minutes before slicing and serving.
Smoky, tender, and finger-licking good—classic St. Louis-style ribs done right. 🍖🔥
How to Know When Ribs Are Done
Don’t rely just on time—look for these signs:
- Bend test: Pick up the rack with tongs in the center. It should bend easily and form small cracks in the bark.
- Toothpick test: A toothpick should slide into the meat with no resistance.
- Internal temp: Ribs are safe to eat at 190°F, but most pitmasters go to 195–203°F for peak tenderness.
Avoid overcooking—ribs should have a slight pull but not completely fall apart unless that’s your style.
Tips for Perfect St. Louis-Style Ribs Every Time
Want to master ribs every time you fire up the grill? Keep these expert tips in mind:
- Trim evenly: Uniform ribs cook more evenly.
- Don’t skip the membrane removal: That stuff gets tough and chewy when cooked.
- Use a binder: Mustard or olive oil helps the rub stick and doesn’t affect flavor.
- Low and slow is key: High heat will dry them out.
- Don’t over-sauce: Let the meat shine.
- Rest before slicing: Juices redistribute for better flavor.
Practice makes perfect, but these tricks will set you up for success.
Best BBQ Sauces for These Ribs
You’ve got options, and the sauce you choose can take your ribs to the next level.
Here are a few top picks:
- Sweet and Tangy: Brown sugar, ketchup, vinegar—classic KC-style.
- Spicy: Add cayenne or hot sauce for a kick.
- Smoky: Use chipotle peppers or smoked paprika.
- Mustard-Based: Great for a Carolina twist.
Or go bold and make your own. Customize the flavor to your liking and impress everyone at the table.
Serving Suggestions
Pair these ribs with crowd-pleasing sides to round out your meal:
- Classic coleslaw
- Macaroni and cheese
- Grilled corn on the cob
- Baked beans
- Cornbread
- Pickles or pickled onions
Don’t forget extra napkins—it’s about to get messy in the best way possible.
Storage and Reheating Tips
If you have leftovers (a rare thing), here’s how to handle them:
- Storage: Wrap in foil or place in an airtight container. Keep in the fridge for up to 4 days.
- Freezing: Store in freezer-safe bags for up to 3 months.
- Reheating:
- Oven: Wrap in foil and heat at 300°F for 20 minutes.
- Grill: Reheat over indirect heat for about 10–15 minutes.
- Microwave: Use with caution—add a bit of water and cover.
Common Mistakes to Avoid
Avoid these rookie errors:
- Not removing the membrane
- Too much heat too fast
- Skipping the resting step
- Using cold meat on the grill
- Over-saucing too early
- Not using a thermometer
Cooking ribs isn’t difficult—it’s just about patience and attention to detail.
FAQs about St. Louis-Style Ribs Recipe
1. Can I cook St. Louis-style ribs in the oven instead of on the grill?
Absolutely! Use the same low-and-slow method. Bake at 250°F, follow all wrapping and saucing steps, and broil at the end to caramelize the glaze.
2. How long should I marinate the ribs before cooking?
Overnight is ideal, but even 1–2 hours will help the rub absorb into the meat.
3. What’s the best wood to smoke St. Louis-style ribs?
Applewood and hickory are excellent choices. Cherrywood adds a beautiful color and mild sweetness.
4. Are St. Louis ribs supposed to fall off the bone?
They should be tender, but a slight pull from the bone is preferred for proper texture. Overcooked ribs fall apart completely.
5. Can I make these ribs ahead of time?
Yes! Cook and cool them, then reheat just before serving. They’re even better the next day.
Conclusion
There you have it—the complete, no-fail, step-by-step guide to making St. Louis-style ribs that will leave your friends and family asking for seconds. With the perfect balance of spice, smoke, and sweetness, these ribs are an iconic dish that turns any day into a BBQ celebration. Now that you know how to master the cut, apply the rub, cook low and slow, and finish strong, you’re officially ready to impress at your next cookout.
So fire up that grill, gather your ingredients, and let’s make some mouthwatering magic happen.


