Filipino Spanish Bread Recipe: If you’ve ever been to a Filipino bakery, chances are you’ve come across a soft, golden roll filled with a buttery-sweet surprise—that’s Spanish Bread. And guess what? You don’t have to fly to the Philippines or make a bakery run to get it.
With this in-depth step-by-step guide, you’ll learn how to make authentic Filipino Spanish Bread right at home. This recipe is cozy, delicious, and oh-so-satisfying!
What is Filipino Spanish Bread?
Despite the name, Filipino Spanish Bread isn’t directly from Spain. Instead, it’s a legacy of the Spanish colonial era that has evolved into a Filipino favorite. Imagine a soft, fluffy bread roll filled with a sweet, buttery filling rolled in breadcrumbs. It’s usually enjoyed as a merienda (snack), paired with hot coffee or cocoa.
This isn’t your typical savory bread. It’s subtly sweet and known for that signature swirl when you bite into it. It’s like the sweet cousin of a dinner roll—with a gooey surprise in every bite. The best part? You can make a whole batch and freeze some for later!
A Brief History of Spanish Bread in the Philippines
The Philippines was colonized by Spain for over 300 years, and during that time, Spanish influence seeped into Filipino food culture—especially in baking. While “Spanish Bread” as we know it today doesn’t exist in Spain, the concept of stuffed bread rolls is very European. Filipinos took the idea and gave it a twist: soft enriched dough with a sweet, buttery breadcrumb filling.
Over time, this humble bread became a staple in panaderias (local bakeries) all over the country. Today, it remains one of the most nostalgic comfort foods for many Filipinos.
Why You’ll Love This Homemade Spanish Bread
Let’s be real—bakery bread is good, but homemade bread? That’s love baked into every bite. Making Filipino Spanish Bread at home gives you full control over the ingredients, the texture, and the flavor. Want it more buttery? Go for it. Prefer a richer filling? You’re the boss.
Here’s why this recipe is worth your time:
- It’s beginner-friendly (yes, even if it’s your first time baking!)
- The dough is soft and easy to work with.
- The filling is rich, buttery, and addictively sweet.
- It fills your kitchen with a bakery-style aroma you’ll never forget.
What Makes Filipino Spanish Bread Unique?
Unlike other filled breads, Spanish Bread has a few defining traits:
- Buttery, sweet filling made with breadcrumbs, sugar, and margarine or butter.
- Soft, enriched dough similar to brioche, made with eggs and milk.
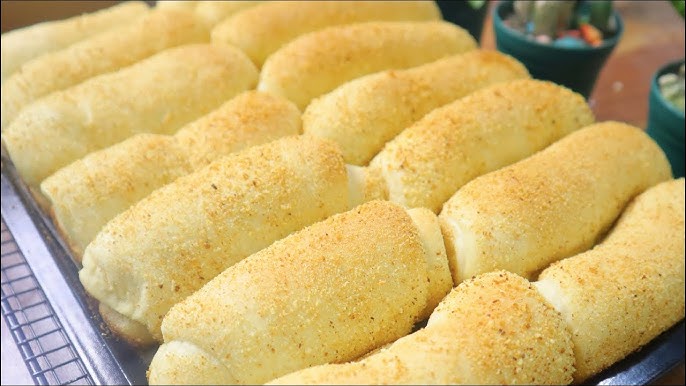
- Signature spiral shape, rolled like a jelly roll with filling tucked inside.
- Coated in breadcrumbs before baking, giving it a rustic, golden crust.
It’s humble but heavenly—and that’s what makes it so well-loved.
List of Ingredients You’ll Need
Let’s break down everything you’ll need to make this fluffy, buttery magic happen.
For the Dough:
- 3 ½ cups all-purpose flour (plus extra for dusting)
- 1 packet (2 ¼ tsp) active dry yeast
- ¼ cup white sugar
- ¾ cup warm milk (not hot!)
- ¼ cup unsalted butter, melted
- 2 large eggs, room temperature
- ½ tsp salt
For the Filling:
- ½ cup breadcrumbs (fine)
- ⅓ cup brown sugar
- ¼ cup unsalted butter or margarine, softened
- 1 tbsp all-purpose flour
- 1 tsp vanilla extract (optional, but adds aroma)
You’ll also need some extra breadcrumbs to roll the dough before baking.
Essential Kitchen Tools for Making Spanish Bread
Before we jump into the steps, here are some tools that will make life easier:
- Mixing bowls (at least two)
- Measuring cups and spoons
- Stand mixer or hand mixer (optional)
- Clean kitchen towel or plastic wrap (for proofing)
- Rolling pin
- Baking tray
- Parchment paper or silicone baking mat
- Pastry brush (for butter or egg wash)
Step-by-Step Guide to Making Filipino Spanish Bread
This is where the magic happens. Follow these detailed steps and take your time—bread rewards patience!
Step 1: Preparing the Dough
In a large bowl, combine flour, sugar, salt, yeast, warm milk, egg, and melted butter. Mix until a soft dough forms. The dough should be slightly sticky but manageable.
Step 2: Kneading the Dough
Transfer the dough to a lightly floured surface and knead for 8–10 minutes until smooth, elastic, and no longer sticky. Proper kneading develops gluten, giving the bread a soft texture.
Step 3: Letting the Dough Rise
Place the dough in a greased bowl, cover, and let it rise for 1–1½ hours, or until doubled in size. Keep it in a warm, draft-free area for best results.
Step 4: Making the Spanish Bread Filling
In a bowl, mix softened butter, brown sugar, breadcrumbs, and a little milk. Stir until the mixture is creamy and spreadable. This sweet filling is what gives Spanish bread its signature flavor.
Step 5: Dividing and Shaping the Dough
Punch down the risen dough and divide it into equal portions. Roll each piece into a ball, then flatten into a small oval or rectangle using a rolling pin.
Step 6: Rolling and Filling
Spread a thin layer of filling over the dough, leaving the edges clear. Roll tightly from one end to the other and pinch the seam to seal.
Step 7: Second Rise
Place the rolls seam-side down on a lined baking tray. Cover loosely and let them rise for 30–45 minutes until slightly puffy.
Step 8: Baking the Spanish Bread
Bake in a preheated oven at 180°C (350°F) for 15–18 minutes, or until golden brown. Cool slightly and serve warm for a soft, buttery Filipino treat. 🥖✨
Tips for Perfect Spanish Bread Every Time
Making bread can seem intimidating, but here are some solid tips to help you out:
- Check your yeast: Always test your yeast before mixing. Expired or inactive yeast is the #1 reason for dense bread.
- Don’t over-flour: Sticky dough is normal. Adding too much flour makes the bread tough and dry.
- Let it rise in a warm, draft-free space: Yeast loves warmth. If your kitchen is cold, your oven with just the light on works wonders.
- Cool completely before storing: Steam can make bread soggy if packed too soon.
- Practice makes perfect: If the first batch isn’t perfect, don’t give up. Each attempt teaches you something new.
Common Mistakes to Avoid
Even seasoned bakers slip up. Here’s what to avoid when making Filipino Spanish Bread:
- Skipping the first rise: This is crucial for fluffy bread. Don’t rush it!
- Over-filling the rolls: It may seem like a good idea, but too much filling can cause leaks and make the bread soggy.
- Using cold ingredients: Cold milk or eggs can slow down your yeast. Use room temperature ingredients whenever possible.
- Underbaking: If the bread looks pale, it’s probably underbaked inside. Bake until golden and hollow-sounding when tapped.
- Overcrowding the pan: Leave enough space between rolls so they can expand properly.
Can You Make Spanish Bread Without a Mixer?
Absolutely. While a stand mixer helps with kneading, you can totally make this bread by hand. It might take a little more effort, but the results are just as rewarding.
Here’s what to keep in mind if going mixer-free:
- Knead on a floured surface to prevent sticking.
- Use the heel of your hand to stretch and fold the dough.
- Be patient. Hand-kneading can take up to 15 minutes to reach the right texture.
Need a workout? Making Spanish Bread by hand is a great way to get it done!
Variations of Spanish Bread You Should Try
Once you’ve mastered the classic version, it’s time to get creative. Here are some tasty twists to try:
- Ube Spanish Bread: Add a layer of ube halaya (purple yam jam) to the filling.
- Cheese-Filled: Add shredded cheddar cheese or cream cheese to the butter mixture.
- Nutty Delight: Sprinkle crushed cashews or walnuts inside for crunch.
- Cinnamon Sugar: Mix a little cinnamon into the filling for a warm, spiced twist.
- Chocolate Swirl: A spoonful of chocolate spread makes it dessert-worthy.
Don’t be afraid to experiment. Filipino bread culture is all about fusing flavors and memories.
How to Store and Reheat Spanish Bread
If you somehow don’t finish the whole batch (rare!), here’s how to keep them fresh:
Storage Tips:
- Keep in an airtight container or zip-lock bag at room temperature for up to 3 days.
- For longer storage, freeze in a zip-lock bag for up to 2 months.
Reheating Tips:
- Microwave: Wrap in a damp paper towel and microwave for 10-15 seconds.
- Oven/Toaster Oven: Reheat at 300°F (150°C) for 5-7 minutes until warm.
Avoid storing in the fridge—it dries the bread out.
Is Filipino Spanish Bread Vegan or Gluten-Free?
Short answer: not by default, but you can make adjustments.
To make it vegan:
- Swap butter with plant-based margarine.
- Use plant-based milk (like soy or almond).
- Replace eggs with flaxseed meal (1 tbsp flaxseed + 3 tbsp water = 1 egg).
To make it gluten-free:
- Use a gluten-free flour blend that’s made for baking.
- Keep in mind: gluten-free dough behaves differently, so expect changes in texture.
While the classic version contains dairy, eggs, and gluten, there’s always room to adapt this recipe to suit your needs.
FAQs about Filipino Spanish Bread Recipe
How long does Filipino Spanish bread last?
At room temperature in an airtight container, Spanish Bread stays fresh for about 2–3 days. For longer shelf life, freeze them, and they’ll be good for up to 2 months.
Can I freeze Spanish bread?
Yes! Allow them to cool completely, then wrap each roll in plastic wrap and store in a freezer-safe bag. When you’re ready to eat, thaw and reheat as needed.
Can I use a bread machine for this recipe?
Absolutely. Use the dough setting to mix and knead the dough, then remove, fill, and shape by hand. The bread machine is great for saving time during the initial steps.
Why is my dough too sticky?
Sticky dough is normal in enriched breads. If it’s unmanageable, sprinkle in 1 tablespoon of flour at a time, but avoid adding too much or the bread will come out dry.
Is there a healthier version of Spanish bread?
You can tweak the recipe by using whole wheat flour (partially), less sugar, or a plant-based butter. But remember, it’s a treat—balance is key!
Conclusion
Making Filipino Spanish Bread from scratch isn’t just about baking—it’s about bringing comfort and joy into your kitchen. This soft, sweet, buttery bread is a symbol of Filipino warmth and hospitality, best enjoyed with loved ones or savored during a quiet afternoon snack.
You don’t have to be a pro baker to make these. Just follow the steps, trust the process, and enjoy the ride (and the delicious smells). Once you get a taste of warm, freshly baked Spanish Bread, you’ll understand why it’s such a beloved treat.
Now go ahead—roll up your sleeves, gather your ingredients, and get baking!


