Soft Pretzels Recipe: Craving something warm, golden, and delightfully chewy? There’s nothing quite like a fresh-baked soft pretzel.
Whether you remember getting one at a ball game, a street cart, or your favorite bakery, soft pretzels are the ultimate comfort snack. But did you know you can make them right at home—no fancy equipment needed?
This guide will walk you through exactly how to create bakery-quality soft pretzels from scratch, with simple ingredients and a lot of love.
Why Make Homemade Soft Pretzels?
Sure, you could run to the store or pick one up at your local bakery, but there’s something truly satisfying about making soft pretzels from scratch. First off, they taste ten times better fresh out of your oven—crispy on the outside, soft and warm inside. You also control the ingredients, so they’re free from preservatives, additives, and unnecessary sugars. Plus, shaping pretzels is oddly therapeutic (and kids love helping too).
Homemade pretzels are also versatile. Craving something sweet? Dust them with cinnamon sugar. Prefer savory? Load them up with shredded cheese or everything bagel seasoning. The possibilities are endless when you’re the baker. Most importantly, baking these will make your whole house smell amazing—who can resist that?
List of Ingredients You’ll Need
Let’s talk pantry essentials. To get started on your soft pretzel adventure, you only need a few simple ingredients. Most are already sitting in your kitchen.
Basic Ingredients
- All-purpose flour – 4 cups (spooned and leveled)
- Active dry yeast – 1 packet (2 ¼ teaspoons)
- Warm water – 1 ½ cups (110°F or warm to the touch)
- Salt – 1 ½ teaspoons (plus more for topping)
- Sugar – 1 tablespoon (to activate the yeast)
- Unsalted butter – 2 tablespoons (melted)
For the Baking Soda Bath
- Baking soda – ½ cup
- Water – 8 cups
This step is crucial—it’s what gives pretzels that iconic chewy crust and golden-brown color.
Optional Toppings
- Coarse sea salt
- Cinnamon sugar
- Grated Parmesan
- Everything bagel seasoning
- Shredded cheddar
- Garlic powder
You can even go wild with stuffed pretzels later—think cheese-filled or Nutella-filled creations.
Essential Kitchen Tools for Pretzel Making
You don’t need anything fancy, but a few tools make the job much easier:
- Mixing bowls – Large enough for kneading and rising
- Measuring cups and spoons – Accuracy matters!
- Stand mixer with dough hook (optional but helpful)
- Slotted spoon – For lifting pretzels from the soda bath
- Baking sheet – Lined with parchment paper
- Pastry brush – To brush melted butter or egg wash
- Cooling rack – Keeps pretzels crisp while cooling
Having these tools ready will streamline the process and make cleanup a breeze.
The Science Behind Pretzel Dough
Pretzel dough isn’t that different from basic bread dough—until you introduce it to a baking soda bath. That step is what sets pretzels apart. Here’s the science in simple terms:
- Yeast: It eats sugar, creates gas, and makes your dough rise. Think of it like the air pump for your fluffy pretzels.
- Gluten: The structure. Kneading develops gluten, giving pretzels their chewy texture.
- Baking Soda Bath: The high-alkaline environment transforms the outer layer of dough, setting the crust before baking and creating that deep golden brown, slightly crisp shell.
It’s like turning a regular roll into a pretzel superhero.
How to Make Soft Pretzels at Home: Step-by-Step
Ready to get your hands floury? Let’s dive into each step in detail.
Step 1: Preparing the Dough
In a large bowl, combine warm water and sugar, then sprinkle in the yeast. Let it sit for 5–10 minutes until it gets foamy—this means the yeast is alive and well. Once foamy, stir in the melted butter and salt.
Slowly add the flour, one cup at a time, mixing until a shaggy dough forms. Knead the dough for about 8–10 minutes by hand (or 5 minutes in a stand mixer with a dough hook) until it’s smooth and elastic.
This is where you really bond with your pretzel dough—literally. If it’s too sticky, add a tablespoon of flour at a time. Too dry? A splash of water will fix it.
Step 2: Letting the Dough Rise
Place the dough in a lightly greased bowl, cover it with a clean towel or plastic wrap, and let it rise in a warm spot for 1 hour, or until it’s doubled in size.
Pro tip: If your kitchen’s a little chilly, turn on your oven light and place the dough inside (with the oven OFF). It creates a cozy proofing box.
Once risen, punch it down gently to release the air.
Step 3: Shaping the Pretzels
Divide the dough into 8 equal pieces. Roll each piece into a rope—about 20 inches long. Form a U-shape, cross the ends over, and twist to make that classic pretzel shape. Pinch the ends to the bottom of the U to secure.
Don’t stress if your first few look wonky—it takes a little practice. Rustic pretzels still taste amazing.
Step 4: The Baking Soda Bath
Preheat your oven to 450°F (230°C) and line a baking sheet with parchment paper. Bring a large pot with 8 cups of water to a boil. Slowly add ½ cup of baking soda—carefully, because it’ll bubble up like a science experiment.
Gently drop each shaped pretzel into the bath for about 20 seconds. Use a slotted spoon to lift them out and place them on your prepared baking sheet.
This bath is the secret to the pretzel’s texture and color. Skipping it would be like making pizza without cheese—just not the same.
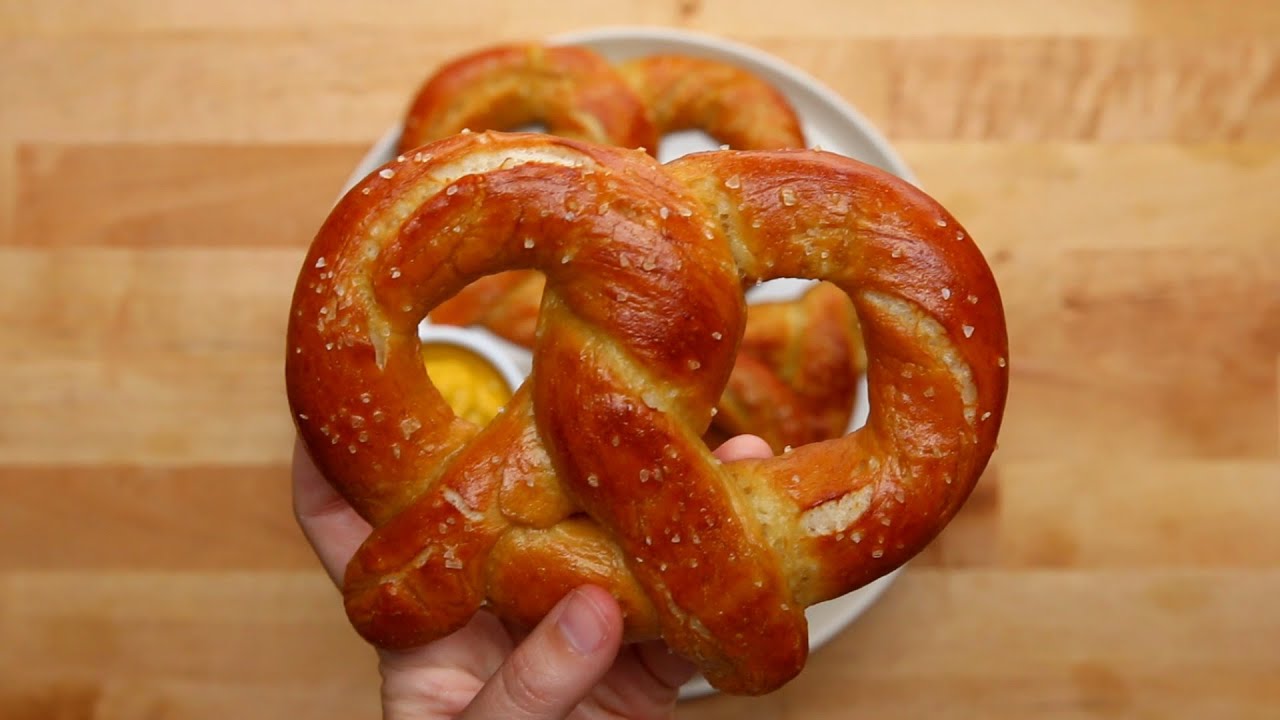
Step 5: Baking to Golden Perfection
Brush the pretzels with egg wash (1 beaten egg mixed with a splash of water) for that shiny, golden finish. Sprinkle with coarse salt or your favorite toppings.
Bake in the preheated oven for 12–15 minutes, or until beautifully golden brown. The smell alone will have everyone hovering around the kitchen.
Once baked, let them cool slightly on a wire rack (if you can wait). Serve warm and enjoy every chewy, salty, buttery bite.
Common Mistakes to Avoid
Even though making soft pretzels at home is pretty straightforward, there are a few common mistakes that can affect your final results. Let’s walk through what not to do so your pretzels come out perfect every time.
1. Skipping the baking soda bath: This step might seem skippable, but it’s what gives pretzels their signature chewy crust and deep brown color. Without it, you’re essentially baking soft rolls shaped like pretzels—not quite the same.
2. Using cold water for the yeast: Yeast is picky. If your water is too cold, the yeast won’t activate. Too hot, and it’ll die. The sweet spot is around 110°F—just warm to the touch.
3. Over-flouring the dough: It’s tempting to keep adding flour if your dough feels sticky, but too much will lead to dense, dry pretzels. Knead until it’s smooth and elastic, not stiff and dry.
4. Under-kneading the dough: If you don’t knead enough, the gluten won’t develop properly, and your pretzels may turn out too soft or fall apart. Give it at least 8–10 minutes of kneading by hand.
5. Overcrowding the baking sheet: Leave space between each pretzel so they bake evenly and don’t steam each other. Crowding leads to pale, soggy bottoms—yuck.
Avoiding these pitfalls will save you frustration and guarantee chewy, golden-brown success.
Tips for the Perfect Texture and Flavor
Let’s talk about dialing in that ideal pretzel texture—chewy outside, pillowy inside—and bold, buttery flavor. Here are a few key tips:
- Use bread flour instead of all-purpose for extra chewiness. It has more protein, which helps build structure.
- Add a touch of brown sugar or honey to the dough for a subtle sweetness that balances the saltiness beautifully.
- Brush with butter right after baking. Not only does this enhance flavor, but it also gives that irresistible sheen.
- Chill your shaped pretzels in the fridge for 20 minutes before the baking soda bath. This helps them hold their shape better.
- Try beer in place of water for a grown-up twist. It adds depth and enhances the yeasty aroma.
- Use pretzel salt or flaky sea salt. Regular table salt can melt into the dough and disappear during baking.
With these hacks, your homemade pretzels will taste like they came straight from a Bavarian bakery.
Different Pretzel Shapes and Twists
Who says pretzels have to look one way? Once you’ve mastered the basic shape, try switching it up. It’s a fun way to personalize your bake and impress your friends or family.
Classic Twist: The traditional pretzel shape—make a U, cross the ends, twist, and fold down.
Pretzel Bites: Roll the dough into ropes and cut into 1-inch pieces. Boil and bake like normal. Perfect for dipping!
Pretzel Knots: Tie the dough into a simple knot. These are chunkier and great for soaking up dips.
Pretzel Sticks: Skip the twist and bake them like long breadsticks. Simple, yet super satisfying.
Pretzel Rolls or Sliders: Shape into small balls for dinner rolls or burger buns with a pretzel twist.
Get creative with it. Shapes don’t affect flavor, but they definitely boost fun and presentation.
Sweet vs. Savory Pretzel Variations
Pretzels aren’t just a salty snack. With a few tweaks, they can swing sweet too! Here’s how to create different variations that suit any craving:
Savory Variations:
- Cheddar Jalapeño Pretzels – Add shredded cheese and diced jalapeños to the dough or sprinkle on top.
- Garlic Herb – Mix minced garlic and Italian herbs into the dough or butter topping.
- Everything Pretzels – Top with everything bagel seasoning before baking.
Sweet Variations:
- Cinnamon Sugar Pretzels – Skip the salt, and once baked, brush with butter and roll in a mix of cinnamon and sugar.
- Chocolate Drizzle Pretzels – After baking, drizzle with melted chocolate or dip half of each in chocolate.
- Caramel Pretzels – Drizzle warm caramel and sprinkle with sea salt for a sweet-salty combo.
Sweet pretzels make amazing desserts or brunch treats, while savory versions pair well with meals or beer.
Dips and Sauces That Pair Perfectly
Pretzels are good on their own, but dipping them takes the experience to another level. Here are some classic and creative dips to try:
- Classic Cheese Dip – A creamy cheddar sauce made with real cheese, milk, and a little spice.
- Honey Mustard – A sweet and tangy favorite, great with both soft and crunchy pretzels.
- Beer Cheese – Rich, thick, and bold—perfect for parties.
- Marinara Sauce – Great with garlic or pizza-flavored pretzels.
- Chocolate Sauce – Ideal for cinnamon sugar pretzels.
- Cream Cheese Frosting – A sweet dip that feels like a pretzel version of cinnamon rolls.
You can also use hummus, ranch, spicy mayo, or sriracha aioli—whatever suits your taste.
Storing and Reheating Soft Pretzels
Homemade soft pretzels are best fresh, but you can definitely store and reheat them.
- Storage: Keep cooled pretzels in an airtight container at room temperature for up to 2 days. Any longer, and they’ll start to dry out.
- Reheating: Pop them in the oven at 350°F (175°C) for about 5–10 minutes. For a quicker option, microwave for 15–20 seconds and then toast in a skillet for crispiness.
- Refresh with butter: A quick brush of melted butter before reheating will bring them back to life.
Avoid storing them in the fridge, as this can dry them out faster.
Can You Freeze Homemade Pretzels?
Absolutely. Freezing pretzels is a great way to keep a batch on hand for whenever a craving hits.
To Freeze After Baking:
- Let pretzels cool completely.
- Wrap individually in plastic wrap and place in a freezer-safe bag.
- Freeze for up to 2 months.
To Reheat from Frozen:
- Bake at 350°F for 10–12 minutes or until heated through.
- Or microwave for 30–40 seconds (not as crispy, but still tasty).
To Freeze Before Baking:
- Shape the pretzels and skip the baking soda bath.
- Freeze on a baking sheet until solid, then transfer to a bag.
- When ready to bake, thaw, dip in soda bath, and bake as usual.
Perfect for snack prep or surprise guests.
Gluten-Free or Vegan Alternatives
Got dietary needs? No problem. You can still enjoy soft pretzels with a few simple swaps.
Gluten-Free Pretzels:
- Use a 1:1 gluten-free flour blend that includes xanthan gum.
- Expect the dough to be a bit stickier and less elastic.
- Don’t skip the soda bath—it still works with GF dough!
Vegan Pretzels:
- Replace butter with plant-based butter or oil.
- Skip the egg wash and use dairy-free milk for browning.
- Everything else—yeast, flour, salt, baking soda—is already vegan!
These alternatives are great for sharing at parties or potlucks where dietary needs vary.
FAQs about Soft Pretzels Recipe
1. Can I make pretzel dough ahead of time?
Yes! You can refrigerate the dough overnight after the first rise. Just let it come to room temperature before shaping.
2. Why did my pretzels come out pale?
This usually means you skipped or rushed the baking soda bath. Make sure each pretzel gets a full 20-second dip.
3. Can I use instant yeast instead of active dry?
Totally. Just mix it in with the dry ingredients—no need to proof in water.
4. What’s the best flour for pretzels?
All-purpose works fine, but bread flour gives them a chewier texture. Gluten-free flour works for dietary needs.
5. How do I keep pretzels soft the next day?
Store in an airtight container and reheat in the oven or microwave with a bit of butter to revive them.
Conclusion
There’s just something special about homemade soft pretzels. From the yeasty aroma while they bake to that first warm, salty bite, they deliver comfort in every twist. Whether you’re going for classic salt, sweet cinnamon sugar, or a bold cheesy version, making them at home is easier than you think—and way more delicious than anything store-bought.
Ready to twist, bake, and impress? Grab your apron and get baking. Your snack game is about to level up big time.