Smoked Pork Shoulder Recipe: Smoking a pork shoulder isn’t just cooking—it’s an experience. Whether you’re hosting a backyard BBQ or planning a cozy Sunday feast, this dish delivers big flavor, juicy meat, and smoky goodness.
In this ultimate guide, we’ll walk you through every step, from choosing the meat to slicing into your first smoky bite.
Ready to smoke like a pro? Let’s dive in.
Why Smoked Pork Shoulder Is a Must-Try
Smoked pork shoulder, also known as pulled pork when shredded, is the kind of dish that turns casual gatherings into memorable feasts. The magic lies in the long, slow cooking process that breaks down the connective tissues, turning tough meat into tender, melt-in-your-mouth strands. Add in the rich smoke flavor from the wood of your choice, and you’ve got a dish that stands tall in the world of BBQ.
But why is it so beloved? For starters, it’s affordable. Compared to brisket or ribs, pork shoulder offers a lot of bang for your buck. It also feeds a crowd—one pork shoulder can serve 8–10 people easily. And with a good rub and the right smoke, it doesn’t take much to bring out incredible flavor.
Plus, smoked pork shoulder is versatile. Sandwiches, tacos, nachos, bowls—it fits in almost anywhere. Whether you’re a beginner or a seasoned grill master, mastering smoked pork shoulder should be on your culinary bucket list.
What Cut is Pork Shoulder?
Pork shoulder, also known as “picnic shoulder” or “picnic roast,” comes from the upper front leg of the pig. It’s a well-used muscle group, meaning it’s tough—but tough in a good way. That’s where low-and-slow cooking comes in.
The shoulder has layers of fat and connective tissue, which, when cooked properly, render down and baste the meat from the inside out. This makes it ideal for smoking. You’ll notice a bone in many pork shoulders—leave it in. Bone-in cuts tend to be more flavorful and stay juicier through long cook times.
Look for shoulders in the 6–10 lb range. They’re big enough for flavor and moisture but manageable on most smokers or grills.
Difference Between Pork Shoulder and Pork Butt
Here’s a common BBQ conundrum: pork shoulder vs. pork butt—aren’t they the same? Not quite. Pork butt, also known as “Boston butt,” comes from the upper portion of the shoulder, while the picnic shoulder (true pork shoulder) is slightly lower.
Pork butt is generally thicker and more uniform in shape, making it easier to cook evenly. It also has more intramuscular fat, which can lead to richer pulled pork. Pork shoulder is a bit leaner and slightly tougher but still works beautifully for smoking.
Can you use both cuts for this recipe? Absolutely. Just remember to adjust your cooking time slightly depending on the size and shape.
Best Wood for Smoking Pork Shoulder
The wood you choose is like the seasoning in your smoke. It impacts the flavor, aroma, and even the color of your final product.
Here are top wood options:
- Hickory: Strong, smoky, slightly sweet—classic BBQ flavor.
- Applewood: Mild and fruity, perfect if you want a softer smoke.
- Cherry: Slightly sweet and gives the meat a beautiful red hue.
- Oak: Bold but not overwhelming—great for a steady, even smoke.
- Maple: Subtle sweetness, excellent for a unique twist.
Mixing woods is totally fair game. Apple and hickory, for instance, make a flavorful and balanced combo. Avoid mesquite unless you’re confident—it’s very strong and can overpower pork if overused.
Choosing the Right Smoker
There are plenty of ways to smoke a pork shoulder, and each type of smoker has its strengths.
- Offset Smokers: Best for traditionalists. Offers the most control but requires attention.
- Electric Smokers: Great for beginners. Set it and forget it—just monitor temperature.
- Pellet Smokers: Combines convenience and flavor. Pellet grills maintain steady temps and smoke levels.
- Charcoal Smokers: The classic. Rich smoke flavor with more manual effort.
If you’re new to smoking, pellet and electric smokers offer a simpler entry point. Experienced pitmasters may prefer the nuance of charcoal or wood offset models.
List of Ingredients You’ll Need
Main Ingredients
- 1 bone-in pork shoulder (6–8 lbs)
- 2 tbsp olive oil (for rub adhesion)
Dry Rub Ingredients
- 2 tbsp brown sugar
- 2 tbsp paprika (smoked or sweet)
- 1 tbsp kosher salt
- 1 tbsp black pepper
- 1 tsp garlic powder
- 1 tsp onion powder
- 1 tsp cayenne pepper (optional)
- 1 tsp mustard powder
Optional Mop Sauce
- 1 cup apple cider vinegar
- 1 cup water
- 1 tbsp Worcestershire sauce
- 1 tsp red pepper flakes
These ingredients come together to create a bold, flavorful crust (aka bark) on your pork shoulder. The mop sauce helps keep things moist and adds tang during the long smoke.
Prepping the Pork Shoulder
Trimming Excess Fat
Start by removing any excess fat from the outside. You don’t want to remove all the fat—some will render down beautifully during cooking. But any thick, hard chunks should go. A thin fat cap (about 1/4 inch) is ideal.
Applying the Dry Rub
Pat the pork shoulder dry with paper towels. Rub the entire surface with olive oil to help the seasoning stick. Then, generously apply your dry rub. Press it into the meat—don’t be shy. Cover every inch, including the bottom and sides.
For best results, let the rubbed pork sit in the fridge overnight (wrapped in plastic or foil). This gives the spices time to penetrate and start forming a crust.
Marinating: Letting the Flavor Soak In
Once your pork shoulder is coated in that beautiful dry rub, it’s time to let it rest and marinate. You might be tempted to throw it straight onto the smoker, but trust me—letting it sit overnight is worth the wait.
Place the seasoned pork in a large dish or tray and cover it tightly with plastic wrap or foil. Refrigerate it for at least 8 hours, ideally overnight. During this time, the salt in the rub begins to penetrate the meat, helping to tenderize it and amplify the flavor. The other spices will cling to the surface, creating that crusty, flavorful “bark” you’re looking for once it’s smoked.
No time for overnight marinating? Even 2–3 hours will do the trick in a pinch. Just know that more time = more flavor.
Pro Tip: If you’re using a mop sauce, you can prepare it at the same time and keep it in the fridge. That way, everything is ready to go in the morning when it’s time to fire up the smoker.
Setting Up the Smoker for Success
If you want perfect pulled pork, don’t rush this step. Prepping your smoker correctly is just as important as seasoning the meat.
Ideal Smoking Temperature
The sweet spot for smoking pork shoulder is 225°F to 250°F (107°C to 121°C). At this range, the meat cooks slowly, giving the collagen time to break down and become tender without drying out.
Maintain this temperature throughout the cook. Invest in a good thermometer if your smoker doesn’t have one built in. A digital probe thermometer that monitors both the meat and the smoker’s internal temperature is a game-changer.
Water Pan or No Water Pan?
Using a water pan helps regulate heat and adds humidity to the smoker, which keeps the pork shoulder moist. Most people place the pan directly under the meat.
Fill the pan with:
- Plain water
- Apple juice
- A mix of apple cider vinegar and water
Not using a water pan? That’s okay too—just be sure to spritz or mop the pork every 1–2 hours to keep it from drying out.
Step-by-Step Smoking Process
This is where the magic happens. Here’s how to tackle the actual smoking process.
Stage 1: Getting the Smoke Started
Preheat your smoker to 225°F. Add your chosen wood chunks or pellets. Hickory and apple are a great combo for pork.
Once your smoker is up to temp and your smoke is rolling light and blue (not thick and white!), place the pork shoulder directly on the grates with the fat side up. This allows the melting fat to baste the meat as it cooks.
Stage 2: First Few Hours
Let the pork cook undisturbed for the first 3 hours. This is when the smoke penetrates deepest. Around hour 4, you can begin to spritz or mop it every hour using your vinegar mop sauce or apple juice. This keeps the bark moist and flavorful.
During this phase, you’ll see the rub begin to darken and form that classic bark. It’s also normal to hit a stall around 150–160°F internal temp, where the temp plateaus for a while. Don’t panic—it’s totally normal.
Stage 3: Wrapping the Pork
Once your pork reaches an internal temp of around 160°F to 165°F, it’s time to wrap it. Use heavy-duty aluminum foil or butcher paper.
Wrapping:
- Locks in moisture
- Speeds up cooking through the stall
- Prevents the bark from getting too dark or dry
Place the wrapped pork back in the smoker and continue cooking.
Stage 4: Final Internal Temp
Your goal is an internal temp of 195°F to 205°F, ideally around 203°F for pulled pork. At this point, the collagen has melted, and the meat will be fork-tender.
Use a thermometer to check the temp in multiple spots. If the probe slides in like butter, you’re golden.
How Long Does It Take to Smoke a Pork Shoulder?
Here’s the general rule: Plan for 1.5 to 2 hours per pound at 225°F.
So for an 8-pound pork shoulder, expect:
- 12 to 16 hours total smoking time
- Plus 1 hour for resting
Factors that affect cook time:
- Size and shape of the pork shoulder
- Type of smoker
- How often you open the lid
- Outdoor temperature and wind (for offset and charcoal smokers)
Always go by internal temperature, not time alone. Smoking isn’t a race—it’s a low-and-slow journey to greatness.
How to Know When It’s Done
Forget timers—go by feel and temperature. Your pork shoulder is done when:
- The internal temp hits 203°F
- A thermometer probe slides in and out easily with no resistance
- The bone (if bone-in) wiggles easily or pulls out cleanly
Another test: grab a pair of tongs and twist the meat slightly. If it begins to shred without effort, it’s ready.
This step is crucial. Undercooked pork shoulder won’t shred properly, and overcooked meat can become dry—even with all that fat. Patience pays off here.
Resting the Meat: Don’t Skip This Step
After hours of smoking, the meat is finally done—but don’t rush to slice or shred it just yet. Resting is essential, and skipping it can ruin all your hard work.
Once the pork shoulder reaches the target temperature of 203°F, remove it from the smoker and leave it wrapped. Place it in a cooler, a warm oven (turned off), or a roasting pan covered with a towel, and let it rest for at least 1 hour.
Why rest? Because during smoking, juices get pushed toward the outer layers of the meat. Resting allows those juices to redistribute throughout the shoulder, making every bite moist and flavorful. If you cut it too early, all that goodness will run out onto your cutting board instead.
One hour is ideal, but even 30 minutes will help. If you’re planning to eat later, you can rest the meat for up to 2–3 hours in a well-insulated cooler.
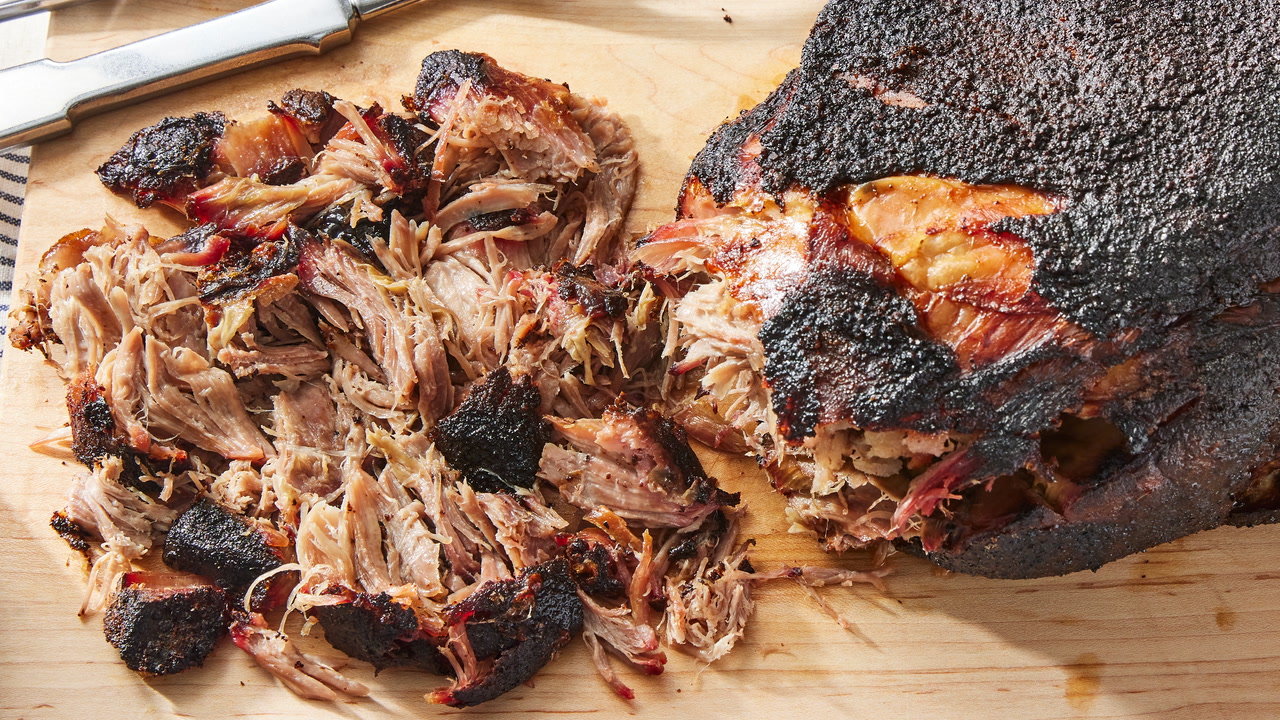
Shredding the Pork Shoulder
Once the pork has rested, it’s time to shred it. This is where your patience pays off!
Here’s how:
- Unwrap the pork shoulder and place it in a large tray or pan.
- Use meat claws, two forks, or even your hands (with gloves) to pull the meat apart.
- Remove any large chunks of fat or gristle, and discard the bone—it should slide right out.
- Mix the meat well to distribute the bark (outside crust) and inside pieces evenly.
If you want more flavor, you can drizzle a little of the meat’s juices (from the foil or wrap) back over the pulled pork. Some people also add a bit of finishing sauce—like vinegar-based Carolina BBQ sauce—for a final flavor kick.
Shredded pork is great on its own, but also perfect for sandwiches, sliders, tacos, nachos, rice bowls, and more. It’s juicy, tender, and absolutely packed with smoky flavor.
Serving Suggestions
Smoked pork shoulder is the main event, but it pairs beautifully with all kinds of sides and sauces.
Perfect Pairings:
- Coleslaw (classic creamy or vinegar-style)
- Mac and cheese
- Baked beans
- Cornbread
- Pickles or pickled red onions
- Grilled corn on the cob
- Potato salad
Serving Ideas:
- Pulled pork sandwiches with toasted buns and slaw
- Pork tacos with avocado, lime, and cilantro
- Pulled pork nachos with cheese, jalapeños, and BBQ drizzle
- Pulled pork bowls with rice, beans, and salsa
- Breakfast hash with pork, eggs, and potatoes
Let your imagination run wild—this dish is super versatile and works in so many meals.
Storage Tips: Leftovers Done Right
Pork shoulder yields a lot of meat, so you’ll likely have leftovers—and that’s a good thing.
Storing Leftover Pulled Pork:
- Refrigerator: Store in an airtight container with some of the juices to keep it moist. Lasts up to 4 days.
- Freezer: Portion into freezer bags (with air removed) or airtight containers. Add a splash of broth or juices before sealing. Keeps up to 3 months.
Reheating Tips:
- Oven: Cover with foil, add a splash of broth or water, and reheat at 300°F until warmed through.
- Stovetop: Warm in a skillet with a lid over medium-low heat.
- Microwave: Use a microwave-safe dish, cover, and heat with a little liquid added.
Avoid reheating too quickly or at high temps—it can dry the pork out. Reheating gently helps keep the texture and flavor just right.
Common Mistakes to Avoid
Even experienced cooks slip up from time to time. Here are some common errors to dodge:
- Not trimming excess fat – Thick layers of fat won’t render and can block the rub from sticking.
- Skipping the resting phase – Cutting too early causes dry pork. Always rest for at least an hour.
- Not using a thermometer – Internal temp is key. Guessing leads to undercooked or dry meat.
- Opening the smoker too often – Every peek lets out heat and smoke. Be patient!
- Over-smoking – Too much wood or thick white smoke can lead to bitter meat.
- Forgetting to spritz or wrap – This helps keep the meat juicy and prevents bark from burning.
Follow the steps closely and you’ll avoid these pitfalls. BBQ success is all about consistency and care.
Tips for Juicy, Tender Pork Every Time
Want to level up your smoked pork shoulder game? Keep these pro tips in mind:
- Start early – Smoking pork takes time. Begin in the morning or even the night before.
- Use a water pan – Helps regulate heat and keeps the smoker humid.
- Keep it steady – Temperature swings are your enemy. Aim for consistent heat.
- Rest with care – Wrap it tight and let the meat chill (literally) before pulling.
- Shred while warm – It’s much easier when the meat is still hot and tender.
- Save the juices – Mix them back into the shredded pork for even more flavor.
With the right tools, timing, and a bit of patience, you’ll be making crowd-pleasing pulled pork like a seasoned pitmaster.
FAQs about Smoked Pork Shoulder Recipe
1. Can I smoke pork shoulder in the oven?
Yes, while you won’t get the same smoky flavor, you can slow-cook pork shoulder in the oven at 225°F. Use liquid smoke or smoked paprika in the rub for added flavor.
2. What’s the best internal temperature for pulled pork?
Aim for 203°F. At this point, the collagen breaks down fully, and the meat becomes tender enough to shred easily.
3. Do I need to brine pork shoulder before smoking?
It’s optional. A dry rub works well on its own, but brining (especially overnight) can help with moisture and seasoning deeper into the meat.
4. What’s the difference between smoking and roasting?
Smoking uses low heat and flavored wood smoke over a long period. Roasting typically uses dry heat at a higher temp and lacks the smoky profile.
5. How do I reheat leftover smoked pork shoulder?
Reheat slowly in the oven or on the stovetop with a bit of broth or reserved juices to keep it moist. Avoid high heat or microwaving for too long.
Conclusion
Smoked pork shoulder is a labor of love—but the rewards are huge. From prepping the meat and seasoning it just right to mastering the long smoke and finally pulling that juicy, flavorful pork, every step counts. This dish isn’t just delicious—it’s memorable. Whether you’re cooking for family, friends, or just because, you’ll end up with a meal that leaves people asking for seconds (and thirds).
Get ready to fire up that smoker, build your bark, and own your next BBQ. Because once you master smoked pork shoulder, you’ve got a true BBQ classic in your back pocket.


