Pizza Roll Recipe: Who doesn’t love pizza? Now imagine that cheesy, saucy goodness wrapped up into a warm, handheld bite-sized roll. That’s the magic of pizza rolls—snack-sized powerhouses of flavor that disappear faster than you can say “more please!” Whether you’re craving a quick appetizer, a kid-friendly dinner idea, or the ultimate party snack, pizza rolls deliver big flavor in a tiny package. But let’s be real—store-bought frozen ones just don’t cut it. They’re either too salty, too dry, or filled with mystery ingredients you can’t even pronounce.
That’s why making your own pizza rolls at home is a game-changer. You get full control over the ingredients, the ability to customize each roll to your taste, and a final product that’s warm, crispy, cheesy, and 100% satisfying. Plus, the process is actually fun and pretty therapeutic—especially when you see those golden rolls come out of the oven.
In this guide, you’re going to learn exactly how to make perfect pizza rolls from scratch, step-by-step. We’ll walk through everything—from the dough to the filling to baking them to crispy perfection. Whether you’re a beginner or a kitchen pro, this guide has something for you. Ready? Let’s roll!
List of Ingredients You’ll Need
Before we dive into the process, let’s make sure your kitchen is fully stocked. Here’s everything you’ll need to whip up a batch of mouthwatering homemade pizza rolls:
Basic Dough Ingredients:
- 2 ¼ teaspoons (1 packet) active dry yeast
- 1 cup warm water (about 110°F)
- 2 ½ to 3 cups all-purpose flour
- 1 tablespoon olive oil
- 1 teaspoon sugar
- 1 teaspoon salt
Note: You can also use store-bought pizza dough to save time, but nothing beats homemade!
Filling Ingredients:
- 1 cup marinara or pizza sauce
- 1 ½ to 2 cups shredded mozzarella cheese
- ½ cup mini pepperoni or cooked sausage (optional)
- ¼ cup chopped bell peppers or onions (optional)
- 1 teaspoon Italian seasoning
- ½ teaspoon garlic powder
- Pinch of red pepper flakes (optional for spice lovers)
Optional Toppings & Dips:
- Grated Parmesan cheese (for sprinkling)
- Chopped fresh basil or parsley
- Ranch dressing, garlic butter, or extra pizza sauce for dipping
These ingredients make a classic pepperoni-style pizza roll, but you can totally customize it. Want it vegetarian? Add mushrooms or spinach instead of meat. Craving extra cheese? Add some cheddar or provolone. The beauty of pizza rolls is they’re as versatile as your imagination.
Kitchen Tools Required
Let’s not forget the gear. You don’t need a fancy setup, but having the right tools on hand can make the process smoother and more enjoyable:
- Mixing bowls (small and large)
- Measuring cups and spoons
- Whisk or wooden spoon
- Rolling pin
- Sharp knife or pizza cutter
- Baking sheet
- Parchment paper or silicone baking mat
- Pastry brush (for brushing oil or butter)
Optional but useful:
- Stand mixer with dough hook (for easier kneading)
- Kitchen thermometer (for checking water temperature)
- Cooling rack
Having these items ready before you start ensures a stress-free cooking session. Now that you’re prepped and ready, let’s roll up those sleeves and dive into the real action—the step-by-step pizza roll making!
Step-by-Step Guide to Making Pizza Rolls
Homemade pizza rolls are soft, cheesy, and packed with flavor. Follow these steps for perfectly baked, crowd-pleasing rolls.
Step 1: Preparing the Dough
Mix flour, yeast, salt, sugar, warm water, and olive oil until a soft dough forms. Knead on a floured surface for 8–10 minutes until smooth and elastic. Place the dough in a lightly oiled bowl, cover, and let it rise in a warm spot for 1–1½ hours, or until doubled in size.
Step 2: Preparing the Sauce and Filling
Use pizza sauce or marinara as the base. Customize your filling with mozzarella cheese, pepperoni, sausage, mushrooms, or bell peppers. Keep fillings finely chopped so the rolls hold together while baking.
Step 3: Rolling Out the Dough
Punch down the risen dough and roll it out on a floured surface into a rectangle about ¼-inch thick. Even thickness helps the rolls bake uniformly without doughy centers.
Step 4: Filling and Rolling
Spread a thin layer of sauce over the dough, leaving a small border around the edges. Sprinkle cheese and toppings evenly. Avoid overstuffing, as this can cause filling to leak. Roll the dough tightly from the long side into a log and pinch the seam closed.
Step 5: Cutting the Rolls
Using a sharp knife or unflavored dental floss, cut the log into even slices. Aim for equal sizes so all rolls bake at the same rate.
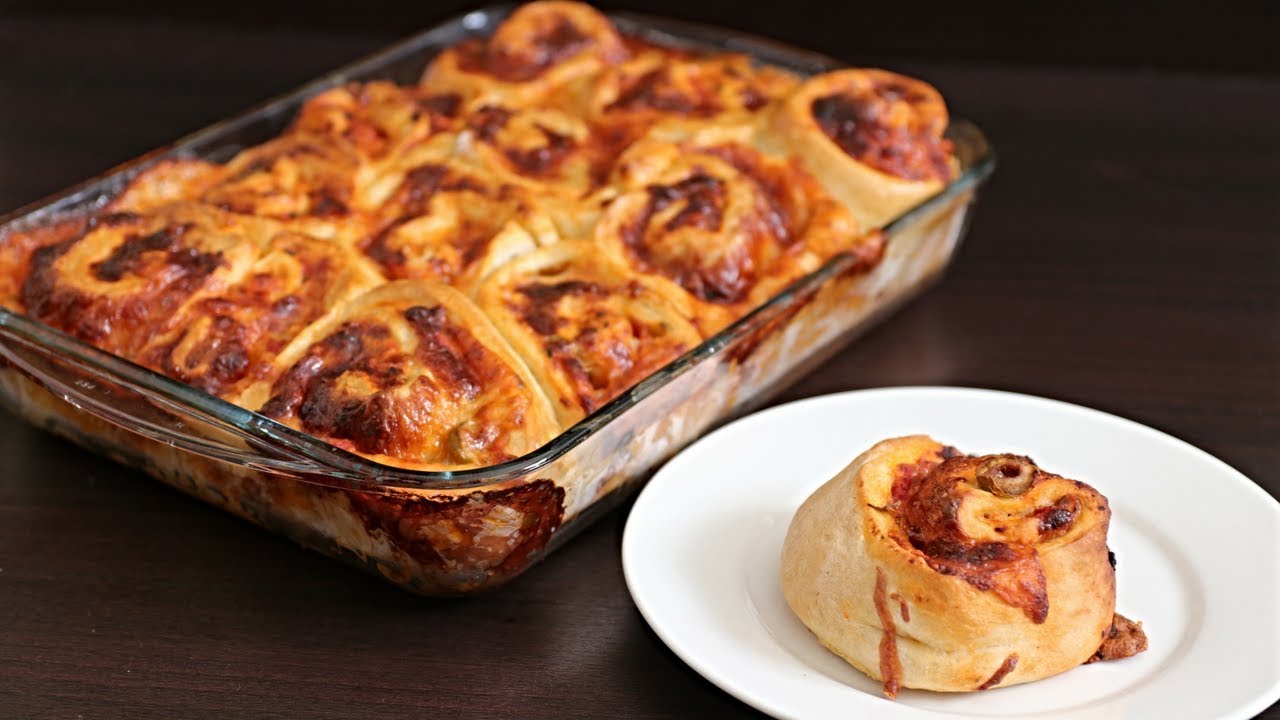
Step 6: Baking the Pizza Rolls
Place rolls cut-side up in a greased baking dish. Bake at 180°C (350°F) for 20–25 minutes until golden brown and bubbly. Let cool slightly before serving. Enjoy warm with extra sauce for dipping! 🍕✨
Homemade Pizza Dough vs. Store-Bought Dough
If you’re wondering whether to go the homemade route or grab dough from the store, here’s a quick comparison:
| Feature | Homemade Dough | Store-Bought Dough |
|---|---|---|
| Flavor | Rich, fresh, and customizable | Often bland or overly yeasty |
| Texture | Light and airy when fresh | May be denser or rubbery |
| Time Required | 1–2 hours including rise | Instant, saves time |
| Control Over Ingredients | Total control | Limited |
| Cost | Cheaper overall | Slightly more expensive |
If you have the time, homemade dough is hands-down the winner. But store-bought can be a lifesaver when you’re short on time or planning last-minute meals.
Different Filling Ideas for Pizza Rolls
Tired of the classic pepperoni style? Let’s get creative with these awesome variations:
1. Meat Lover’s Rolls:
- Ground sausage, crumbled bacon, pepperoni, mozzarella
- Add BBQ sauce instead of marinara for a smoky twist
2. Vegetarian Delight:
- Spinach, mushrooms, diced tomatoes, red onion
- Feta cheese and black olives for a Mediterranean vibe
3. Cheese Explosion:
- Mozzarella, cheddar, provolone, ricotta
- Add a sprinkle of crushed red pepper for some heat
You can even try breakfast-style with scrambled eggs, ham, and cheddar—or taco-inspired with seasoned beef and salsa. The only limit is your imagination!
Tips to Make Pizza Rolls Extra Crispy
If you love that golden crunch, here’s how to level up your pizza roll texture:
- Brush with Oil or Butter: A light coating before baking gives a golden, crispy finish.
- Use a Wire Rack on Your Baking Sheet: Elevating the rolls allows air to circulate for an even crisp.
- Don’t Overload with Sauce: Too much moisture = soggy bottoms.
- Bake High, Then Low: Start with a blast of heat (425°F for the first 5 mins), then lower to 375°F to finish cooking.
Try experimenting with these techniques to find your sweet spot!
Serving Suggestions
Alright, your pizza rolls are hot, crispy, and oozing with cheesy goodness—now it’s time to make the whole experience even better. The right dips and sides can take your pizza rolls from a tasty snack to a total crowd-pleasing meal.
Dipping Sauces: The Flavor Boosters
Let’s start with the sauces because, let’s face it, dipping is half the fun:
- Classic Marinara – Always a safe bet. Warm it up for maximum dunkability.
- Garlic Butter Sauce – Melted butter with garlic powder and parsley? Yes, please.
- Ranch Dressing – That creamy, tangy flavor pairs perfectly with spicy rolls.
- Spicy Sriracha Mayo – A blend of mayo and sriracha for those who like heat.
- BBQ Sauce – Especially good with bacon or meat lover’s rolls.
You can serve one or a variety so everyone can mix and match!
Side Pairings: Make it a Meal
While pizza rolls are filling on their own, adding a simple side can round out your meal:
- Caesar Salad or Garden Salad – Something fresh to balance the richness.
- Soup – Tomato soup or creamy broccoli cheddar are amazing pairings.
- Garlic Breadsticks – Because why not double down on carbs?
- Fruit Skewers or Sliced Melon – A sweet contrast to the savory rolls.
Set everything up on a tray and let people build their perfect bite. Perfect for movie nights, game days, or even lunchboxes!
How to Store and Reheat Pizza Rolls
If you’ve got leftovers (lucky you!), don’t let them go to waste. Here’s how to store and reheat them like a pro:
Storing in the Fridge:
- Let the rolls cool completely.
- Store in an airtight container.
- They’ll stay good for up to 4 days in the fridge.
Freezing for Later:
- Flash freeze them first: Place the cooled rolls on a tray and freeze until solid (about 1–2 hours).
- Then, transfer them to a freezer-safe bag or container.
- They’ll keep for up to 2 months.
Reheating Options:
- Oven (Best Texture): Bake at 375°F for 8–10 minutes until heated through.
- Microwave (Quickest): Wrap in a damp paper towel and microwave for 30–60 seconds. Not as crispy, but works in a pinch.
- Air Fryer: 350°F for 4–6 minutes. Great balance of speed and crisp!
Avoid reheating too many times—it affects texture and taste. Heat only what you plan to eat!
Making Pizza Rolls Ahead of Time
Want to prep for a party or make lunchboxes easier during the week? Here’s how to make your pizza rolls in advance:
Prep and Store (Unbaked):
- Assemble and roll the dough as usual.
- Slice into rolls, then flash freeze on a tray.
- Once frozen, store in a ziplock bag.
- When ready to bake, no need to thaw—just add 3–5 minutes to the bake time.
Bake and Store:
- Fully bake your pizza rolls.
- Let cool, then refrigerate or freeze as detailed earlier.
Bonus Tip:
Label your bags with the date and filling type. Future-you will thank you!
This make-ahead method is great for busy families, meal preppers, and surprise snack cravings.
Pizza Roll Recipe for Kids
If you’ve got little hands helping in the kitchen, pizza rolls are a fantastic kid-friendly recipe. It’s fun, hands-on, and the end result is something they’ll actually want to eat.
Kid-Friendly Tips:
- Let kids help roll the dough or sprinkle cheese.
- Use cookie cutters to make mini pizza shapes before rolling.
- Offer mild fillings (like cheese and ham) if they’re picky eaters.
- Let them dip in their own sauce cup—less mess, more fun.
Cooking with kids teaches them valuable skills and builds confidence. Plus, they’re more likely to try what they help make!
Gluten-Free or Vegan Pizza Roll Options
Dietary restrictions? No problem. You can still enjoy amazing pizza rolls with a few swaps:
For Gluten-Free:
- Use gluten-free pizza dough (store-bought or homemade).
- Ensure all fillings (like pepperoni or sauces) are certified gluten-free.
For Vegan:
- Use vegan dough (many recipes use olive oil instead of dairy).
- Swap mozzarella for vegan cheese (like Daiya or homemade cashew cheese).
- Use veggies or vegan meats for filling.
- Choose dairy-free sauces.
These alternatives still deliver big flavor and satisfying texture, so no one has to miss out!
Common Mistakes to Avoid
Even the simplest recipes can go sideways. Here are the most common pizza roll blunders and how to avoid them:
1. Overstuffing the Rolls
Too much filling causes rolls to burst open during baking. Less is more—trust us!
2. Not Sealing the Edge
If the edge isn’t sealed properly, your roll may uncoil in the oven. Use a dab of water to glue it down.
3. Soggy Bottoms
This usually happens from excess sauce or not preheating the oven. Go light on sauce and always bake on parchment or a wire rack.
4. Undercooked Dough
Avoid thick dough and make sure rolls aren’t crowded on the tray. Give them space to cook evenly.
5. Skipping the Rest Time
Let the rolls rest after baking! This helps the cheese set and avoids burning your mouth on molten filling.
Nutritional Information (Per Roll – Approximate)
Here’s a general idea of the nutritional breakdown for a standard pepperoni pizza roll:
| Nutrient | Amount (per roll) |
|---|---|
| Calories | 150–180 kcal |
| Carbohydrates | 18–22 g |
| Protein | 6–8 g |
| Fat | 6–9 g |
| Sugar | 1–2 g |
| Sodium | 300–450 mg |
Note: This varies depending on your ingredients and portion sizes. You can tweak the recipe to be lighter by using less cheese, skipping processed meats, or using whole wheat dough.
FAQs about Pizza Roll Recipe
1. Can I use puff pastry instead of dough?
Yes! Puff pastry gives a flakier, buttery texture. Just be sure to reduce the bake time slightly—around 12–15 minutes at 375°F.
2. How long do pizza rolls stay good in the fridge?
Stored in an airtight container, they’ll last up to 4 days. Reheat before serving for best taste.
3. Can I air-fry pizza rolls?
Absolutely! Air fry at 350°F for 6–8 minutes. It’s quick and makes them super crispy.
4. What cheeses melt best inside pizza rolls?
Mozzarella is king for melting. But cheddar, provolone, and Monterey Jack also work well when mixed in.
5. Are pizza rolls okay to eat cold?
Sure, though they taste better warm. Cold pizza rolls make a fun snack or lunchbox surprise.
Conclusion
And there you have it—the ultimate homemade Pizza Roll Recipe – Step-by-Step Guide! Whether you’re hosting game night, packing school lunches, or just satisfying your snack cravings, these cheesy bites are guaranteed to be a hit. They’re customizable, kid-approved, and way more delicious than the frozen kind. Plus, once you’ve mastered the technique, you can get creative with flavors and fillings.
So go ahead, roll up your sleeves, and give it a try. Your kitchen is about to smell like an Italian pizzeria—and your taste buds will thank you.


