Peanut Chutney Recipe: Ever wondered how that tangy, nutty, slightly spicy chutney on the side of your dosa tastes so addictive? Welcome to the world of peanut chutney—a staple in South Indian cuisine that elevates your breakfast game instantly. It’s creamy, flavorful, and so versatile that you’ll find yourself reaching for it every single day.
Whether you’re prepping a hearty South Indian breakfast or just want a spread for your toast, this peanut chutney will blow your mind. And the best part? It takes less than 15 minutes to make, with ingredients that are probably already sitting in your kitchen.
Let’s dive into this creamy delight and unlock the full potential of peanuts in your meals.
Health Benefits of Peanut Chutney
Peanuts aren’t just about taste—they pack a powerful nutritional punch too. They’re rich in protein, healthy fats, and fiber, which means they can keep you full for longer and support muscle health. A handful of peanuts contains more protein than an egg, making this chutney a protein-packed sidekick to any meal.
Chutneys in Indian cuisine aren’t just dips; they’re a balance of flavor, nutrition, and tradition. Peanut chutney is gluten-free, low-carb (if made without sugar), and can be vegan-friendly if you skip curd or yogurt. That makes it perfect for a variety of diets.
On top of that, the spices in the tempering—like mustard seeds, curry leaves, and dry red chilies—aren’t just for flavor. They aid digestion, have anti-inflammatory properties, and enhance the bioavailability of nutrients. It’s a win-win for both your tastebuds and your body.
Ingredients You’ll Need
Here’s the complete list of what you’ll need to whip up this lip-smacking peanut chutney. Most of these are pantry staples:
Main Ingredients:
- 1 cup raw peanuts
- 2–3 green chilies (adjust based on spice preference)
- 1 small onion (optional for extra flavor)
- 2–3 garlic cloves
- ½ inch piece of ginger
- Salt to taste
- ½ teaspoon tamarind paste or a small piece of tamarind
- ½ cup water (adjust for consistency)
For Tempering (Tadka):
- 1 tablespoon oil (preferably coconut or sunflower oil)
- ½ teaspoon mustard seeds
- 1 dry red chili (broken)
- 5–6 curry leaves
- A pinch of hing (asafoetida)
Optional Add-ons:
- A spoonful of roasted chana dal for creaminess
- A tablespoon of fresh grated coconut for texture
- A squeeze of lemon juice for brightness
These ingredients are flexible—you can skip or substitute based on your taste and what you have at home.
Kitchen Tools Required
Before you start, make sure you have the right tools on hand. While the recipe is simple, having the correct kitchen tools will make it a breeze.
Essential Tools:
- A non-stick or cast iron pan (for roasting peanuts)
- Mixer or blender
- Small frying pan (for tempering)
- Spoon and spatula
Optional Gadgets:
- Wet grinder (for a smoother texture)
- Garlic press (if you don’t want to chop)
- Small sieve (to remove skin after roasting peanuts)
Even with the basic tools, you’ll get a restaurant-style chutney in minutes.
Step-by-Step Guide to Making Peanut Chutney
Let’s break it down into easy-to-follow steps. This is where the magic happens.
Step 1: Roasting the Peanuts
Start by dry roasting 1 cup of raw peanuts on a medium flame. Stir continuously to ensure even roasting. You’ll know they’re ready when they turn golden brown and you start to hear a popping sound.
Let them cool, then rub them between your palms to remove the skin. This step adds depth to the chutney’s flavor—roasted peanuts bring in that smoky, nutty aroma that raw ones simply don’t.
Step 2: Prepping the Other Ingredients
While the peanuts cool, prep your other ingredients—chop the green chilies, peel garlic, grate a bit of ginger, and keep your tamarind and salt ready. If you’re using onion or roasted chana dal, now’s the time to measure that too.
Pro Tip: Lightly sauté onions and garlic if you want to mellow out their raw bite.
Step 3: Grinding It All Together
Add the roasted peanuts, green chilies, garlic, ginger, tamarind, and salt into a blender jar. Add about ½ cup water and blend until smooth. Adjust the water gradually to get the consistency you prefer—thick for a spread, thinner for a dip.
Taste and tweak—need more heat? Add another chili. Too thick? Add a splash of water.
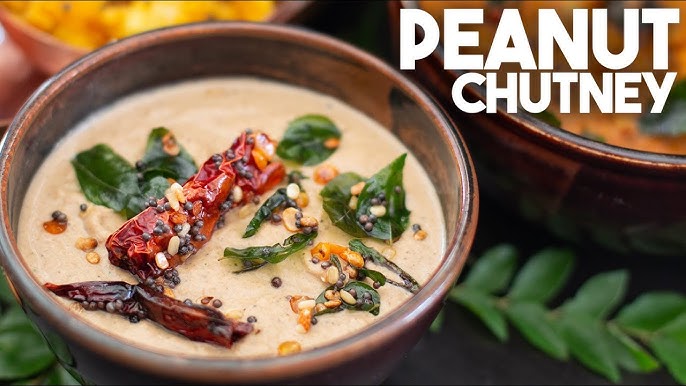
Step 4: Preparing the Tempering (Tadka)
In a small pan, heat 1 tablespoon of oil. Add mustard seeds and wait for them to splutter. Add dry red chili, curry leaves, and a pinch of hing. Fry for 10–15 seconds until aromatic.
Pour this hot tempering directly onto the chutney. The sizzling effect not only adds flavor but also that satisfying chhonk sound we all love in Indian kitchens.
Step 5: Mixing and Serving
Mix the tadka into the chutney and give it a good stir. Transfer it to a bowl, garnish with fresh coriander if desired, and serve fresh. Trust me—once you try it with idli, dosa, or even plain rice, you’ll never go back to store-bought dips.
Tips for the Perfect Peanut Chutney
Creating the perfect peanut chutney isn’t rocket science, but a few insider tips can elevate your game and bring that restaurant-style flavor right into your kitchen.
1. Roast to Perfection
Roasting the peanuts just right is the backbone of this recipe. Undercooked peanuts make the chutney taste raw and bland, while over-roasted peanuts can turn bitter. Roast on medium heat, stirring constantly until they’re golden and aromatic. Let them cool before blending.
2. Use Cold Water While Grinding
This is a lesser-known hack but using cold or room temperature water while blending helps keep the chutney fresh longer. It also prevents the mixture from heating up in the blender, which can change the flavor.
3. Don’t Skip the Tempering
Tadka isn’t just garnish—it’s flavor infusion. Mustard seeds, curry leaves, dry red chilies, and hing all work together to add complexity. Without it, your chutney might taste a bit flat or unfinished.
4. Achieve the Right Consistency
Peanut chutney is flexible. Want to use it as a spread? Keep it thick. Prefer a dip? Add a bit more water. Just remember that chutney thickens slightly after resting, so it’s okay if it looks a little runny right after blending.
5. Balance the Flavors
Peanuts are naturally sweet, so balancing them with spice (chilies), sour (tamarind or lemon), and salt is crucial. Taste as you go and don’t hesitate to tweak it.
Variations of Peanut Chutney
One of the coolest things about peanut chutney? It’s super customizable. Here are a few tried-and-tested versions you can experiment with:
Spicy Peanut Chutney
Love heat? Add more green chilies or throw in a dry red chili while grinding. You can even add a dash of chili powder in the tadka for that extra punch.
Coconut-Peanut Chutney
Blend in 2–3 tablespoons of fresh grated coconut with the peanuts. It adds a tropical, sweet depth and a creamier texture—perfect for pairing with dosa or uttapam.
Raw Peanut Chutney
Pressed for time? Skip the roasting and use raw peanuts. The flavor is milder and earthier, and the texture is a bit softer. This version is often used in traditional Maharashtrian cuisine.
Garlic-Infused Peanut Chutney
Double up on the garlic for a chutney that packs a bold punch. Roast or sauté the garlic cloves before blending for a mellow, smoky twist.
Each variation brings a new layer of flavor to your meal and keeps things interesting.
Serving Suggestions
Peanut chutney is incredibly versatile. Here’s how to serve it like a pro:
1. With South Indian Breakfasts
This is the classic combo. Serve peanut chutney with idli, dosa, vada, pongal, or upma. It’s a staple in most South Indian homes and instantly elevates the meal.
2. As a Sandwich Spread
Use thick chutney as a spread on toasted bread or inside a grilled sandwich. Pair it with sliced tomatoes, cucumber, and cheese for a spicy Indian twist.
3. As a Dip for Snacks
Hosting guests? Serve peanut chutney with pakoras, samosas, chips, or veggie sticks. It’s healthier than mayo or ketchup and packs a flavor bomb.
4. With Plain Rice
Sounds simple, but peanut chutney mixed with hot rice and ghee is comfort food at its best. You’ve got to try it at least once!
Storage and Shelf Life
Peanut chutney is super fresh, but that doesn’t mean it won’t last a few days—if stored properly.
Refrigeration:
Store it in an airtight container in the fridge. It stays fresh for up to 3–4 days. Always use a clean, dry spoon to avoid contamination.
Freezing:
Yes, you can freeze peanut chutney! Use freezer-safe containers or ziplock bags and portion it out. Thaw it in the fridge overnight or use the defrost option on your microwave. You may need to stir in a bit of water or re-temper it before serving to refresh the flavors.
Common Mistakes to Avoid
Even seasoned cooks can slip up, so watch out for these common mistakes:
1. Over-roasting Peanuts
Too much roasting = bitterness. Medium flame and constant stirring are key.
2. Adding Too Much Water
Peanut chutney can become watery and bland if you go overboard with water. Add in small increments and adjust based on use.
3. Skipping the Tadka
This isn’t optional—temper your chutney! It brings aroma, texture, and flavor all at once.
4. Not Tasting As You Go
Peanuts can vary in sweetness and richness, so always taste and balance your flavors.
5. Using Old Peanuts
Stale or rancid peanuts will ruin your chutney. Make sure they smell fresh before roasting.
Nutritional Breakdown (Per Serving – Approx. 2 Tablespoons)
| Nutrient | Amount |
|---|---|
| Calories | 120 |
| Protein | 4g |
| Fat | 10g |
| Carbohydrates | 4g |
| Fiber | 2g |
| Sugar | 1g |
| Sodium (with salt) | 200mg |
These numbers can vary based on your ingredients and portion size, but overall, peanut chutney is a wholesome, high-protein side dish.
Why This Peanut Chutney Recipe Works
This peanut chutney recipe is a winner for so many reasons:
- Quick and Easy: Ready in under 15 minutes with minimal prep.
- Flavor Explosion: Nutty, spicy, tangy—all in one bite.
- Budget-Friendly: Uses pantry staples, no fancy ingredients required.
- Adaptable: Vegan, gluten-free, and easily customizable.
- Perfect with Everything: Breakfasts, snacks, spreads—you name it.
It’s one of those recipes that becomes a weekly go-to once you try it.
Pairing Ideas with Other Dishes
Looking to make it part of a complete meal? Here are some delicious pairings:
Best South Indian Combos:
- Masala Dosa + Peanut Chutney + Sambar
- Medu Vada + Coconut-Peanut Chutney
- Rava Upma + Spicy Peanut Chutney
Fusion Recipes Using Peanut Chutney:
- Peanut Chutney Quesadilla – Use as a spread inside tortillas with cheese.
- Chutney Grilled Sandwich – Add sliced veggies and grill for a quick lunch.
- Peanut Chutney Pasta – Toss with cooked pasta and sautéed veggies for a desi twist.
Let your creativity run wild—peanut chutney is super versatile and forgiving.
FAQs about Peanut Chutney Recipe
1. Can I make peanut chutney without garlic?
Yes! You can skip garlic entirely or replace it with a bit of ginger for a slightly different flavor.
2. How do I fix chutney that’s too spicy?
Add more roasted peanuts or a little yogurt/coconut to tone down the heat.
3. Can I use roasted peanuts from the store?
Absolutely. Just make sure they’re unsalted and not flavored. It’ll save you some time too.
4. How do I make it vegan?
This recipe is already vegan unless you add yogurt. Just skip that, and you’re good to go.
5. What’s the best way to serve peanut chutney at parties?
Use it as a dip with crackers, pakoras, or veggie sticks—it’s always a hit!
Conclusion
Peanut chutney is more than just a side dish—it’s a flavor-packed, protein-rich, incredibly satisfying dip that deserves a permanent spot in your fridge. Whether you’re enjoying it with your morning dosa, jazzing up a sandwich, or serving it as a dip, this humble chutney delivers every single time.
Its ease of preparation, customizable ingredients, and bold flavor make it a must-have in every kitchen. Once you master this recipe, it’s going to be hard to imagine breakfast without it. So go ahead—roast those peanuts, fire up the tadka, and whip up your own batch of creamy, dreamy peanut chutney today!


