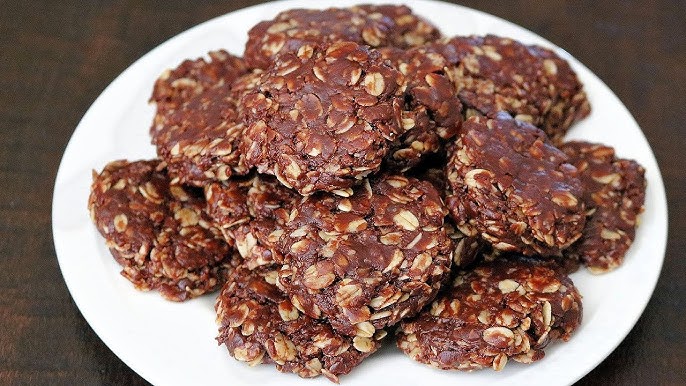
Peanut Butter No-Bake Cookies Recipe: Craving a sweet treat but don’t want to turn on the oven? Say hello to Peanut Butter No-Bake Cookies—your new favorite dessert hack! These cookies are a dream for those moments when you want something quick, simple, and totally satisfying. Whether you’re baking with kids, prepping snacks for the week, or whipping up a last-minute dessert for guests, these no-bake cookies are a go-to option that never disappoints.
Made with a handful of pantry staples, they come together in minutes and deliver that perfect chewy, nutty, and slightly sweet bite. No stress, no heatwave in the kitchen, just pure peanut butter bliss. Let’s dive into everything you need to make the perfect batch!
Benefits of No-Bake Cookies
Why choose a no-bake cookie over a traditional baked one? For starters—convenience. These cookies eliminate the need for preheating ovens, baking sheets, and the dreaded burnt bottoms. Instead, you’re mixing, scooping, and chilling. That’s it.
Other awesome benefits include:
- Speed: From start to finish, they’re ready in under 30 minutes.
- Kid-Friendly: Minimal heat involved means a safer recipe for little helpers.
- Perfect for Summer: No oven means a cooler kitchen.
- Fewer Dishes: One pot, one spoon, one sheet = happy dishwasher.
No-bake cookies are the lazy chef’s best friend and an ideal entry point for new bakers. They’re practically foolproof!
List of Ingredients You’ll Need
Let’s talk ingredients. The magic of these cookies lies in their simplicity. Here’s everything you need to make a basic batch:
Basic Ingredients:
- 1/2 cup (1 stick) unsalted butter
- 2 cups granulated sugar
- 1/2 cup milk (whole or 2%)
- 1 cup creamy peanut butter
- 1 tsp vanilla extract
- 3 cups quick-cooking oats
Optional Add-Ins for Flavor and Fun:
- Pinch of salt – enhances flavor balance
- 1/2 cup chocolate chips – for a chocolaty twist
- Chopped nuts or coconut flakes – for added crunch
- Cinnamon or nutmeg – adds a warm depth
These pantry staples work together beautifully. You can easily tweak this base recipe to fit dietary needs or flavor preferences.
Tools and Equipment Needed
No fancy gear required here! Just a few basic kitchen tools to get the job done:
- Medium to large saucepan – for mixing and boiling ingredients
- Wooden spoon or silicone spatula – for stirring
- Measuring cups and spoons – accuracy matters
- Cookie scoop or tablespoon – for portioning
- Wax paper or parchment paper – prevents sticking
- Baking sheet or countertop space – to let the cookies set
That’s it! Minimal tools, maximum payoff.
Choosing the Right Peanut Butter
Not all peanut butter is created equal—especially when baking. For no-bake cookies, the texture and oil content of your peanut butter can change everything.
- Creamy Peanut Butter: Best for smooth texture; think Skippy or Jif.
- Crunchy Peanut Butter: Adds texture and crunch but can make cookies more crumbly.
- Natural Peanut Butter: Works, but stir thoroughly! Natural oils can cause separation and softer cookies.
- Avoid Low-Fat Versions: These often contain fillers that can affect the setting process.
Stick with a tried-and-true creamy peanut butter for consistent, delicious results.
Understanding the Role of Each Ingredient
Each ingredient in no-bake cookies plays a specific role. Let’s break it down:
- Butter: Adds richness and helps with texture.
- Sugar: Sweetens and helps the mixture set once boiled.
- Milk: Provides liquid to bind everything together.
- Peanut Butter: The star of the show—adds flavor, fat, and acts as a binder.
- Vanilla Extract: Adds aromatic sweetness.
- Oats: The bulk and bite—quick-cooking oats work best for chewiness without toughness.
Skipping or substituting any of these may affect the cookie’s texture or setting. Measure carefully for best results.
Step-by-Step Guide: How to Make Peanut Butter No-Bake Cookies
Let’s get to the good part—making them. Follow these steps closely for foolproof cookies every time.
Step 1: Gather All Ingredients and Tools
Before you begin, prep your space. Measure your ingredients, line a baking sheet or counter with wax paper, and keep your utensils handy. Once the mixture starts boiling, timing matters, so having everything ready makes it smoother.
Step 2: Boil the Sugar, Butter, and Milk
In a medium saucepan over medium heat, combine:
- 1/2 cup butter
- 2 cups sugar
- 1/2 cup milk
Stir constantly until butter melts. Once everything is melted, bring to a rolling boil and cook for exactly 1 minute. Use a timer! Boiling too long = dry cookies. Too short = won’t set properly.
Step 3: Mix in the Peanut Butter and Vanilla
Remove the pan from heat and immediately stir in:
- 1 cup peanut butter
- 1 tsp vanilla extract
Stir quickly and thoroughly until smooth. The residual heat melts the peanut butter into a creamy, rich base.
Step 4: Stir in the Oats
Add 3 cups of quick oats to the mixture and stir to coat evenly. Make sure there are no dry patches. It should look thick, sticky, and well mixed.
Step 5: Scoop and Shape Cookies on Wax Paper
Use a spoon or cookie scoop to drop mounds of cookie mixture onto the prepared wax paper. Leave some space between each for easy removal later. You can shape them slightly with the back of a spoon if desired.
Step 6: Let Cookies Set
Let the cookies sit at room temperature for 20–30 minutes or until they’re firm. Resist the urge to refrigerate them too early—it can affect the texture. Once set, enjoy immediately or store for later.
Troubleshooting Common Issues
Even with the simplest recipes, things can go sideways. Don’t worry—it happens! Let’s look at the most common no-bake cookie issues and how to fix them.
1. Cookies Not Setting Properly
This is the #1 issue, and it almost always comes down to the boiling time. If you don’t boil the sugar, butter, and milk mixture for a full 60 seconds, the sugar won’t reach the right temperature to firm up as it cools. On the flip side, boiling too long can make the cookies dry and crumbly.
Fix: If you’ve already made a batch and they’re too soft, pop them in the fridge or freezer for a firmer texture. For next time, use a timer to get that sweet spot.
2. Grainy Texture
If the sugar doesn’t dissolve fully before boiling or during the boil, you might end up with a gritty, sandy cookie texture.
Fix: Make sure to stir continuously until the mixture reaches a smooth boil. Scrape the sides of the pot to incorporate everything well before adding peanut butter.
3. Too Dry or Crumbly
Boiled it too long? Used the wrong oats? That’ll do it. Overcooked sugar becomes brittle when cooled, and oats that are too thick won’t absorb moisture well.
Fix: Try using quick-cooking oats, which are smaller and absorb better. And be precise with your boil time.
4. Peanut Butter Separates
Using natural peanut butter without fully mixing it can cause oil to pool in your mixture, creating an inconsistent texture.
Fix: Stir natural peanut butter thoroughly before measuring. Better yet, use a classic store-brand creamy peanut butter for consistency.
Peanut Butter No-Bake Cookie Variations
One of the coolest things about this recipe? It’s a blank canvas for creativity. You can mix things up with just a few tweaks and additions.
Chocolate Peanut Butter No-Bakes
Add 1/4 cup cocoa powder to the sugar mixture before boiling for a rich, fudgy twist. You can also toss in chocolate chips after stirring in the oats (wait a few minutes or they’ll melt completely).
Nut Butter Substitutes
Not a peanut fan? Try:
- Almond butter
- Cashew butter
- Sunflower seed butter (great nut-free option)
Just keep the same ratios.
Vegan Version
Making it dairy-free is simple:
- Swap butter for vegan butter or coconut oil
- Use non-dairy milk like oat, soy, or almond
Just make sure your oats are certified gluten-free and your sugar is vegan-friendly if needed.
Add-In Ideas
- Shredded coconut
- Mini marshmallows
- Chopped nuts
- Dried cranberries or raisins
- Crushed pretzels for saltiness
Experiment and make them your own!
Storage Tips
Once your cookies are set, keeping them fresh is key. Here’s how to store them like a pro:
Room Temperature
Store in an airtight container for up to 1 week. Stack them with parchment paper in between to avoid sticking.
Refrigerator
If you like a firmer texture or live in a warm climate, keep them in the fridge for up to 2 weeks.
Freezer
These cookies freeze beautifully. Lay them flat in a zip-top bag or container and freeze for up to 3 months. Just let them thaw at room temp for 10–15 minutes before serving.
Serving Suggestions
These cookies aren’t just for snacking. They’re super versatile and perfect for:
- Lunchbox treats
- After-school snacks
- Holiday cookie platters
- Party favors
- Midnight cravings (yep, we’ve all been there)
Want to get fancy? Serve them with a scoop of ice cream or drizzle some melted chocolate on top. You can even crumble them over yogurt or smoothie bowls for extra texture.
Healthier Ingredient Swaps
Craving a healthier version? Here are a few easy swaps without sacrificing flavor:
- Sugar: Use coconut sugar or a sugar substitute like erythritol (but know this might affect texture)
- Butter: Try coconut oil or a plant-based butter
- Milk: Use almond, soy, or oat milk
- Oats: Choose gluten-free oats if needed
Keep in mind that changing ingredients can affect how well the cookies set, so test small batches first.
Fun Tips for Making with Kids
These cookies are perfect for making memories in the kitchen with kids. Here’s how to make it fun and safe:
- Let them scoop: Kids love using a cookie scoop or spoon to make their own portions
- Add toppings: Sprinkles, M&Ms, or gummy bears? Why not!
- Use cookie cutters: Once the cookies cool slightly, press them into fun shapes
- Give them a task: Stirring the oats or lining the tray keeps them involved and away from the hot pot
Bonus? These cookies are ready to eat in under 30 minutes, so there’s no long wait!
Why These Cookies Are Great for Gifting
Looking for an easy homemade gift? These cookies are a winner.
Here’s why they work so well:
- Affordable: Ingredients are inexpensive and easy to find.
- Quick to Make: You can whip up a batch in under 30 minutes.
- Package Perfectly: Stack them in cellophane bags, jars, or cookie tins with a ribbon.
- Long Shelf Life: They stay fresh for days, and even longer in the fridge or freezer.
- Customizable: Make them themed with colored sprinkles or tags.
Perfect for holidays, birthdays, teacher gifts, or just to brighten someone’s day.
FAQs about Peanut Butter No-Bake Cookies Recipe
1. Can I use old-fashioned oats instead of quick oats?
You can, but the texture will be chewier and denser. For the best result, stick with quick-cooking oats.
2. Why are my cookies too sticky even after cooling?
They probably didn’t boil long enough. Make sure you’re boiling the sugar mixture for a full 60 seconds.
3. Can I make these without sugar?
You can try sugar substitutes, but they may affect texture. Avoid liquid sweeteners like honey or maple syrup unless following a specific recipe.
4. Do these cookies need to be refrigerated?
Nope, but they’ll last longer if you keep them in the fridge—especially in warmer climates.
5. Can I double the recipe?
Absolutely! Just make sure your saucepan is large enough, and adjust boiling time slightly if the volume is significantly higher.
Conclusion
Peanut butter no-bake cookies are the ultimate low-effort, high-reward dessert. With just a few simple ingredients, a saucepan, and less than half an hour of your time, you’ve got a chewy, sweet, peanut-buttery snack that hits every time. Whether you’re making them for yourself, your family, or a last-minute party, these cookies are always a hit.
So next time you’re craving something sweet but don’t want to deal with the oven—remember this easy recipe. Once you try it, you’ll be hooked.


