Outback Bread Recipe: There’s something magical about the warm, dark, slightly sweet loaf they serve before the meal at Outback Steakhouse. You know the one—the bread that makes you forget what you even ordered.
If you’ve ever dreamed of recreating that soft, tender, slightly chewy bread at home, you’re in for a treat. This is the ultimate step-by-step guide to baking Outback Bread in your own kitchen—and guess what? It’s easier than you think!
What is Outback Bread?
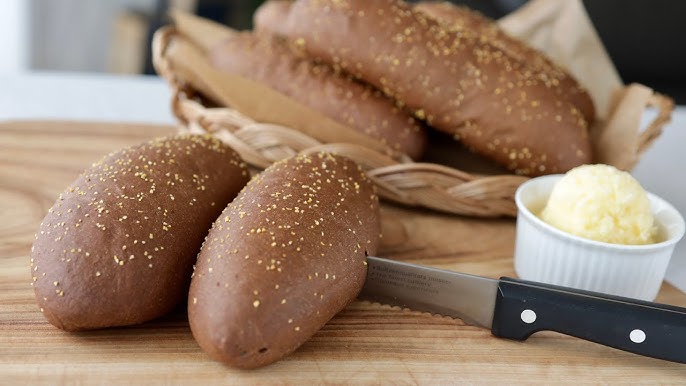
Outback Bread, often referred to as “Bushman Bread,” is a signature starter from Outback Steakhouse. It’s a soft, dark brown loaf made with molasses, whole wheat flour, and a touch of sweetness. What sets it apart is not just its color but its unique texture—fluffy on the inside with a subtle chew on the outside. Plus, it’s usually served warm with whipped butter, making it totally irresistible.
It’s technically a sweet wheat bread, with a hint of cocoa powder (yes, cocoa!) that gives it a slightly chocolaty hue without actually tasting like dessert. The combination of whole wheat flour and all-purpose flour makes the loaf hearty yet soft. A touch of molasses gives it that deep flavor and distinctive brown color.
Why You’ll Love This Copycat Outback Bread Recipe
Here’s why this recipe might just become your new favorite:
- Taste like the original: This is as close to the real thing as it gets without stepping into the restaurant.
- Simple ingredients: You likely already have most of these in your pantry.
- Healthier homemade version: No preservatives or unknown additives.
- Perfect for any occasion: Whether it’s dinner with friends or a cozy night in, this bread fits right in.
Not to mention, baking your own bread is super rewarding. The smell alone will make it worth your time!
The Origins of the Famous Outback Steakhouse Bread
The bread is inspired by Australian bush bread traditions, but with an American twist. Outback Steakhouse, a U.S.-based restaurant chain themed around Australian culture, introduced this bread to complement their hearty steak and comfort food offerings.
It was designed to be satisfying, mildly sweet, and filling—an ideal precursor to a meat-heavy meal. Over the years, it’s become a cult favorite, with people trying to crack the code at home. Now you can be one of them!
List of Ingredients You’ll Need
Getting your ingredients right is the first step to making this amazing bread. Let’s break it down:
Dry Ingredients
- 1 cup whole wheat flour
- 1 ½ cups all-purpose flour
- 2 tablespoons unsweetened cocoa powder
- 2 tablespoons granulated sugar
- 1 teaspoon salt
- 1 tablespoon dry active yeast
- 2 tablespoons cornmeal (for dusting)
Wet Ingredients
- ¾ cup warm water (about 110°F)
- ¼ cup molasses
- 2 tablespoons honey
- 2 tablespoons vegetable oil (or melted butter)
Optional Add-ins
- A pinch of instant coffee powder (enhances flavor)
- A few drops of brown food coloring (only if you want a darker loaf—totally optional)
Tools You’ll Need
- Mixing bowls
- Measuring cups and spoons
- Wooden spoon or stand mixer with dough hook
- Loaf pan or baking sheet
- Kitchen towel or plastic wrap
- Parchment paper (optional)
- Oven thermometer (recommended)
- Cooling rack
How to Make Outback Bread at Home
Let’s get to the fun part. Follow these steps for bakery-quality Outback Bread that’ll leave everyone asking for seconds!
Step 1: Activating the Yeast
In a small bowl, combine warm water (not hot), sugar, and active dry yeast. Stir gently and let it sit for 5–10 minutes until foamy. If it bubbles, your yeast is alive and ready to go.
Step 2: Mixing the Dry Ingredients
In a large bowl, whisk together bread flour, whole wheat flour, cocoa powder, instant coffee (optional but recommended), and salt. This mix gives the bread its signature color and deep flavor.
Step 3: Combining Wet and Dry
Add honey, melted butter, and molasses to the yeast mixture. Pour the wet ingredients into the dry ingredients and mix until a shaggy dough forms.
Step 4: Kneading the Dough
Turn the dough onto a lightly floured surface and knead for about 8–10 minutes, or until smooth and elastic. The dough should be soft but not sticky. Add a little flour if needed.
Step 5: First Proofing (Letting It Rise)
Place the dough in a lightly oiled bowl, turning once to coat. Cover with plastic wrap or a clean towel and let it rise in a warm spot for 1–1½ hours, or until doubled in size.
Step 6: Shaping the Loaves
Punch down the dough to release air. Divide it into equal portions and shape into oval or round loaves, depending on your preference.
Step 7: Second Rise
Place the shaped loaves on a parchment-lined baking sheet. Cover loosely and let rise again for 30–45 minutes until puffy.
Step 8: Baking to Perfection
Preheat the oven to 350°F (175°C). Bake the loaves for 25–30 minutes until the crust is firm and the bread sounds hollow when tapped.
Step 9: Cooling and Serving
Remove from the oven and let cool slightly. Slice and serve warm with whipped butter—just like the steakhouse experience, but better because you made it yourself 🥖
Expert Tips for Better Results
- Use room-temperature ingredients: This helps everything mix evenly and ensures a proper rise.
- Don’t over-knead: Too much kneading can make the bread tough.
- Be patient with rising: Good bread takes time to proof. Rushing it will affect the final texture.
- Check your yeast: Always proof your yeast to make sure it’s active before using it.
- Add flavor depth: A pinch of instant coffee or espresso powder can enhance the richness of the bread without making it taste like coffee.
These tips might seem small, but they make a big difference in achieving that perfect loaf.
Common Mistakes to Avoid
Even experienced bakers sometimes slip up. Watch out for these common missteps:
- Water that’s too hot: It can kill the yeast. Aim for around 110°F.
- Skipping the second rise: Makes your bread dense and heavy.
- Using too much flour: Resist adding extra flour unless the dough is very sticky. A little tackiness is normal.
- Overbaking: Leads to a dry loaf. Start checking at the 20-minute mark.
- Cutting too early: Let the bread rest after baking to avoid a gummy center.
Learning to recognize these will help you perfect your bread over time.
How to Store and Reheat Outback Bread
Homemade bread is best fresh, but it can last a few days if stored properly.
- Room Temp: Wrap the bread in foil or place it in an airtight container for up to 3 days.
- Freezer: Wrap tightly in plastic wrap and foil, then freeze for up to 3 months.
- Reheat: To bring it back to life, warm it in a 300°F oven for 8–10 minutes or slice and toast.
Avoid storing bread in the fridge—it dries out quickly there. Freezing is a much better option if you need to store it longer.
Serving Suggestions
This bread isn’t just a pre-dinner snack. You can serve it in so many creative ways:
- With soup: Especially hearty ones like potato soup or chili.
- As sandwich bread: For roast beef, turkey, or even grilled cheese.
- With a steak dinner: Just like Outback does.
- Toasted with butter and cinnamon sugar: A sweet treat for breakfast.
- With dips: Try spinach-artichoke dip or whipped goat cheese.
Its mildly sweet flavor pairs with both sweet and savory dishes, making it super versatile.
Outback Bread Variations You Can Try
Once you’ve mastered the classic version, why not mix it up a bit? There are several creative ways to tweak this recipe based on your taste preferences or dietary needs:
1. Honey-Oat Outback Bread
Swap out some of the whole wheat flour for oat flour and sprinkle rolled oats on top before baking. This adds a nuttier flavor and a heartier texture.
2. Gluten-Free Version
Use a 1:1 gluten-free flour blend in place of the all-purpose flour and whole wheat flour. Be sure to add a binding agent like xanthan gum (usually included in blends). You may need to adjust rise times and kneading slightly, as GF dough behaves differently.
3. Vegan Outback Bread
The base recipe is already close to vegan. Just ensure you use maple syrup or agave instead of honey and stick to plant-based oil or vegan butter.
4. Spiced Outback Bread
Add ½ teaspoon of cinnamon and ¼ teaspoon of nutmeg to the dry mix for a warm, spiced twist—perfect for holiday dinners or cozy nights.
5. Chocolate-Chip Outback Loaf
Want a sweet twist? Fold in mini dark chocolate chips before shaping the dough. It becomes a dessert bread that’s totally indulgent without being overly sugary.
Each of these variations brings something new to the table while maintaining the heart and soul of the original recipe.
Nutritional Information (Approximate per slice)
| Nutrient | Amount (per slice) |
|---|---|
| Calories | 160–180 kcal |
| Carbohydrates | 32 g |
| Protein | 4 g |
| Fat | 3 g |
| Sugar | 6 g |
| Fiber | 2 g |
| Sodium | 180 mg |
Keep in mind that values will vary slightly based on portion size and any substitutions or add-ins.
FAQs about Outback Bread Recipe
1. Can I use all-purpose flour instead of whole wheat?
Yes, you can substitute all-purpose for whole wheat flour, but it will slightly change the texture and flavor. Whole wheat gives the bread its hearty, nutty base.
2. Why is cocoa powder in the recipe?
The cocoa doesn’t make the bread taste like chocolate—it adds color and depth. It’s subtle but essential for that authentic Outback color and mild bitterness to balance the sweetness.
3. Can I make the dough ahead of time?
Absolutely. After the first rise, you can refrigerate the dough overnight. Just let it come to room temperature and rise again before baking.
4. What if my bread isn’t rising?
Check your yeast. It may be expired or the water might’ve been too hot or too cold. Always proof your yeast to make sure it’s alive before moving forward.
5. How long does the bread stay fresh?
Homemade Outback Bread stays fresh for up to 3 days at room temperature. For longer storage, freeze it and reheat when needed.
Conclusion
Baking your own Outback Bread isn’t just about satisfying a restaurant craving—it’s about turning your kitchen into a warm, inviting space filled with the smell of fresh-baked goodness. With its rich color, sweet molasses notes, and soft, tender crumb, this bread is more than just a side dish—it’s a centerpiece.
From start to finish, you’ve learned how to activate yeast, mix and knead the perfect dough, and bake loaves that’ll have your friends and family thinking you trained at a steakhouse bakery. And don’t forget, you can customize this bread in tons of ways—vegan, gluten-free, chocolatey, or oat-crusted—so it never gets boring.
So go ahead, preheat that oven, roll up your sleeves, and start baking. Once you make this at home, you might never go back to the restaurant just for the bread again.


