Multigrain Bread Recipe: Who doesn’t love the smell of freshly baked bread filling the house? And if you’re on the hunt for something hearty, healthy, and absolutely delicious, multigrain bread is the way to go. Packed with the goodness of various grains, this bread isn’t just a treat to your taste buds but also a powerhouse of nutrition.
Whether you’re a first-time baker or a seasoned pro, this step-by-step guide will walk you through everything you need to know to make the perfect loaf of multigrain bread at home. Let’s roll up our sleeves and get baking!
Why Choose Multigrain Bread Over Regular Bread?
When you’re at the grocery store, you’re likely overwhelmed with choices—white, whole wheat, rye, sourdough, and of course, multigrain. So, why should you reach for that multi-textured, seedy loaf instead of the soft, fluffy white one? The answer is simple: nutrition and taste.
Multigrain bread is made from two or more types of grains and seeds. Each grain brings its own unique set of nutrients, textures, and flavors to the table. While white bread is often stripped of its fiber and essential nutrients during processing, multigrain bread keeps it real—offering you fiber, protein, vitamins, and minerals in every bite. Plus, the combination of grains gives it a heartier texture and nutty, wholesome flavor that white bread just can’t compete with.
And if you’re someone who’s watching your weight or managing your blood sugar, the slow-digesting complex carbs in multigrain bread help keep energy levels stable. It’s a smart, tasty upgrade for your daily diet.
Health Benefits of Multigrain Bread
Multigrain bread isn’t just tasty—it’s good for you, too. When you use a mix of whole grains, seeds, and legumes, your body reaps the nutritional rewards. Here are some of the top health benefits:
- High in Dietary Fiber: Helps improve digestion and keeps you full longer, reducing the chances of overeating.
- Promotes Heart Health: Whole grains are linked to a reduced risk of heart disease, thanks to their fiber, antioxidants, and plant compounds.
- Manages Blood Sugar Levels: Complex carbs digest more slowly, helping to prevent blood sugar spikes.
- Rich in Micronutrients: Including iron, magnesium, selenium, and B vitamins.
- Supports Weight Loss: The fiber and protein content helps you feel full and satisfied.
Adding multigrain bread to your diet isn’t just a culinary choice—it’s an investment in your health.
List of Grains Commonly Used in Multigrain Bread
Here’s where multigrain bread shines. You’re not limited to just wheat. Here’s a list of grains and seeds commonly found in multigrain bread, each adding its own flair:
- Whole Wheat Flour: Base grain that gives structure and fiber.
- Rolled Oats: Adds chewiness and softness to the crumb.
- Barley: Nutty flavor and additional fiber.
- Millet: Adds crunch and a slightly sweet flavor.
- Flaxseed: A great source of omega-3s and fiber.
- Sunflower Seeds: Provides a toasty, nutty flavor and crunchy texture.
Mix and match depending on your preference or what you have at home. The variety makes every loaf special.
Kitchen Tools and Equipment You’ll Need
Before diving into the recipe, make sure your kitchen is set up for success. Here’s a checklist:
- Mixing Bowl: For combining ingredients.
- Measuring Cups & Spoons: Precision matters.
- Stand Mixer with Dough Hook (optional): Makes kneading easier.
- Wooden Spoon or Spatula: For initial mixing.
- Bread Loaf Pan: 9×5 inches is the standard.
- Kitchen Scale (optional): For exact ingredient measurements.
- Plastic Wrap or Clean Towel: To cover dough during rising.
- Oven or Bread Machine: Choose your preferred method of baking.
Having the right tools on hand ensures your baking session runs smoothly and efficiently.
Ingredients You’ll Need (Detailed List)
Ready to gather your ingredients? Here’s a complete list, divided into categories for clarity:
Dry Ingredients
- 2 cups whole wheat flour
- 1 cup bread flour (or all-purpose flour)
- ½ cup rolled oats
- 2 tbsp ground flaxseed
- 2 tbsp sunflower seeds
- 1 tbsp chia seeds (optional)
- 1½ tsp salt
- 2 tbsp brown sugar or honey
Wet Ingredients
- 1 tbsp instant yeast
- 1½ cups warm water (110°F/43°C)
- 2 tbsp olive oil
Optional Toppings
- Rolled oats for garnish
- Sesame seeds or flaxseeds for crust
- Egg wash or water spray before baking
Having all your ingredients ready before you start helps everything go faster and smoother.
Understanding the Role of Each Ingredient
To bake great bread, you’ve got to understand what each ingredient brings to the table. Think of your bread dough like a team—every player has a role.
- Whole Wheat Flour is the foundation. It’s dense, hearty, and full of nutrients. It adds a rich, nutty flavor and increases the fiber content of your bread.
- Bread Flour (or All-Purpose Flour) adds the protein (gluten) that helps give the bread structure and elasticity. Using a bit of white flour helps balance the density of whole wheat.
- Oats bring a chewy, soft texture to the bread, while also providing slow-digesting carbs and heart-healthy fiber.
- Flaxseeds and Chia Seeds are nutrient bombs. These tiny seeds add omega-3s, fiber, and a crunchy bite.
- Sunflower Seeds create a nice contrast with their nutty taste and a little crunch in every bite.
- Salt controls the yeast fermentation and enhances flavor. Without it, your bread might taste flat.
- Brown Sugar or Honey adds a slight sweetness, but more importantly, it feeds the yeast during proofing.
- Instant Yeast is the magic that makes your dough rise. It eats sugar, produces carbon dioxide, and makes the dough puff up.
- Olive Oil adds moisture and richness to the bread, making the crumb tender and flavorful.
- Warm Water activates the yeast and hydrates the flour, starting the gluten development process.
Each ingredient has a purpose. Leaving out even one can impact the final product.
Prepping Your Ingredients: What to Do First
Before you even touch the mixing bowl, there are a few prep steps to take that can make or break your bread.
- Measure Accurately: Bread baking is more of a science than other types of cooking. Use measuring cups for dry ingredients and a glass or measuring jug for liquids. Better yet, weigh ingredients with a digital scale for consistent results.
- Toast Your Grains (Optional but Recommended): Toast oats, sunflower seeds, and flaxseeds in a dry pan over medium heat for a few minutes until lightly golden and aromatic. This enhances their flavor and gives your bread a more complex, nutty taste.
- Warm the Water: Yeast loves warm water (around 110°F or 43°C). Too hot, and it’ll die. Too cold, and it won’t activate. Use a thermometer if you’re unsure.
- Grease Your Loaf Pan: Use butter or non-stick spray. This makes removing the bread later easier and gives the crust a nice golden finish.
- Clear Your Workspace: Having everything in one place makes the process smooth and enjoyable.
Proper prep ensures your baking process flows like clockwork—and that you don’t end up with a doughy disaster.
Step-by-Step Guide to Making Multigrain Bread
Alright, let’s dive into the heart of the process—baking! Follow these steps carefully, and you’ll end up with a golden, hearty loaf every time.
Step 1: Activate the Yeast
In a small bowl, mix warm water (not hot), yeast, and a pinch of sugar or honey. Stir gently and let it sit for 5–10 minutes until foamy. This confirms the yeast is active.
Step 2: Mix the Dry Ingredients
In a large bowl, combine multigrain flour (or a mix of whole wheat and grains), oats, seeds, salt, and any additional grains you like. Mix well so everything is evenly distributed.
Step 3: Combine Wet and Dry Ingredients
Add the activated yeast mixture, oil or melted butter, and any sweetener to the dry ingredients. Stir until a rough dough forms. The dough should be slightly sticky but manageable.
Step 4: Kneading the Dough
Transfer the dough to a lightly floured surface. Knead for 8–10 minutes until smooth and elastic. If the dough is too sticky, add small amounts of flour as needed.
Step 5: First Proofing
Place the dough in a lightly oiled bowl, turning once to coat. Cover with a clean towel and let it rise in a warm place for 1–1½ hours, or until doubled in size.
Step 6: Shaping the Dough
Punch down the dough gently to release air. Shape it into a loaf or desired form and place it into a greased loaf pan or on a baking tray.
Step 7: Second Proofing
Cover the shaped dough and let it rise again for 30–45 minutes until puffy. This second rise improves texture and crumb.
Step 8: Baking the Bread
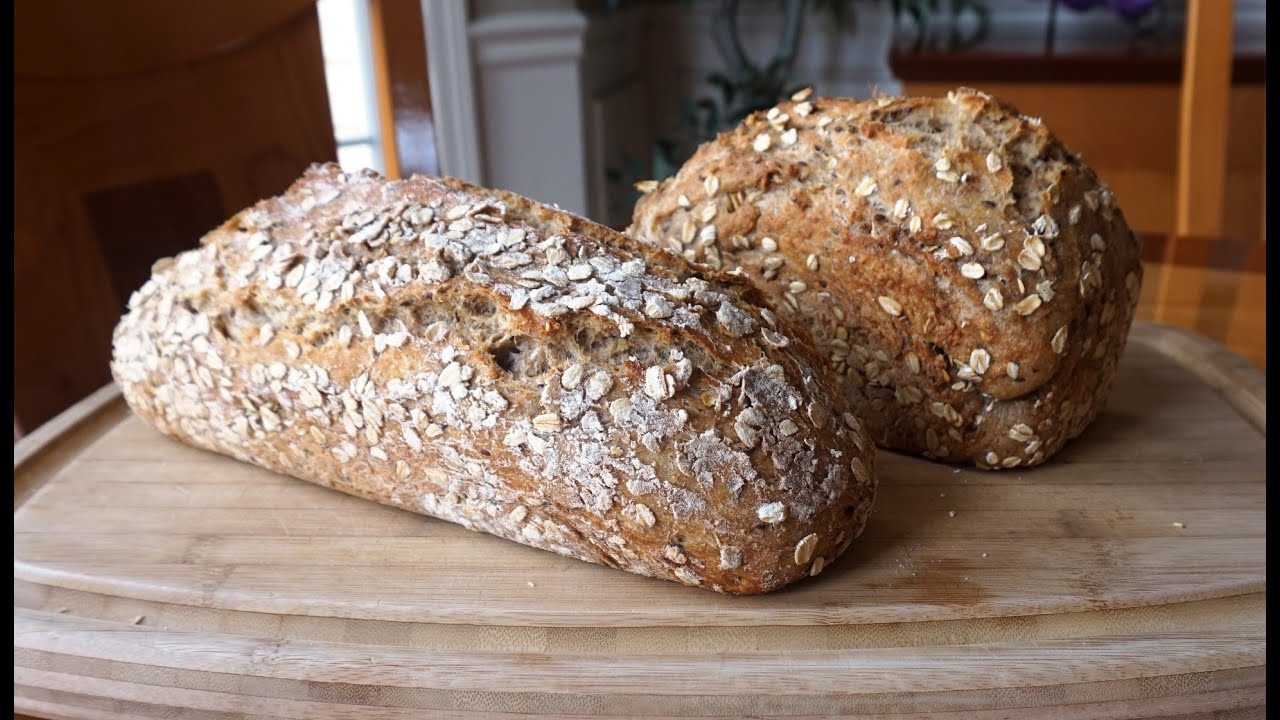
Preheat the oven to 190°C (375°F). Bake for 30–35 minutes, or until the loaf is golden brown and sounds hollow when tapped on the bottom.
Step 9: Cooling and Storing
Remove the bread from the pan and cool completely on a wire rack before slicing. Store in an airtight container or wrap to keep fresh.
Pro Tips for Perfect Multigrain Bread Every Time
- Don’t Rush the Rise: Letting the dough rise slowly brings out better flavor and texture.
- Hydration is Key: Your dough should be soft and slightly tacky but not sticky. Adjust with small amounts of flour or water as needed.
- Slash the Top: Make a shallow cut across the top of your loaf before baking. It helps control where the bread expands and gives it a professional look.
- Steam in the Oven: Place a small pan of water on the bottom rack of your oven while baking. The steam creates a crisp crust.
- Use Fresh Ingredients: Old flour or expired yeast can ruin your loaf. Always check expiration dates before you begin.
Multigrain Bread Variations
Looking to experiment? There are tons of ways to customize your multigrain loaf.
- Gluten-Free Version: Swap wheat flour with gluten-free alternatives like oat flour, buckwheat, and almond flour. Use psyllium husk to mimic gluten’s elasticity.
- Vegan Version: This recipe is already vegan if you use maple syrup or sugar instead of honey.
- Seeded Crust Option: Press sesame, poppy, or pumpkin seeds into the top of your dough before baking for a crunchy finish.
These tweaks make it easy to adapt your bread for dietary needs or just for fun.
How to Store Homemade Multigrain Bread
You’ve just baked a beautiful loaf—now let’s talk about how to keep it fresh and tasty for as long as possible.
Short-Term Storage (1–3 Days)
- Room Temperature: Store your bread in a breadbox, paper bag, or cloth bag at room temperature. Avoid plastic if you want a crispy crust.
- Airtight Container: If your environment is very dry, you can store it in a reusable, airtight container, but know that it might soften the crust.
Medium-Term Storage (Up to 1 Week)
- Refrigeration Warning: Avoid the fridge unless your kitchen is very humid. Bread tends to dry out faster in cold environments.
- If you must refrigerate, wrap it tightly in plastic wrap or place it in a sealed container.
Freezing Multigrain Bread
- Freeze Slices Individually: Slice the bread, wrap each slice in parchment paper, and freeze in a zip-top freezer bag. This way, you can pull out one slice at a time.
- To Thaw: Just toast it directly from frozen, or let it sit at room temp for 15–20 minutes.
Proper storage helps prevent waste and makes sure you get the most out of your homemade effort.
Serving Suggestions
Multigrain bread isn’t just a sidekick—it can be the star of your meals. Here are some delicious ways to enjoy it:
For Breakfast
- Avocado Toast: Spread ripe avocado, sprinkle with chili flakes, sea salt, and lemon juice.
- Nut Butter & Banana: A smear of almond butter with sliced bananas and a drizzle of honey—simple and powerful.
- Toasted with Jam: Classic but always good with homemade berry jam or marmalade.
For Lunch
- Hearty Sandwich: Use it as a base for turkey, cheese, lettuce, and mustard.
- Grilled Cheese: Multigrain bread adds crunch and depth to a melty grilled cheese.
- Open-Faced Toppers: Try smoked salmon, cream cheese, capers, and dill.
Dinner Pairings
- Soup Sidekick: Serve it warm alongside creamy soups like tomato basil or butternut squash.
- With Salad: Cube and toast it to make croutons or serve slices alongside Caesar or Greek salads.
Get creative! This bread plays well with sweet and savory, soft and crunchy.
Troubleshooting Common Bread Baking Problems
Even seasoned bakers hit a snag now and then. Here’s how to fix the most common issues with multigrain bread:
1. My Bread Didn’t Rise
- Your yeast may have been expired.
- The water might’ve been too hot or too cold.
- You may not have proofed it long enough or your kitchen was too cold.
Fix: Always test your yeast before starting. Let dough rise in a warm, draft-free space.
2. The Bread is Too Dense
- Not enough kneading time or flour with low protein.
- Too many heavy grains without enough gluten to support them.
Fix: Knead longer or add more bread flour to give structure.
3. Crust is Too Hard
- You baked it too long or didn’t use steam in the oven.
Fix: Cover the top loosely with foil during the last 10 minutes of baking to prevent over-browning. Add steam to keep the crust from hardening too fast.
4. Bread is Dry
- Over-baking, too much flour, or not storing properly.
Fix: Check doneness with a thermometer and follow storage tips to preserve moisture.
5. Bread Collapsed After Baking
- Over-proofing or under-baking.
Fix: Reduce second rise time slightly and ensure you’re baking until internal temperature hits 200°F (93°C).
Bread baking is part science, part art. Mistakes help you learn—and the rewards are always tasty.
FAQs about Multigrain Bread Recipe
1. Can I make multigrain bread without yeast?
Yes! You can substitute yeast with baking soda and an acid like buttermilk or yogurt for a quick bread version. The texture will be different—more like a dense cake—but still delicious.
2. How long does homemade multigrain bread last?
Typically 3–4 days at room temperature, up to a week in the fridge, or 2–3 months in the freezer. Just be sure to store it properly.
3. Can I use a bread machine for this recipe?
Absolutely. Add the ingredients in the order recommended by your machine (usually liquids first, then dry ingredients, and yeast last). Use the “Whole Wheat” or “Multigrain” setting if available.
4. Is multigrain bread healthier than white bread?
Yes! Multigrain bread usually contains more fiber, vitamins, and minerals, especially if made with whole grains. It digests slower, keeps you full longer, and offers more nutrients per slice.
5. How do I know when the bread is fully baked?
Tap the bottom of the loaf—it should sound hollow. For accuracy, use a food thermometer; the inside should read about 200°F (93°C).
Conclusion
Homemade multigrain bread is more than just a recipe—it’s a lifestyle change. With every loaf you bake, you’re choosing real ingredients, full flavors, and better health. Sure, it takes a little more time and attention than grabbing a loaf off the shelf, but the reward is so much greater. You control what goes into your bread—no preservatives, no weird fillers, just wholesome grains and the satisfaction of doing it yourself.
Whether you eat it for breakfast, build a sandwich for lunch, or toast it with soup for dinner, this bread will be a daily staple you’ll never get tired of. Plus, once you master the basics, you can tweak the recipe to make it uniquely yours.
So go ahead, gather your grains, roll up those sleeves, and bake your heart out.


