Marshmallow Frosting Recipe: If you’re on the hunt for a frosting that’s light as air, sweet like a dream, and glossy enough to make your dessert photos pop, marshmallow frosting is your golden ticket. This cloud-like topping is a magical blend of sugar, egg whites, and vanilla that whips into a smooth, shiny, and incredibly delicious finish. Whether you’re frosting cupcakes, topping a cake, or simply want a new go-to frosting that isn’t as heavy as buttercream, this recipe’s for you.
But here’s the real kicker: it looks fancy, but it’s surprisingly easy to make at home with just a few ingredients and a little know-how. Ready to take your desserts to the next level?
Let’s dive right in.
Ingredients You’ll Need
This marshmallow frosting recipe calls for just a handful of basic pantry staples. You probably already have most of them in your kitchen. Here’s what you’ll need:
- 4 large egg whites
- 1 cup granulated sugar
- 1/4 teaspoon cream of tartar
- 1 teaspoon pure vanilla extract
- Pinch of salt (optional)
Simple, Everyday Ingredients
The beauty of this recipe is how minimal it is. No need for store-bought fluff or marshmallow creme—this is the real, homemade deal. Egg whites give the frosting its structure, sugar sweetens and stabilizes, cream of tartar helps achieve those lovely stiff peaks, and vanilla adds that irresistible flavor.
Ingredient Breakdown & Substitutes
- Egg Whites: Use fresh eggs or pasteurized liquid egg whites. Just make sure there’s no yolk mixed in.
- Granulated Sugar: Don’t sub with powdered sugar—it won’t work the same. The granules help with the meringue structure.
- Cream of Tartar: This is optional but highly recommended. It helps stabilize the egg whites and makes the frosting hold its shape longer.
- Vanilla Extract: Use pure vanilla for best flavor. You can also experiment with almond or coconut extract for a twist.
- Salt: A pinch helps balance the sweetness.
Kitchen Tools You’ll Need
To pull this off like a pro, having the right equipment on hand makes a big difference. Here’s what you’ll need:
- Heatproof mixing bowl (glass or metal)
- Saucepan (to act as a double boiler)
- Hand mixer or stand mixer
- Whisk
- Spatula
- Candy thermometer (optional but helpful)
Pro Tip: Make sure all tools, especially your mixing bowl and beaters, are super clean and grease-free. Any fat residue can prevent the egg whites from whipping up properly.
Before You Begin
Before you crack those eggs, let’s set you up for success. Marshmallow frosting is super simple once you get into the flow, but preparation is key.
- Separate the eggs carefully – even a tiny bit of yolk will mess with the meringue.
- Wipe down your tools with vinegar or lemon juice to ensure no fat or oil residue is present.
- Measure everything out ahead of time so you’re not scrambling mid-step.
- Set up your double boiler – you’ll be whisking the mixture over simmering water, not direct heat.
Step-by-Step Guide: How to Make Marshmallow Frosting
Step 1: Prep the Double Boiler
Fill a saucepan with about 1-2 inches of water and bring it to a simmer. Place your heatproof mixing bowl on top (without touching the water). This is where the magic begins.
Step 2: Combine Ingredients
In the mixing bowl, combine egg whites, sugar, and cream of tartar. Give it a good whisk to combine, then set it over your simmering water.
Step 3: Heat Gently While Whisking
Whisk the mixture constantly over the simmering water. The sugar should dissolve completely—this takes about 4 to 6 minutes. You can rub a bit of the mixture between your fingers to check. It should feel smooth, not gritty.
Optional: Use a candy thermometer and heat the mixture until it reaches 160°F. This ensures the egg whites are safe to eat.
Step 4: Whip Until Glossy and Stiff
Once the sugar is dissolved and the mixture is warm, remove the bowl from the heat. Immediately beat with a hand or stand mixer on high speed for 6 to 8 minutes, or until stiff, glossy peaks form. The frosting should look like shiny clouds.
Step 5: Cool and Use Immediately
Let the frosting cool slightly before using. It’s best used right away for piping or spreading. Don’t wait too long—it starts to set as it cools!
Pro Tips for Perfect Marshmallow Frosting
Want that show-stopping, bakery-level marshmallow frosting? A few little tricks make a huge difference:
- No Yolk Allowed: Even the tiniest drop of yolk can stop your egg whites from whipping. Be extra careful when separating eggs.
- Clean Tools Only: Grease is the enemy. Wipe your bowl and beaters with lemon juice or vinegar before using them.
- Whisk Constantly When Heating: Don’t stop stirring while your egg whites and sugar are heating over the double boiler. If you let it sit, the eggs could start to cook—and no one wants scrambled eggs in their frosting.
- Test for Sugar Dissolving: Before removing from heat, rub a tiny amount of the mixture between your fingers. If it feels gritty, keep whisking. Smoothness is your cue.
- Cool Slightly Before Using: This frosting sets as it cools, so wait just a minute or two before applying, especially if you plan to pipe designs.
- Use Immediately: Unlike buttercream, marshmallow frosting doesn’t hold its shape for days. It’s best applied fresh for maximum fluff.
If you follow these tips, your frosting will look and taste like it came straight from a pro bakery—promise.
Ways to Use Marshmallow Frosting
This frosting is far more versatile than you might think. Its texture is ideal for everything from everyday cupcakes to elegant layer cakes.
Cakes & Cupcakes
Pipe tall swirls onto cupcakes or spread thick layers between cakes. The glossy white peaks look stunning and feel ultra-light on the palate.
Cookies
Ever tried sandwiching it between two graham crackers or chocolate cookies? Think of it like a homemade MoonPie. Total game-changer.
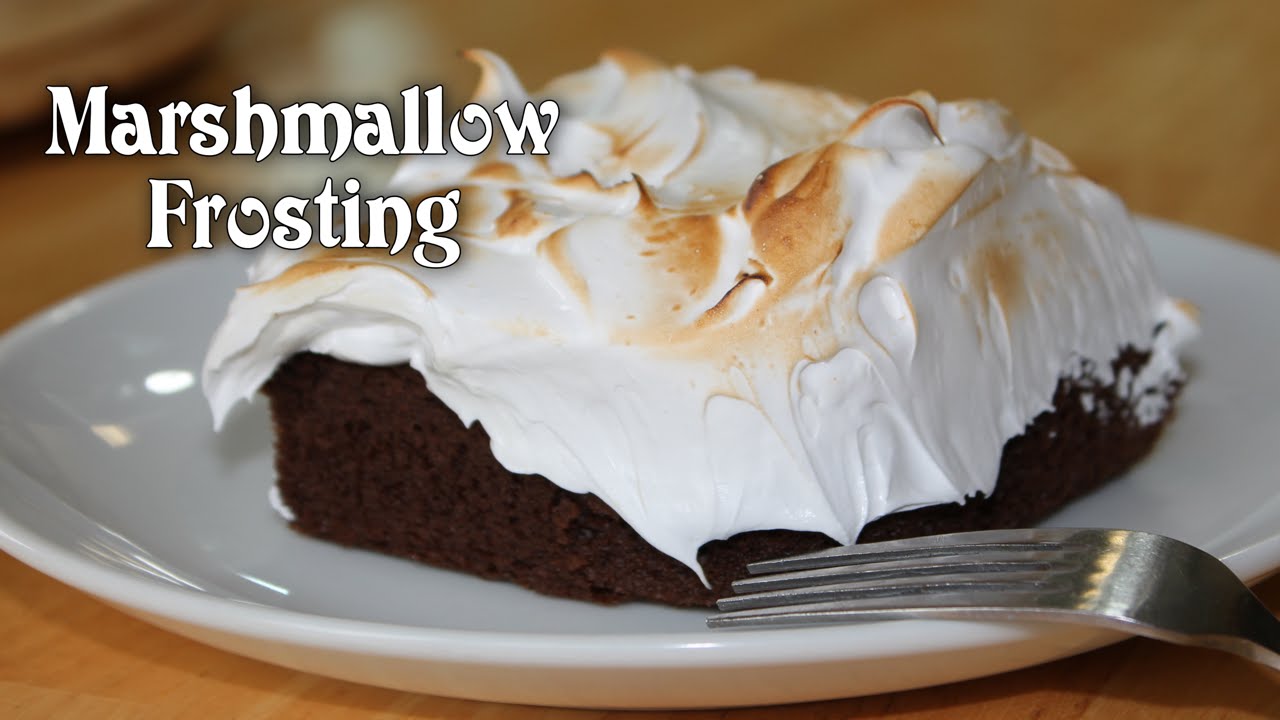
Brownies
A layer of marshmallow frosting on top of fudgy brownies turns your standard dessert into a marshmallow lover’s dream.
Hot Cocoa Topping
Swap your standard marshmallows for a spoonful of this frosting on top of hot chocolate. Add a quick torching for that toasted marshmallow vibe!
Creative Ideas
- Dollop it over fruit for a fun dessert dip.
- Use it to top s’mores-inspired milkshakes.
- Swirl it into pie toppings (think lemon meringue-style).
Honestly, once you make it once, you’ll find a dozen more reasons to whip it up again.
Flavor Variations
Plain vanilla is classic, but don’t stop there. Add a little creativity and transform this frosting into something totally unique.
Chocolate Marshmallow
Add 2 tablespoons of unsweetened cocoa powder after whipping to create a chocolatey version that’s rich but still fluffy.
Strawberry Swirl
Fold in a couple of spoonfuls of freeze-dried strawberry powder or swirl in pureed strawberries for a fruity twist.
Toasted Marshmallow Flavor
Add a drop or two of toasted marshmallow flavoring (yes, it exists!) to make your frosting taste like it just came from a campfire.
Mint or Almond
A few drops of mint extract or almond extract can completely change the vibe. Great for holiday cupcakes or themed cakes.
Feel free to experiment, and don’t be afraid to mix extracts with fruit purees or colorings. Marshmallow frosting plays well with bold flavors.
Storage Tips
Since marshmallow frosting is made from egg whites, it doesn’t store like buttercream. But you can save it for later if you’re strategic.
Short-Term Storage
- Store leftover frosting in an airtight container at room temperature for up to 2 hours.
- For longer, place it in the fridge for up to 2 days. Stir gently before reusing.
- If piped onto baked goods, it can sit at room temperature for a few hours but should ideally be consumed the same day.
Freezing? Not Recommended
Freezing breaks down the meringue and messes with the texture. It will likely turn watery once thawed.
Re-Fluffing Leftovers
If your frosting gets a bit flat in the fridge, give it a quick re-whip with your mixer to bring back some of the fluffiness.
How to Toast the Frosting (Optional)
If you really want to go gourmet, toast the frosting. It adds a gorgeous golden top and deep, caramelized flavor that screams s’mores.
Tools You’ll Need
- Kitchen torch (small handheld one)
- Fireproof surface
Steps
- Pipe or spread your frosting on your dessert.
- Hold the torch about 2-3 inches away.
- Move in circular motions until golden brown.
No Torch? Carefully place your frosted dessert under the oven broiler for a few seconds. Watch it like a hawk—it can burn in a flash.
Toasted marshmallow frosting turns basic cupcakes into an Instagram moment. Try it at least once—you won’t regret it.
Comparison: Marshmallow Frosting vs. Buttercream
Let’s break it down. These two frostings couldn’t be more different in taste, texture, and use.
| Feature | Marshmallow Frosting | Buttercream |
|---|---|---|
| Texture | Light, airy, fluffy | Dense, creamy, rich |
| Sweetness | Sweet but not heavy | Sweet and buttery |
| Main Ingredients | Egg whites, sugar | Butter, powdered sugar |
| Shelf Life | Short (1-2 days) | Long (up to a week refrigerated) |
| Use | Cakes, cupcakes, pies, toasting | Cakes, piping, intricate designs |
| Calories | Lower (no fat) | Higher (fat from butter) |
Bottom line: marshmallow frosting is best when you want something light, meringue-like, and whimsical. Buttercream rules when you need structure or richness.
Troubleshooting Guide
Why Is My Frosting Runny?
- You may not have whipped it long enough.
- There might be yolk contamination.
- The sugar may not have fully dissolved.
Fix: Re-whip on high speed for a few more minutes. If that doesn’t help, try starting a fresh batch.
Why Isn’t It Glossy?
- Not enough whipping.
- Overheating the egg whites.
- Low-quality sugar.
Gloss comes from aeration and clean ingredients. Next time, double-check your steps and tools.
Why Does It Taste Grainy?
That means the sugar didn’t fully dissolve during heating. Whisk longer over the double boiler until smooth.
Nutritional Information
Let’s break down what’s actually in a serving of this marshmallow frosting. Keep in mind, exact numbers will vary depending on portion size and any added flavors or toppings.
Per 2-Tablespoon Serving (Approximate):
- Calories: 60–70
- Fat: 0g
- Carbohydrates: 15g
- Sugars: 14–15g
- Protein: 1–2g
- Fiber: 0g
- Cholesterol: 0mg
- Sodium: Trace amounts (depending on salt or cream of tartar used)
Since this frosting doesn’t include butter or heavy cream, it’s fat-free—but it does pack in the sugar. It’s lighter on the palate and in calories compared to traditional buttercream, making it a great alternative when you want something airy and sweet without the heaviness.
Of course, moderation is key. Even though it’s low in fat, it’s still sugar-heavy. But hey—this is dessert we’re talking about, not a protein shake!
FAQs about Marshmallow Frosting Recipe
1. Can I make marshmallow frosting in advance?
Yes—but it’s best fresh. If you must prep it early, store it in the fridge in an airtight container for no more than 1–2 days. Re-whip before using to restore the texture.
2. Can I color marshmallow frosting?
Absolutely! Use gel food coloring (not liquid, which can water it down). Add a tiny amount at the end of whipping and gently fold to incorporate.
3. Is marshmallow frosting safe to eat with raw egg whites?
Yes—because the egg whites are heated to 160°F during the double boiler process, they’re safe to eat. Alternatively, use pasteurized egg whites for extra peace of mind.
4. Can I use marshmallow frosting to pipe decorations?
Yup! It holds soft shapes beautifully—perfect for swirls, rosettes, and simple borders. Just don’t expect the stiffness of buttercream for detailed flowers or sharp designs.
5. Why does my frosting deflate after a while?
This can happen if it’s under-whipped or sits too long. Always beat until you see stiff, glossy peaks, and try to use it immediately after making for the fluffiest results.
Conclusion
There you have it—the ultimate guide to making marshmallow frosting from scratch. It’s simple, satisfying, and sweet without being over-the-top. Whether you’re decorating cupcakes, layering cakes, or just need a fluffy topper for your brownies or cookies, this frosting adds a beautiful, homemade touch.
You don’t need fancy ingredients or years of pastry school to whip this up—just a little patience and a sweet tooth. Once you make it the first time, you’ll wonder why you ever bothered with store-bought versions.
So the next time you need a frosting that wows without weighing your dessert down, skip the buttercream and go marshmallow. Light, glossy, and totally irresistible—this recipe is a keeper.


