Japanese Pancakes Recipe: Have you ever seen a stack of pancakes so fluffy they literally jiggle on the plate? That’s the magic of Japanese pancakes—light, airy, and melt-in-your-mouth soft. These aren’t your average American breakfast flapjacks. They’re sky-high, souffle-style wonders that have taken over Instagram and foodie blogs alike. The craze started in Japan but quickly spread worldwide thanks to their dreamy appearance and delicate texture.
What’s so addictive about them? It’s not just the taste (which is subtly sweet and buttery), but the entire experience—watching them rise as they steam-cook in molds, giving them their iconic thickness. You don’t need to travel to Tokyo or pay $15 at a fancy brunch café to enjoy these beauties. With the right technique and a little patience, you can make them right at home.
So, ready to give your pancake game an upgrade? Let’s get fluffy!
What Makes Japanese Pancakes Different?
Japanese pancakes, also known as “souffle pancakes,” are a unique fusion of souffle and pancake. Instead of being dense and doughy, they’re airy and cloud-like. The secret lies in the technique—specifically, the use of meringue.
Traditional pancakes rely on baking powder or soda to rise. Japanese pancakes, on the other hand, get their lift from whipped egg whites folded into the batter. This creates an incredibly soft, fluffy texture that’s almost like eating sweet pancake clouds. They’re also cooked slowly over low heat in ring molds, which helps maintain their structure and rise.
Another standout feature? Their presentation. These pancakes are often served in a towering stack, with toppings like whipped cream, powdered sugar, fresh fruits, or even a drizzle of maple syrup. The final result is not only delicious but also picture-perfect—ideal for your next food post.
List of Ingredients You’ll Need
Creating the perfect Japanese pancake starts with gathering the right ingredients. Most of these are common kitchen staples, but the ratios and freshness matter!
Basic Ingredients:
- 2 large eggs (separated)
- 2 tablespoons whole milk
- 1/4 teaspoon vanilla extract (optional but recommended)
- 3 tablespoons all-purpose flour (sifted)
- 1/4 teaspoon baking powder
- 2 tablespoons granulated sugar
- 1/8 teaspoon cream of tartar or lemon juice (to stabilize meringue)
- Butter (for greasing the pan)
- Water (for steaming in the pan)
Optional Add-ons:
- Powdered sugar (for dusting)
- Fresh berries (strawberries, blueberries, raspberries)
- Whipped cream
- Maple syrup or honey
- Ice cream (for dessert-style pancakes)
These ingredients make a small batch of about 2-3 thick pancakes. You can easily double or triple the recipe for more servings.
Tools and Equipment Required
To pull off this recipe like a pro, you’ll need more than just ingredients. The right tools make a big difference:
- Electric hand mixer or stand mixer
- Ring molds (3-4 inches wide and at least 2 inches tall)
- Non-stick frying pan with lid
- Silicone spatula
- Measuring spoons and cups
- Mixing bowls (at least two)
- Cooking spray or butter for greasing
- Small ladle or spoon
Ring molds are essential to help your pancakes rise vertically instead of spreading out. If you don’t have them, you can DIY some using parchment paper and foil.
Tips Before You Start Cooking
Before diving in, here are some golden rules:
- Use fresh eggs. Older eggs won’t whip into stiff peaks as easily.
- Don’t skip sifting the flour. It helps keep the batter light and lump-free.
- Make sure the bowls and beaters are clean. Any oil or yolk can ruin your meringue.
- Work fast after folding the meringue. Letting the batter sit too long will make it deflate.
- Cook low and slow. High heat will burn the outside before the inside cooks.
Get everything prepped and measured before starting—this recipe moves quickly once the batter is ready!
Step-by-Step Guide to Making Japanese Pancakes
Let’s break down the process so you can get jiggly pancakes every time.
Step 1: Separate the Eggs
Crack your eggs and carefully separate the yolks from the whites. Place the whites in a clean, dry bowl. Be careful not to get any yolk in your whites—it will stop them from whipping properly. Let the egg whites sit at room temperature while you prepare the yolk mixture; this helps them whip better later.
Step 2: Prepare the Egg Yolk Batter
In a separate bowl, whisk together the egg yolks, milk, and vanilla extract. Once combined, sift in the flour and baking powder. Gently whisk until the batter is smooth. This mixture should be thick but pourable.
Step 3: Whip the Egg Whites
Using an electric hand mixer, start beating your egg whites on medium speed. Once they become foamy, add cream of tartar or a few drops of lemon juice. Slowly add in the sugar, one tablespoon at a time, as you continue to beat. After 3–5 minutes, you should have stiff peaks—meaning the meringue stands tall when you lift the beaters.
Step 4: Combine the Batter Gently
This is where the magic (and the fluffiness) happens.
- Take 1/3 of the meringue and gently fold it into the yolk batter to loosen it up.
- Then carefully fold in the remaining meringue in two parts. Don’t stir or whisk—fold using a spatula in a circular motion, scooping from the bottom. This helps keep the air bubbles intact.
The final batter should be light, airy, and cloud-like.
Step 5: Preheat the Pan and Grease Molds
Place your non-stick frying pan on low heat. Lightly grease the inside of your ring molds with butter or spray. Add a bit of butter to the pan and place the molds inside. Cover with a lid and let them warm up for a minute.
Step 6: Pour the Batter into the Molds
Use a ladle or spoon to gently fill each mold with the pancake batter. Fill them about 3/4 full, leaving some room for the pancakes to rise. Once filled, add a splash of water to the pan (around the molds, not inside) and immediately cover with the lid to create steam.
Step 7: Steam-Cook the Pancakes
Let the pancakes cook on low heat for about 4–5 minutes. The steam will help them rise and set. Resist the urge to peek too often—keeping the lid on maintains the moisture and heat.
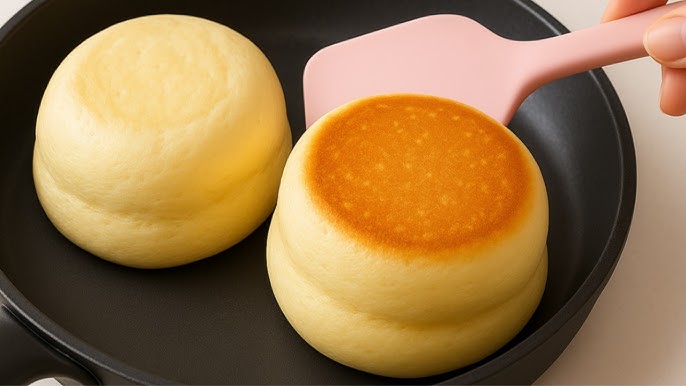
Step 8: Flip and Finish Cooking
Once the bottom is set and golden brown, gently flip each pancake (still in the mold) using a spatula. Cook for another 4–5 minutes with the lid on. You can add a few more drops of water if the pan looks dry.
How to Know When They’re Done
Here’s the tricky part—making sure your Japanese pancakes are fully cooked inside without overcooking the outside. Because of their height and thickness, they take a bit longer than regular pancakes.
You’ll know they’re done when:
- Both sides are golden brown.
- A toothpick inserted into the center comes out clean.
- They bounce back when gently pressed.
- They slide out of the mold easily without sticking.
If you’re unsure, it’s always better to cook a bit longer on low heat rather than risk a gooey center. Be patient—the result is worth it!
Serving Suggestions
Now for the fun part—dressing up your jiggly pancakes to take them from great to unforgettable.
Classic Toppings
If you want to keep things traditional and let the pancake texture shine, go for:
- A dusting of powdered sugar
- A dollop of fresh whipped cream
- A few slices of fresh strawberries or banana
- A drizzle of maple syrup or honey
- A pat of butter on top
These keep the focus on that dreamy, soft texture while adding just enough sweetness.
Creative Combos
Feeling extra? Try these unique pancake pairings:
- Matcha whipped cream + red bean paste
- Chocolate ganache + crushed Oreos
- Caramel sauce + sea salt + roasted nuts
- Lemon curd + blueberries
- Vanilla ice cream + espresso drizzle (affogato-style)
Use your imagination—these pancakes are a blank canvas ready for whatever flavors you crave!
How to Store Leftovers (If You Have Any!)
If you somehow manage to not devour the entire stack, you can store your Japanese pancakes—though they’re best fresh.
- Refrigerator: Wrap them tightly in plastic wrap or place in an airtight container. They’ll last up to 2 days.
- Freezer: Let the pancakes cool completely, then freeze them in layers with parchment paper in between. Reheat using a steamer or microwave with a damp paper towel to restore moisture.
Note: Reheating in the toaster or oven can dry them out. Steaming is the best way to bring them back to life.
Common Mistakes to Avoid
Even seasoned home cooks can stumble when making Japanese pancakes. Here are some pitfalls to dodge:
- Overbeating the meringue: You want stiff, not dry peaks. Overwhipped egg whites can break down.
- Rough folding: Stirring too harshly will deflate your batter.
- Using high heat: This cooks the outside too fast while leaving the inside raw.
- Not prepping the pan and molds: If you skip greasing, the pancakes can stick and fall apart.
- Opening the lid too often: You’ll lose the steam needed to make them rise.
Mistakes happen—don’t give up! Every pancake is a learning experience.
Making It Vegan or Dairy-Free
Want to enjoy these pancakes without animal products? Totally doable!
For vegan pancakes:
- Replace eggs with aquafaba (chickpea brine)—whip it like egg whites.
- Use plant milk (almond, soy, or oat).
- Swap butter with vegan margarine or coconut oil.
For dairy-free pancakes:
- Use dairy-free milk.
- Substitute butter with oil or dairy-free alternatives.
While they may not jiggle quite as much, they’ll still be delicious and fluffy.
Gluten-Free Japanese Pancake Option
Going gluten-free? No problem.
Replace all-purpose flour with a 1:1 gluten-free flour blend (make sure it includes xanthan gum for structure). Avoid using almond or coconut flour alone—they’re too dense and heavy.
Pro tip: Add an extra 1/4 teaspoon of baking powder for a better rise since gluten-free flours don’t behave exactly like wheat-based ones.
The result? Still fluffy, still fun, and completely gluten-free.
Why Your Pancakes Might Not Be Fluffy
Struggling to get that signature rise? Here’s what might be going wrong:
- Weak meringue: Not beating to stiff peaks is the #1 reason.
- Folding too fast: It breaks down the structure.
- Batter resting too long: Fold and cook immediately!
- Too much moisture: Humidity, watery ingredients, or even undercooked batter can flatten the stack.
- No ring molds: Freehand pancakes spread more and rise less.
Take a breath, review your process, and try again with small adjustments.
Can You Make Them Without Molds?
Short answer: Yes—but they won’t be quite as tall.
How to do it:
- Scoop the batter into a tall pile using a spoon or ice cream scoop.
- Cook very slowly on low heat and use a lid to trap moisture.
- Instead of flipping, gently turn them by tilting the pan or using two spatulas.
Alternative option: DIY molds from strips of parchment paper wrapped in foil and taped shut. Voila—homemade ring molds!
They might not be perfect, but they’ll still be soft and delightful.
FAQs about Japanese Pancakes Recipe
1. Can I freeze Japanese pancakes?
Yes! Cool them completely, then freeze in a single layer with parchment paper between each pancake. Reheat by steaming or microwaving with a damp paper towel.
2. What’s the difference between souffle pancakes and regular ones?
Souffle pancakes are taller, lighter, and get their rise from whipped egg whites instead of just baking powder. They’re soft, jiggly, and have a custard-like texture inside.
3. Why did my pancakes deflate?
Probably due to overmixing the batter or not whipping the egg whites enough. Also, cooking at too high a temperature can cause them to rise fast and collapse.
4. How do I make the pancakes taller?
Use ring molds and be sure to whip the egg whites to stiff peaks. Cook low and slow with the lid on to let them rise fully without deflating.
5. Can I make these in advance?
Yes, but they’re best fresh. You can make the batter and keep it in the fridge for up to 1 hour. Cooked pancakes can be stored for 1–2 days and reheated gently.
Final Thoughts
Making Japanese pancakes isn’t just about following a recipe—it’s a practice in patience. From whipping the egg whites to slow-cooking each side, everything about this dish demands your full attention. But the reward? A plate of tall, jiggly pancakes that feel like biting into a cloud.
Once you master the technique, you can customize, experiment, and even show off your stack online. Whether it’s for a weekend brunch, a birthday breakfast, or just to satisfy a craving, these pancakes never fail to impress.
So grab your eggs, whip out those molds, and get flipping!


