Kanji Recipe: Ever stumbled upon that tangy, probiotic-rich, deep purple or golden-hued drink and wondered what it was? That’s Kanji! A fermented drink with bold flavors and a burst of health benefits, kanji is a traditional Indian beverage made with simple ingredients but offers profound effects on your gut and immune system. Whether you’ve had it at your grandmother’s house or spotted it at a farmer’s market, this drink is regaining popularity due to its probiotic properties and unique taste.
In this guide, we’re diving into the step-by-step process of making kanji from scratch. It’s simpler than you think—and you probably have all the ingredients at home already. But before we get into the kitchen, let’s understand what makes kanji so special.
What is Kanji?
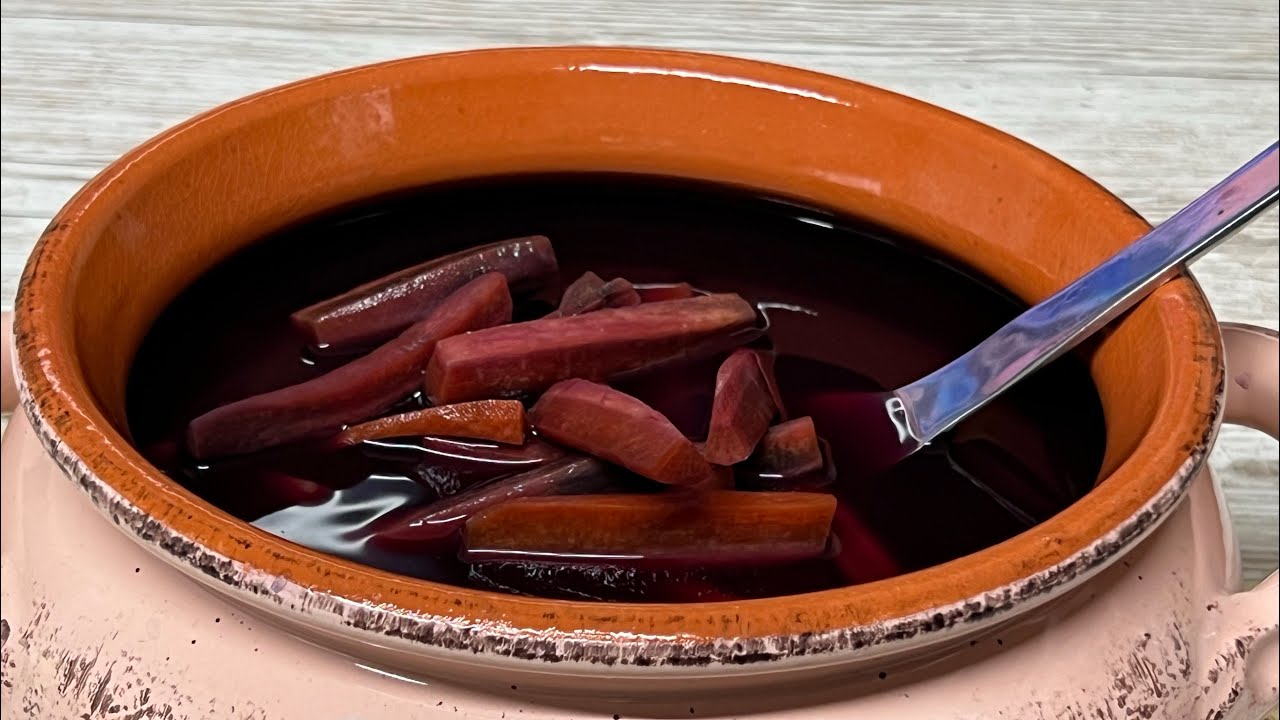
Kanji is a naturally fermented beverage made primarily from black carrots (or regular carrots/beets when black carrots are unavailable), water, mustard seeds, and salt. Its distinctive tangy flavor and deep color make it instantly recognizable. Traditionally, it’s consumed in northern India during the winter and around Holi, the festival of colors.
What makes kanji unique is its fermentation. Once prepared, it’s left out in the sun for a few days, allowing natural microbes to convert sugars into beneficial acids and probiotics. The result? A slightly sour, deeply earthy drink that aids digestion, boosts immunity, and hydrates the body.
Over the years, people have experimented with different grains and vegetables, resulting in variations like rice kanji, barley kanji, and beetroot kanji. But no matter the version, kanji remains a celebrated drink with deep roots in Indian culture.
The Cultural Significance of Kanji
Kanji isn’t just a health drink—it’s a tradition. For many Indian households, especially in Punjab and Uttar Pradesh, preparing kanji is part of seasonal rituals. It’s a way to mark the transition from winter to spring. The fermenting jars sitting out in the sun on terraces are a common sight, signaling that Holi is just around the corner.
It’s also known as a “poor man’s probiotic” because it offers the gut-friendly benefits of expensive supplements but at a fraction of the cost. Historically, people turned to kanji for digestive health long before probiotic pills became a thing.
In Ayurvedic traditions, kanji is praised for balancing pitta and aiding the agni (digestive fire). It is especially recommended after heavy or oily meals to aid digestion and detoxify the system naturally.
Why You Should Try Making Kanji at Home
You may be thinking, “Why should I make kanji when I can just buy it?” But here’s the deal—homemade kanji tastes fresher, you control the ingredients, and it’s way cheaper. Plus, there’s something satisfying about watching your drink ferment and bubble into life.
Here are some reasons why homemade kanji is worth it:
- Zero preservatives or additives – Just real ingredients
- Boosts gut health naturally – Probiotics help digestion and immunity
- Customizable flavors – Want it spicier, tangier, or milder? You’re in control
- Fun and educational – Especially if you’re exploring fermented foods
Most importantly, it only takes 10 minutes of prep time and a few days of patience. You don’t need fancy equipment or chef skills. Just sunlight, salt, and a sense of curiosity.
List of Ingredients You’ll Need
Making kanji is all about simplicity. Here’s your shopping list. You probably already have most of these in your kitchen!
Grains or Vegetables (Choose one):
- Black carrots (preferred for traditional kanji)
- Regular carrots + beetroot (as substitute for black carrots)
- Cooked rice (for rice kanji)
- Cooked barley (optional)
Liquids:
- Filtered water – 1 liter
Spices:
- Mustard seeds – 2 tbsp (crushed or whole)
- Red chili powder – ½ tsp (optional)
- Turmeric – ½ tsp (for added color & benefits)
Salt:
- Rock salt or pink Himalayan salt – 1 to 1.5 tsp
Optional Add-ins:
- Asafoetida (hing) – a pinch for digestion
- Ginger slices – for flavor and warmth
All ingredients should be fresh and organic if possible. Avoid using iodized salt as it can interfere with fermentation.
Equipment Required for Making Kanji
You don’t need anything fancy to make kanji, but having the right tools can help the process go smoothly:
- Glass jar or ceramic pot – Preferably 1.5 to 2 liters with a wide mouth
- Wooden spoon – For mixing
- Cloth cover or muslin – To allow airflow while keeping dust out
- Ladle or strainer – For serving
Avoid using metal containers for fermentation, as acids can react with them. Stick with glass or clay for best results.
Health Benefits of Drinking Kanji
Kanji isn’t just a tasty fermented drink—it’s a powerhouse of health perks. Here’s why your body will thank you:
- Rich in probiotics: Supports your gut microbiome and digestion
- Anti-inflammatory properties: Thanks to mustard seeds and turmeric
- Detoxification: Helps flush out toxins and supports liver function
- Boosts immunity: Especially helpful in colder seasons
- Improves skin health: Healthy gut = glowing skin
- Hydrating and low-calorie: A perfect winter drink
It’s especially beneficial for those with digestive issues like bloating, constipation, or sluggish metabolism. Just a small glass daily can make a noticeable difference.
Types of Kanji in Different Regions
Kanji isn’t one-size-fits-all. Depending on where you are in India (or even outside it), you might encounter these varieties:
- Black Carrot Kanji – The classic North Indian drink made during Holi
- Beetroot Kanji – A vibrant purple drink when black carrots are unavailable
- Rice Kanji – Popular in South India, made with fermented rice water
- Barley Kanji – Cooling drink, ideal for summer detox
- Sweet Kanji – Less common, sometimes mixed with jaggery or dates
Each version brings its own flavor and set of health benefits. Some are cooling, some warming, and others neutral. Choose one that suits your climate and taste.
Step-by-Step Guide to Making Traditional Indian Kanji
Ready to get your hands a little dirty (and your kitchen smelling tangy)? Let’s make traditional black carrot kanji!
Step 1: Selecting the Right Ingredients
Traditional Indian kanji is usually made with rice or grains like rice flour or broken rice. You’ll also need water and salt. Some regional versions include spices such as mustard seeds or red chilies for added flavor. Choose clean, good-quality grains for the best fermentation.
Step 2: Washing and Preparing the Rice or Grains
Rinse the rice or grains thoroughly under running water to remove excess starch and impurities. If using whole rice, soak it for a few hours and lightly crush or grind it. Proper washing ensures a clean, mild taste.
Step 3: Cooking the Mixture
In a pot, combine the prepared rice or grains with water and cook until soft and slightly mushy. The mixture should be thin, almost porridge-like. Stir occasionally to prevent sticking and ensure even cooking.
Step 4: Cooling and Fermentation
Allow the cooked mixture to cool completely. Once cooled, transfer it to a clean glass or clay container. Cover loosely and leave it at room temperature for 1–2 days to ferment. Warmer temperatures speed up fermentation, while cooler environments slow it down.
Step 5: Storing Your Kanji Properly
Once fermented to your liking, add salt and stir well. Store the kanji in the refrigerator to slow further fermentation. Consume within a few days for the best flavor and freshness.
Tips for the Perfect Fermentation
Want a successful batch every time? Here are some expert tips to keep in mind:
- Use filtered water – Chlorinated tap water can hinder fermentation.
- Keep the temperature warm – 75°F to 85°F (24°C to 29°C) is ideal.
- Crush, not powder, your mustard seeds – Whole seeds work slower, powdered seeds can ferment too fast.
- Taste test daily – Fermentation is personal; some like it sour, others mild.
- Don’t over-salt – Too much salt can stop fermentation altogether.
- Use clean jars – Any leftover soap or debris can ruin the batch.
Patience is key. Every batch might ferment differently depending on your environment, so don’t be discouraged if it takes a little longer one week and is done in two days the next.
How to Customize Kanji With Different Flavors
One of the best things about kanji? You can get creative with it! Once you’ve mastered the basic recipe, here are a few ways to jazz things up:
- Add ginger slices for a warm, spicy twist.
- Use beets for a sweeter, deeper flavor and bright red color.
- Throw in green chilies for a spicier punch.
- Try different spices like cumin, ajwain (carom seeds), or even fennel.
- Use rice or barley instead of veggies for a mild, porridge-like drink.
Want it sweet? Add a spoonful of jaggery after fermentation and give it a good stir before drinking. You can even blend it with mint or coriander for a refreshing herbal version.
How Long Does It Take to Make Kanji?
Generally, it takes about 3 to 5 days for a batch of kanji to fully ferment. But this depends on the temperature of your environment. Warmer areas may need just 2 to 3 days, while cooler regions might need 5 to 6 days.
Here’s a quick breakdown:
| Day | What Happens |
|---|---|
| 1 | Ingredients soak and initial microbes activate |
| 2-3 | Bubbles form, tangy smell begins |
| 4-5 | Strong flavor develops, ready to taste test |
| 6+ | Over-fermentation may occur if not refrigerated |
Always taste daily after the second day. Once the flavor hits your sweet spot of sour, move it to the fridge.
Common Mistakes to Avoid When Making Kanji
Even though kanji is easy to make, small missteps can ruin your batch. Here are the top mistakes and how to avoid them:
- Using chlorinated water – Always opt for filtered or boiled-then-cooled water.
- Over-salting or under-salting – Follow the ratio closely (about 1 to 1.5 tsp salt per liter).
- Sealing the jar completely during fermentation – This can build pressure and cause mold.
- Not stirring daily – This allows mold to grow on the surface.
- Storing in plastic – Acidic drinks can react with plastic. Use glass or ceramic.
- Not letting it ferment long enough – Impatient? Let it sit at least 3 days for best results.
If your kanji smells rotten, develops a white or fuzzy mold layer, or tastes off, it’s better to discard it and start fresh.
Serving Suggestions: How to Enjoy Kanji
Now for the fun part—drinking your homemade kanji! Here are a few ways to enjoy it:
- Chilled in a glass as a mid-morning or pre-meal drink
- With soaked mustard seeds and carrot slices for a crunch
- As a digestive shot after heavy meals
- Blended with mint and lemon for a refreshing twist
- Used as a soup base or salad dressing for a tangy punch
Pair it with Indian snacks like samosas or pakoras—it cuts through the oil and helps digestion. Some even enjoy it on an empty stomach in the morning for maximum probiotic absorption.
Storage and Shelf Life
Kanji is best consumed within 5 to 7 days once fermented and refrigerated. Over time, it will become more sour and less palatable. To extend shelf life:
- Keep it in the coldest part of the fridge
- Use clean, sterilized bottles
- Avoid double-dipping into the jar or bottle
If you notice fizzing, that’s normal. But if it smells rancid or turns slimy, it’s time to toss it.
FAQs about Kanji Recipe
1. Can I make kanji without sunlight?
Yes! While sunlight speeds up fermentation, a warm indoor spot works too. Just give it a day or two more.
2. Is kanji good for kids?
In small amounts, yes. It’s a natural probiotic and safe for children unless they’re allergic to mustard.
3. Can I use metal jars or utensils?
Avoid metal containers as they may react with the acids. Use wooden spoons and glass or ceramic jars.
4. What if my kanji smells bad?
A sour smell is normal, but a rotten or moldy odor means it’s spoiled. Discard and start again.
5. Can I freeze kanji for longer storage?
Freezing is not recommended. It kills the live cultures. Stick to refrigeration and small batch sizes.
Conclusion
There you have it—a complete guide to making delicious, healthy, probiotic-rich kanji right at home. Whether you’re sipping it for its health benefits or just enjoying its unique flavor, kanji is one of those traditional recipes that deserves a comeback in every modern kitchen.
It’s simple, budget-friendly, and packed with centuries of wellness wisdom. Don’t be afraid to experiment, taste along the way, and make this drink your own.