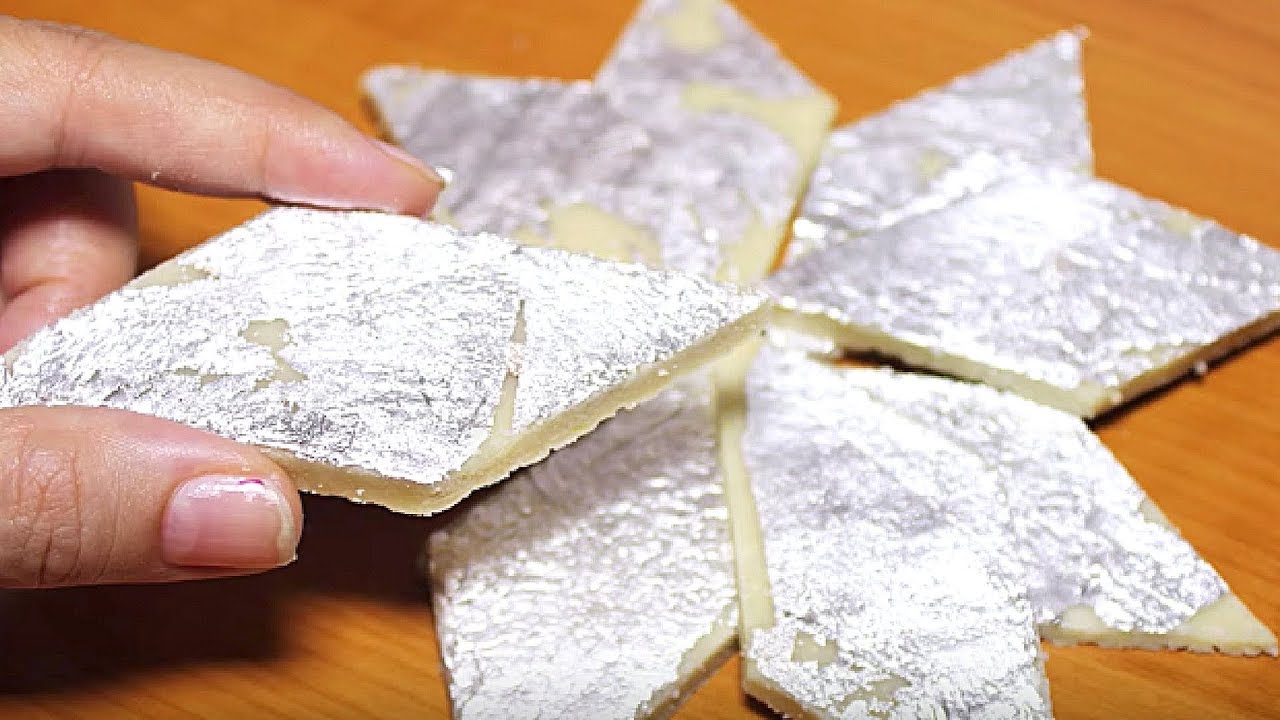
Kaju Katli Recipe: Kaju Katli, also known as Kaju Barfi, is a melt-in-the-mouth Indian sweet made primarily from cashews and sugar. This delicacy holds a special place in every Indian household, especially during festivals like Diwali, Raksha Bandhan, and weddings. It’s famous for its diamond shape, smooth texture, and luxurious taste that appeals to kids and adults alike. Unlike other sweets loaded with ghee or heavy syrups, Kaju Katli is relatively lighter, which makes it more appealing to the health-conscious crowd as well.
The beauty of Kaju Katli lies in its simplicity. With just a handful of ingredients, you can whip up a batch of this rich sweet that rivals even the best mithai shops. Whether you’re a beginner or a seasoned home cook, making Kaju Katli at home is both rewarding and surprisingly easy—once you get the technique down.
Healthier Twist to Traditional Sweets
Let’s be real—most Indian sweets come loaded with ghee, khoya, and sugar. While they taste amazing, they can also feel heavy. That’s where Kaju Katli stands out. It uses cashews as the main ingredient, which are packed with healthy fats, protein, and essential minerals like magnesium and zinc. There’s no ghee involved (unless you want to add a little for aroma), and no milk solids to make it heavy.
In a way, Kaju Katli is a minimal-ingredient sweet that can be part of a “clean” dessert plate. You can even modify it to reduce sugar slightly or add natural flavorings like rose water or saffron. It’s an indulgent sweet that doesn’t make you feel overly guilty after having a few pieces.
List of Ingredients You’ll Need
You only need 3-4 ingredients to create this magic! Here’s what you’ll need:
Basic Ingredients:
- Cashew nuts (Kaju) – 1 cup (preferably room temperature, not refrigerated)
- Sugar – ½ cup (white granulated sugar works best)
- Water – ¼ cup
- Rose water or cardamom powder (optional) – For flavor
- Ghee – ½ tsp (optional, only for greasing)
Ingredient Tips:
- Cashews: Use fresh, dry cashews. Avoid salted or roasted ones. The whiter the cashew, the brighter the katli.
- Sugar: Use fine sugar that dissolves quickly in water. Powdered sugar is not recommended.
- Flavoring: A dash of rose water or a pinch of cardamom adds a lovely aroma, but keep it subtle.
Having these ingredients ready beforehand ensures a smooth cooking process. Measure everything out before you start—timing matters a lot in this recipe.
Kitchen Tools You’ll Need
While the recipe itself is simple, a few basic tools will make a big difference in the texture and appearance of your Kaju Katli.
Essential Tools:
- Blender or Mixer Grinder – For turning cashews into a fine powder
- Non-stick pan or heavy-bottomed kadai – Prevents sticking and ensures even cooking
- Silicone spatula or wooden spoon – For mixing without damaging your cookware
- Parchment paper or butter paper – To roll out the dough
- Rolling pin – For flattening the mixture
- Knife or pizza cutter – To cut clean diamond shapes
- Fine mesh sieve (optional) – To sift cashew powder for ultra-smooth texture
Once you’ve assembled your ingredients and tools, you’re ready to move into the fun part: making the Kaju Katli!
Step-by-Step Guide to Making Kaju Katli
This is where the magic happens. Follow these steps carefully, and you’ll have perfect Kaju Katli every time.
Step 1: Powder the Cashews
Add dry cashews to a blender and pulse in short bursts. This prevents releasing oil and turning them into cashew butter. The powder should be fine and smooth, not grainy. For best results, sift the powder to remove any larger bits.
Step 2: Prepare the Sugar Syrup
In a non-stick pan, combine sugar and water. Heat on medium flame, stirring until the sugar dissolves completely. Continue cooking until you reach one-string consistency. To test, place a drop between your thumb and finger—one thin thread should form.
Step 3: Mix in the Cashew Powder
Lower the heat and gradually add the cashew powder to the syrup. Stir continuously to prevent lumps. The mixture should come together smoothly without sticking.
Step 4: Cook the Mixture
Keep stirring on low to medium heat. The mixture will begin to thicken and pull away from the sides of the pan. Once it forms a soft, non-sticky dough, it’s ready.
Step 5: Cool and Knead the Dough
Transfer the dough onto parchment paper. Let it cool for 5–6 minutes. While still warm (not hot), knead gently for 2–3 minutes until smooth. Lightly grease your palms if needed.
Step 6: Roll and Cut
Place the dough between two parchment sheets and roll evenly to about ¼-inch thickness. Cut into diamond shapes using a sharp knife.
Your homemade Kaju Katli is ready—smooth, rich, and absolutely irresistible.
Pro Tips for Perfect Kaju Katli
Let’s be honest—making Kaju Katli is simple in theory but can go wrong if you miss a step. But don’t worry! With these expert tips, you’ll avoid the common pitfalls and get that smooth, shiny finish every time.
1. Don’t Over-Grind the Cashews
Cashew powder is the heart of this sweet. The key is to pulse it lightly—grind in short bursts. If you keep the blender running, the natural oils will be released and turn the powder into paste. That’s not what you want. You need dry, fluffy powder.
2. Check the Sugar Syrup Consistency
This is where most people mess up. You need a single-thread consistency (ek taar chashni). Too watery? Your katli will never set. Too thick? It’ll turn hard. Always test between your fingers.
3. Cook the Mixture Just Right
When the mixture starts leaving the sides of the pan and comes together into a soft lump, it’s ready. Don’t overcook—this will make the dough dry and difficult to roll. Undercook it and it’ll stay sticky and won’t set.
4. Use Parchment Paper for Rolling
Don’t roll the dough directly on your counter—it’ll stick and make a mess. Sandwich the dough between two sheets of parchment paper. This gives you a smooth finish and makes cleanup easier too.
5. Don’t Skip the Kneading
Once the dough cools down slightly, knead it well. This smooths out any cracks and helps the katli look professional. Think of it like kneading roti dough—same motion, gentle pressure.
Master these tips, and your homemade Kaju Katli will rival the ones you see at sweet shops—if not better!
How to Store Kaju Katli
Kaju Katli doesn’t just taste great—it also stores well if done right. Here’s how to keep it fresh for days:
Room Temperature Storage
- Store it in an airtight container.
- Keep it in a cool, dry place away from direct sunlight.
- It stays good for 7–10 days without refrigeration.
Refrigerator Storage
- If you live in a hot/humid climate, you can refrigerate it.
- Wrap the pieces in butter paper and store in an airtight box.
- Refrigerated katli can last up to 2–3 weeks, but let it sit at room temp for a few minutes before serving.
Freezing Option
- Yes, you can freeze Kaju Katli! Just layer pieces with parchment paper between them, seal in a zip-lock bag, and freeze.
- Thaw overnight in the fridge and bring to room temp before serving.
Always keep moisture out. Exposure to air or humidity can make your katli soggy or sticky.
Serving Suggestions
Kaju Katli is the star of any dessert platter—but you can elevate it even more! Here are a few fun and festive serving ideas:
- Classic Plating: Serve on a silver thali lined with banana leaf or butter paper. Garnish with edible silver leaf (vark) for a royal look.
- Sweet Box Gifts: Pack them in decorative boxes with dividers for festive gifting during Diwali or Raksha Bandhan.
- Combo Platter: Pair with ladoos, peda, or rasgulla for a full-on mithai spread.
- Fusion Style: Crumble katli and use it as a topping on kulfi or ice cream. Sounds odd? Try it—it’s divine!
The possibilities are endless. You can even serve it warm for a slightly gooey experience or chilled for that perfect firm bite.
Variations of Kaju Katli
If you’ve mastered the classic, why not experiment a little? Kaju Katli is like a blank canvas—here are a few flavor-packed spins:
Chocolate Kaju Katli
- Add 1 tbsp of cocoa powder to the cashew mixture while kneading.
- Optionally, add a few chocolate chips and melt slightly for gooey texture.
- Chocolate lovers, this one’s your dream come true!
Rose Kaju Katli
- Add a few drops of rose water or rose essence while cooking the sugar syrup.
- A touch of pink food color will enhance the look.
- Floral and fancy—perfect for weddings.
Saffron (Kesar) Katli
- Soak a few saffron strands in 1 tbsp warm milk.
- Add to the sugar syrup for a rich golden hue and exotic aroma.
- This version is luxurious and festive.
Pistachio Katli (Pista Katli)
- Substitute half the cashews with pistachios.
- The result? A green-tinted delight with a nutty twist.
These variations not only taste amazing but also add visual appeal to your mithai platter.
Nutritional Information
Wondering what’s really in a piece of Kaju Katli? Here’s a quick breakdown so you know exactly what you’re enjoying. While it’s not exactly a “low-calorie” treat, it’s definitely one of the cleaner sweets out there thanks to its short ingredient list.
| Nutrient | Per Piece (Approx. 20g) |
|---|---|
| Calories | 100–120 kcal |
| Carbohydrates | 12–15g |
| Sugar | 9–10g |
| Fat | 5–6g |
| Protein | 2–3g |
| Fiber | 0.5g |
Key Nutritional Benefits:
- Healthy Fats: Cashews provide monounsaturated fats that support heart health.
- Protein-Rich: A small protein boost makes it more satiating than many other sweets.
- Low Additives: No preservatives or artificial flavors if made at home.
Of course, moderation is key. Kaju Katli is a treat, not a staple. But when compared to other sugar-loaded mithais, it’s definitely on the better side of indulgence.
Kaju Katli for Special Occasions
In India, no festival feels complete without sweets. And when it comes to premium mithai, Kaju Katli reigns supreme. Here’s why it’s so tied to celebration:
1. Diwali Essential
Diwali is known as the festival of lights—and sweets! Kaju Katli is the most gifted sweet during this time. Its rich taste and smooth texture make it a crowd favorite, and it pairs perfectly with all the other festive treats.
2. Wedding and Engagement Gifts
You’ll often see boxes of Kaju Katli in wedding hampers. It symbolizes sweetness and prosperity, making it the perfect gift for guests or loved ones.
3. Raksha Bandhan
On Rakhi, sisters often make or buy Kaju Katli to share with their brothers after tying the rakhi thread. It adds a traditional and emotional flavor to the ritual.
4. Birthdays and Anniversaries
If someone doesn’t like cakes or chocolate, Kaju Katli is a fabulous desi alternative. You can even personalize it by cutting it into letters or numbers!
So, no matter the celebration, Kaju Katli always finds a way onto the plate.
Is Kaju Katli Vegan or Gluten-Free?
Short answer: Yes, with one small condition.
Gluten-Free? Absolutely.
Kaju Katli contains no wheat, flour, or gluten-based ingredients. So, it’s naturally safe for people with gluten intolerance or celiac disease.
Vegan? Mostly.
- The traditional version uses no milk, ghee, or butter, making it vegan-friendly.
- But be cautious: some recipes add milk powder or ghee for richness or flavor.
- If you’re making it at home, just skip those, and it’s 100% plant-based.
Always check labels or ask your mithaiwala if you’re buying from a shop and need a strictly vegan version.
Why Homemade is Better
You might ask: Why go through all this effort when you can buy it from a sweet shop?
Here’s why making Kaju Katli at home is totally worth it:
1. Purity and Freshness
No preservatives. No additives. Just pure cashew goodness and sugar. When you make it at home, you know exactly what’s going into it.
2. Customizable
- Want it less sweet? Reduce the sugar.
- Want a vegan version? Leave out the ghee.
- Like it thinner or thicker? You’re the boss.
3. Cost-Effective
Kaju Katli from premium sweet shops can be quite expensive. Making it at home slashes that cost by more than half—especially during festive seasons when prices shoot up.
4. Fresh Every Time
That melt-in-the-mouth texture? You get that best right after making. Store-bought versions may have been sitting for days.
Once you try it homemade, you might never go back to store-bought!
FAQs about Kaju Katli Recipe
1. Can I use milk or milk powder in this recipe?
You can, but it’s not traditional. Adding milk powder gives a creamier texture but makes it less shelf-stable and not vegan. Stick to the original for best results unless you want a richer twist.
2. How long does it take to make Kaju Katli from start to finish?
About 30–40 minutes, including grinding, cooking, kneading, and cutting. It’s quick for a mithai that tastes this fancy!
3. Why is my Kaju Katli sticky and not setting properly?
Most likely, your sugar syrup was undercooked, or the mixture was not cooked enough before turning it into dough. Try cooking the mixture a bit longer next time.
4. Can I use jaggery instead of sugar?
Technically yes, but it will change the flavor and color. It won’t be white or glossy and may become more like a kaju fudge. If you’re going for traditional katli, stick with sugar.
5. How can I fix dough that’s too dry or crumbly?
Try sprinkling a few drops of warm water or milk and knead again. Be cautious—too much, and it turns sticky. Always add liquid sparingly.
Conclusion
Kaju Katli is more than just a sweet—it’s a celebration in every bite. Rich, nutty, and melt-in-your-mouth, this traditional mithai has stood the test of time and continues to be a crowd favorite. Whether you’re making it for Diwali, gifting it to a loved one, or just treating yourself on a regular Tuesday, nothing beats the joy of crafting your own homemade katli.
The process might seem a little detailed at first, but once you try it, you’ll realize how easy (and satisfying) it is to make. Plus, that first bite of silky, nutty perfection? Pure bliss.
So what are you waiting for? Get your cashews ready, and let’s roll!


