Hot Dog Buns Recipe: There’s something satisfying about homemade bread, especially when it’s soft, fluffy, and perfect for cradling your favorite hot dogs. Why settle for store-bought buns that are often dry, bland, or loaded with preservatives? This recipe shows you how to make delicious hot dog buns at home—buns that are tender on the inside, slightly golden on the outside, and smell absolutely amazing straight out of the oven.
Whether you’re prepping for a summer BBQ, a cozy family dinner, or just want to step up your baking game, this recipe will walk you through every step in detail. Even if you’re new to baking, don’t worry—by the end of this guide, you’ll be rolling, shaping, and baking buns like a pro. Ready to get your hands a little floury? Let’s get started!
Ingredients You’ll Need
Let’s get right into the basics. Here’s a list of all the ingredients you’ll need to make classic, fluffy hot dog buns from scratch:
Basic Ingredients:
- 3 ½ cups (440g) all-purpose flour
- 2 ¼ tsp (1 packet) active dry yeast
- 1 cup warm milk (around 110°F or 43°C)
- 2 tbsp sugar
- 1 tsp salt
- 1 large egg
- ¼ cup unsalted butter (softened)
Optional Add-ons or Substitutes:
- Replace milk with almond or oat milk for a dairy-free version
- Use honey instead of sugar for a richer flavor
- Sprinkle sesame or poppy seeds on top for texture
- Use bread flour for a slightly chewier texture
All of these ingredients are pantry staples, and if you’ve baked bread before, you likely have them on hand already. The egg and butter add richness and softness, making your buns extra tender and delicious.
Tools and Equipment Required
You don’t need fancy bakery equipment to make hot dog buns at home. Here’s a list of essentials:
- Large mixing bowl
- Measuring cups and spoons
- Stand mixer with a dough hook (optional, but helpful)
- Clean surface or silicone mat for kneading
- Dough scraper or knife
- Baking sheet
- Parchment paper or silicone baking mat
- Kitchen towel or plastic wrap (for covering dough)
- Pastry brush (if adding an egg wash)
Having the right tools not only makes the process easier but also helps you achieve consistent results. If you don’t have a stand mixer, don’t worry—a good old-fashioned hand kneading works just as well (and gives you a mini workout too).
Understanding Your Ingredients
Let’s break down why each ingredient is important in this recipe:
- Flour: The base structure of your bun. All-purpose flour is perfect for a soft texture.
- Yeast: This is what makes your buns rise and get airy. Active dry yeast needs warm liquid and a bit of sugar to activate.
- Warm Milk: Activates the yeast and adds a creamy richness to the dough.
- Sugar: Feeds the yeast and adds a subtle sweetness.
- Salt: Balances the flavor and controls yeast activity.
- Egg: Adds richness and helps bind the dough.
- Butter: Provides fat, which makes the buns soft and rich.
Understanding how each component works helps you troubleshoot any problems and experiment confidently with variations in the future.
Preparing Your Workspace
Before you dive into mixing and kneading, it’s a good idea to set yourself up for success.
- Clean your countertop thoroughly and dry it well.
- Organize all your tools and ingredients in one place.
- Pre-line your baking sheet with parchment or silicone mat.
- Warm your kitchen slightly if it’s cold—yeast loves a cozy environment.
Having a tidy, prepared workspace will make the whole process smoother and way more enjoyable.
Step-by-Step Guide to Making Hot Dog Buns
Now let’s get into the heart of this recipe: making the buns from scratch.
1. Activate the Yeast
In a small bowl, mix warm milk (about 110°F) with sugar and yeast. Let it sit for 5-10 minutes until it becomes foamy. If it doesn’t foam, your yeast might be dead—try again with new yeast.
2. Mix the Dough
In a large bowl, combine the flour and salt. Add the egg, softened butter, and the yeast mixture. Mix until a shaggy dough forms.
3. Knead the Dough
Turn the dough out onto a floured surface and knead for 8-10 minutes, or use a stand mixer with a dough hook for about 6 minutes. The dough should be soft, elastic, and slightly tacky but not sticky.
4. First Rise (Proofing)
Place the dough in a greased bowl, cover it with a kitchen towel or plastic wrap, and let it rise in a warm place for about 1 to 1.5 hours, or until doubled in size.
5. Shape the Buns
Punch down the dough and divide it into 8-10 equal pieces. Roll each into a ball, then into a log shape about 5-6 inches long. Place them on your lined baking sheet, spacing slightly apart.
6. Second Rise
Cover the shaped buns loosely with a towel and let them rise again for 30–45 minutes, until puffy.
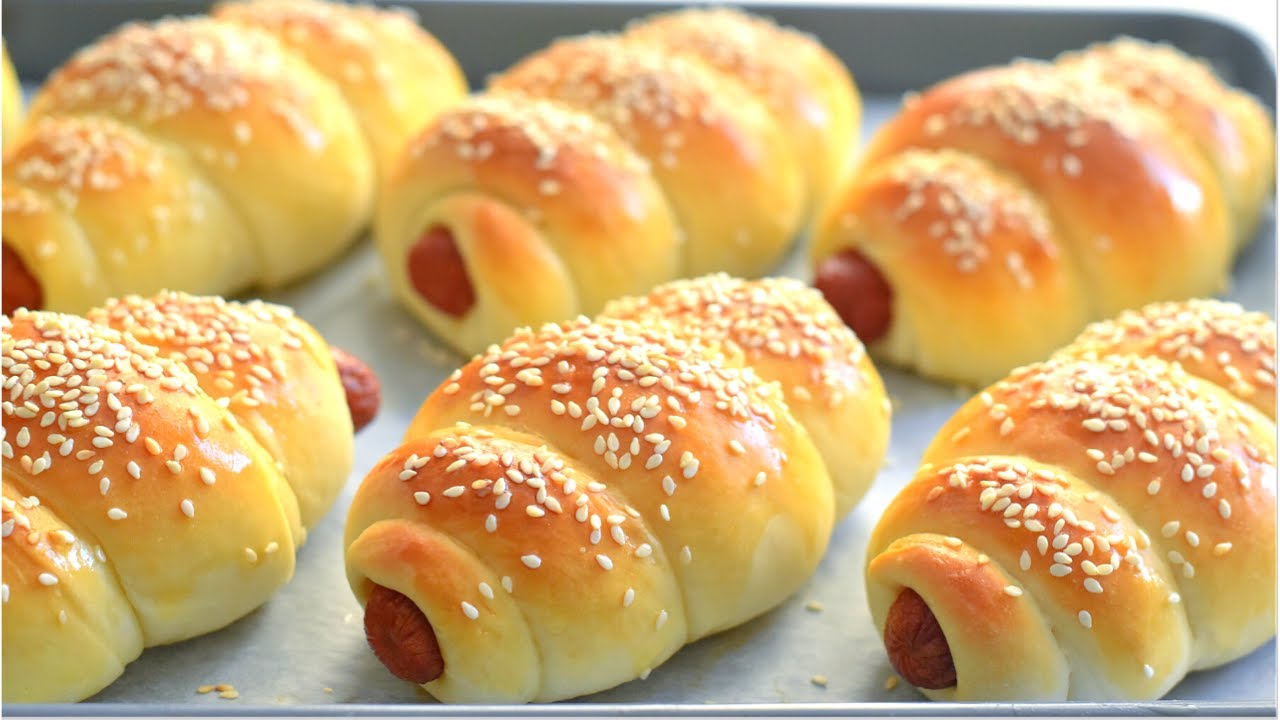
7. Bake the Buns
Preheat your oven to 375°F (190°C). If desired, brush the tops with a beaten egg for a glossy finish. Bake for 15–18 minutes or until golden brown.
8. Cool the Buns
Let the buns cool on a wire rack before slicing. This step keeps the insides from getting gummy.
Pro Tips for the Perfect Hot Dog Buns
Want to take your buns from good to bakery-quality? These tried-and-true tips can make all the difference:
- Check Your Yeast Freshness: Old or expired yeast won’t rise properly. Always test it first in warm liquid with sugar. If it doesn’t foam in 10 minutes, toss it.
- Don’t Overflour the Dough: It might be tempting to keep adding flour if your dough is sticky, but too much flour will make your buns dense and dry. Aim for slightly tacky—not dry.
- Use Room-Temperature Ingredients: Cold ingredients slow down yeast activity. Take out the butter and egg ahead of time to let them warm up.
- Shape Evenly: Consistency is key! Use a kitchen scale to weigh dough portions so all your buns bake evenly and look uniform.
- Steam in the Oven: Place a pan of hot water on the lower rack during baking to add moisture to the oven. This makes your buns softer and helps develop a tender crust.
- Egg Wash for Shine: A simple egg wash gives your buns a golden, glossy finish. You can also sprinkle seeds or herbs on top before baking.
- Let Them Cool Completely: As tempting as it is to dig in right away, give your buns time to cool so the insides set properly.
Small tweaks like these often separate a good homemade bun from an amazing one.
Common Mistakes and How to Avoid Them
Even experienced bakers slip up from time to time. Here are some common mistakes and how you can steer clear of them:
- Dense Buns? You might have added too much flour or under-kneaded the dough. Stick to the recommended kneading time and avoid heavy-handed flouring.
- Buns Didn’t Rise? The room might be too cold, or your yeast could be inactive. Try placing the dough near a warm oven or in a turned-off microwave with a warm cup of water.
- Uneven Shape or Size? Always divide your dough with a scale and shape each bun with consistent pressure and motion.
- Dry Crust? Covering the dough during rising and avoiding over-baking helps maintain moisture.
- Cracked Tops? This usually means your dough dried out during the second rise. Always cover it loosely with a clean kitchen towel or plastic wrap.
Every mistake is a learning moment—once you know what went wrong, the fix is usually pretty simple!
How to Store Hot Dog Buns
Homemade buns are freshest the day they’re baked, but they can definitely be stored and enjoyed later with the right technique.
Room Temperature Storage:
- Let the buns cool completely.
- Store them in a zip-top bag or airtight container.
- Keep at room temperature for up to 3 days.
- Add a paper towel inside the bag to absorb moisture and prevent sogginess.
Refrigeration:
While you can refrigerate them, it may dry out the texture a bit. Only refrigerate if your kitchen is very humid or warm.
Freezing Instructions:
- Wrap each bun individually in plastic wrap.
- Place in a freezer bag and remove as much air as possible.
- Freeze for up to 2 months.
- Thaw at room temperature or warm in the oven/microwave when ready to use.
With proper storage, you can make a big batch and enjoy them over time without compromising quality.
How to Reheat Hot Dog Buns
If your buns have gone a little firm, don’t worry—there are easy ways to bring them back to life.
Microwave Method:
- Wrap a bun in a damp paper towel.
- Microwave for 10–15 seconds.
- This will soften the bread and make it feel freshly baked.
Oven Method:
- Preheat oven to 300°F (150°C).
- Wrap buns in foil and warm for 5–10 minutes.
- Perfect for multiple buns at once.
Toaster or Skillet Method:
- Slice the bun and toast lightly for crisp edges.
- Great for buttery, golden-brown results.
No matter the method, just don’t overdo it—too much heat will dry them out.
Serving Suggestions
Hot dogs are a classic, but these buns can do so much more. Here are some ideas to spice things up:
Classic Hot Dog Toppings:
- Ketchup, mustard, relish, diced onions
- Sauerkraut, pickles, jalapeños
- Chili and shredded cheese for chili dogs
Creative Twists:
- Breakfast Dogs: Add scrambled eggs, sausage, and cheese
- Taco Dogs: Fill with taco meat, lettuce, and salsa
- BBQ Dogs: Load with pulled pork and coleslaw
- Veggie Delight: Roasted peppers, mushrooms, and hummus
Presentation Tips:
- Serve in a paper boat for retro vibes
- Offer a “toppings bar” so everyone can customize
- Toast the buns with garlic butter for an upgraded flavor
You’ll never look at a hot dog bun the same way again!
Healthier Hot Dog Bun Alternatives
Want a healthier version without sacrificing flavor? Here are a few options:
Whole Wheat Buns:
- Replace half or all of the all-purpose flour with whole wheat
- Add 1–2 tablespoons of vital wheat gluten to maintain softness
- Slightly more dense but packed with fiber
Gluten-Free Option:
- Use a gluten-free flour blend
- Add xanthan gum to improve texture
- Expect a slightly different crumb, but still tasty
Low-Sugar or Low-Fat Mods:
- Skip the sugar or replace with natural alternatives like maple syrup or stevia
- Use olive oil instead of butter for heart-healthy fats
Homemade buns give you total control over what goes in—and what stays out.
Making Vegan Hot Dog Buns
It’s super easy to veganize this recipe. Just follow these swaps:
- Egg Replacement: Use a flax egg (1 tbsp ground flaxseed + 3 tbsp water)
- Butter Replacement: Use vegan butter or a neutral oil like coconut or olive oil
- Milk Replacement: Use almond, oat, soy, or any plant-based milk
These simple changes make the recipe 100% plant-based while keeping the soft texture and flavor intact. Great for picnics, parties, or weeknight dinners where everyone can enjoy.
FAQs about Hot Dog Buns Recipe
1. Can I make the dough ahead of time?
Yes! You can refrigerate the dough after the first rise for up to 24 hours. Just bring it back to room temperature before shaping.
2. How long should I knead the dough?
By hand, knead for about 10 minutes. With a stand mixer, about 6 minutes on medium speed should do the trick.
3. Why did my buns turn out too dry?
Too much flour or overbaking are common causes. Stick to the recipe measurements and bake until just golden.
4. Can I double the recipe?
Absolutely! Just make sure to use a large enough bowl and divide dough evenly for consistent buns.
5. What can I do with leftover buns?
Make garlic bread, mini sandwiches, bread pudding, or even croutons. They freeze well too!
Conclusion
And there you have it—your complete step-by-step guide to making soft, delicious hot dog buns right at home. From prepping your dough to shaping, baking, and storing, you’ve now got everything you need to impress friends, family, or even just yourself at your next meal. Once you go homemade, it’s really hard to go back. Plus, the smell of freshly baked bread? Worth it every single time.
So next time you fire up the grill or plan a backyard gathering, skip the store and roll out your own buns. You’ve got the skills now—why not show them off?


