Hot Chocolate Bombs Recipe: Imagine dropping a glossy chocolate orb into a steaming mug of milk, watching it melt away to reveal a surprise inside—mini marshmallows, cocoa powder, sprinkles, and all sorts of delicious goodies. That’s what hot chocolate bombs are all about! They’re the winter treat everyone’s talking about, and the best part? You can totally make them at home.
These charming chocolate spheres are more than just a fun TikTok trend. They’re the ultimate cozy drink experience in a cute, Instagram-worthy package. Whether you’re making them for a chilly afternoon treat or as a homemade gift, hot chocolate bombs are simple to make and super fun to enjoy.
Let’s walk through everything you need to know to whip up a batch of your own—from ingredients to tools, techniques, and even tips to troubleshoot. Ready to become a hot cocoa bomb master? Let’s dive in.
Why Everyone is Obsessed with Hot Chocolate Bombs
Why have hot chocolate bombs taken the internet (and kitchens) by storm? Well, they’re like little edible magic tricks. Drop one into hot milk and—boom!—a cascade of marshmallows and chocolatey goodness explodes into your cup. It’s dramatic, delicious, and totally satisfying.
They’re also incredibly customizable. You can make them festive for holidays, pack them with flavored cocoa, or decorate them to match your vibe. Not to mention, they make amazing gifts! Wrap them up in cellophane, tie with a ribbon, and you’ve got a cozy present that anyone would love.
Another reason? They’re surprisingly easy to make. Once you’ve got the basics down, you’ll be churning them out like a pro. So if you’re looking for something that’s part dessert, part DIY project, and 100% delicious, hot chocolate bombs are where it’s at.
List of Ingredients You’ll Need
Basic Ingredients
Here’s your basic ingredient checklist for making classic hot chocolate bombs:
- 12 oz high-quality semi-sweet or milk chocolate (chopped or chips)
- Hot cocoa mix (about 1 tablespoon per bomb)
- Mini marshmallows
- Warm milk for serving (whole milk works best for richness)
You want to go with a good chocolate—nothing waxy or low-quality. Better chocolate means smoother melting and a better-tasting final drink.
Optional Add-ins and Toppings
Want to level up your bombs? Here are some fun options to try:
- Crushed candy canes
- Sprinkles
- Caramel bits or drizzle
- Mini chocolate chips
- Instant espresso powder (for a mocha twist)
- Cinnamon or nutmeg
- Edible glitter or gold dust
These extras aren’t necessary, but they add flair and flavor that make your bombs even more fun and festive.
Essential Tools and Equipment
Kitchen Tools
You don’t need a professional kitchen to make these, but a few key tools will help:
- Microwave-safe bowl or double boiler (for melting chocolate)
- Silicone spatula
- Spoon or pastry brush
- Piping bag or plastic bag (for drizzling chocolate)
- Small plate (warmed to seal the shells)
- Gloves (optional, to avoid fingerprints)
Molds: Silicone vs Acrylic
The most important tool? Your mold.
- Silicone molds are flexible, easy to use, and beginner-friendly.
- Acrylic molds can give a more polished, glossy finish, but take more finesse.
If you’re just getting started, silicone is your best bet. Make sure your mold has a half-sphere shape—2.5 to 3 inches is a great size.
Choosing the Right Chocolate
Best Chocolate for Melting
When it comes to melting chocolate, quality matters. Skip the candy melts (unless you’re going for colorful shells) and grab:
- Couverture chocolate (best for tempering)
- Ghirardelli, Lindt, or Callebaut (for premium taste)
- Semi-sweet or milk chocolate depending on your preference
Tips for Tempering Chocolate
Tempering chocolate helps it stay shiny and snappy instead of soft and dull. It’s optional, but highly recommended.
Here’s a simple microwave method:
- Heat 2/3 of your chopped chocolate in 30-second intervals.
- Stir in the remaining 1/3 until smooth and glossy.
- Keep temperature between 88–91°F for milk or dark chocolate.
This gives your bombs a professional, bakery-worthy finish.
Step-by-Step Guide to Making Hot Chocolate Bombs
Step 1: Melt the Chocolate Properly
Chop high-quality chocolate into small pieces. Melt it gently using a microwave in short bursts or a double boiler, stirring often until smooth. Avoid overheating, as burnt chocolate will not set properly.
Step 2: Coat the Molds Evenly
Using a spoon or pastry brush, spread melted chocolate inside silicone sphere molds. Make sure the coating is even and thick enough around the edges to prevent cracking. Scrape off excess chocolate from the top for clean edges.
Step 3: Chill and Set the Chocolate Shells
Place the filled molds in the refrigerator or freezer for 10–15 minutes, or until fully set and firm. Proper chilling helps the shells release easily from the molds.
Step 4: Remove Chocolate Halves Carefully
Once set, gently peel the silicone molds away from the chocolate. Handle the shells carefully, as warmth from your hands can cause melting or fingerprints.
Step 5: Fill the Shells with Cocoa Mix and Marshmallows
Place half of the chocolate shells open-side up. Add hot chocolate mix, mini marshmallows, and optional extras like chocolate chips or sprinkles. Do not overfill, or sealing will be difficult.
Step 6: Seal the Bombs
Warm the edge of an empty shell by placing it briefly on a warm plate. Carefully press it onto a filled shell to seal. Hold gently until the seam sets.
Step 7: Decorate Creatively
Drizzle melted chocolate over the bombs or add sprinkles, cocoa powder, or crushed candy. Let decorations set fully before storing. Store in a cool, dry place and enjoy by dropping into hot milk.
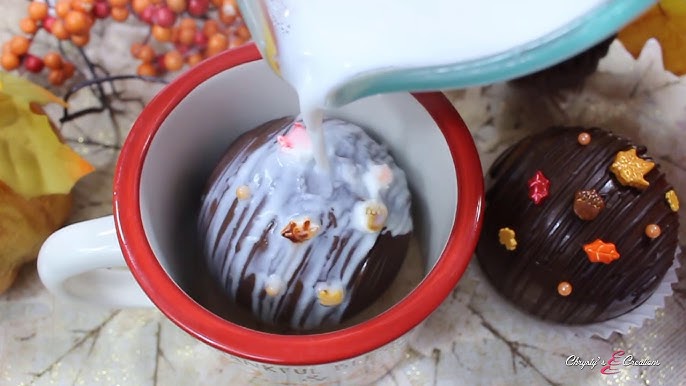
How to Use Hot Chocolate Bombs
Using a hot chocolate bomb is as easy as 1-2-3—and ridiculously fun to watch.
Here’s how:
- Place the chocolate bomb into a large mug.
- Slowly pour 8 to 10 oz of hot milk (steaming, but not boiling) directly over the bomb.
- Watch the magic happen! The bomb melts, bursts open, and releases cocoa mix and marshmallows into the milk.
Give it a quick stir to combine all that chocolatey goodness. You’ll end up with a rich, creamy cup of hot chocolate that’s just as fun to make as it is to drink.
Want to be extra? Top with whipped cream, chocolate shavings, or a drizzle of caramel syrup. It’s your cozy moment—go all in.
Flavor Variations to Try
Hot chocolate bombs are the ultimate customizable treat. Try some of these creative twists to make them even more exciting.
Peppermint Hot Chocolate Bombs
- Add crushed candy canes inside and on top.
- Use peppermint hot cocoa mix or a drop of peppermint extract.
- Decorate with red and white chocolate drizzle.
Salted Caramel Delight
- Fill with caramel-flavored cocoa mix.
- Add caramel bits or a soft caramel center.
- Top with a sprinkle of sea salt and gold sugar.
White Chocolate Raspberry
- Use white chocolate shells.
- Fill with raspberry cocoa mix or powdered freeze-dried raspberries.
- Drizzle with pink-tinted white chocolate.
These are just starting points. Feel free to experiment with nut butters, chili spice, cookies & cream, or anything else your taste buds are craving.
Storing and Packaging Hot Chocolate Bombs
Once your hot chocolate bombs are done and looking gorgeous, you’ll want to make sure they stay that way. Whether you’re keeping them for yourself or gifting them to others, proper storage and packaging make all the difference.
How to Store Them Properly
- Room Temperature: Store in an airtight container at cool room temperature, away from direct sunlight and heat. Chocolate can melt easily, so avoid warm spots like near windows or stoves.
- Refrigerator: Only refrigerate if your kitchen is warm. Place them in an airtight container to prevent moisture from ruining the chocolate’s texture.
- Shelf Life: Hot chocolate bombs can last up to 2-3 weeks at room temperature if stored correctly. If refrigerated, they may last up to a month.
Just remember, they’re best enjoyed fresh!
Packaging for Gifting
Gifting hot chocolate bombs? Here’s how to make them look pro-level:
- Clear cellophane bags tied with ribbon
- Mason jars with a festive tag
- Cupcake boxes or bakery treat boxes
- Custom labels or gift tags with heating instructions: “Place in mug, pour 1 cup of hot milk, stir, and enjoy!”
Add some shredded paper or tissue as padding, and voilà—gorgeous, handmade gifts everyone will love.
Troubleshooting Common Mistakes
Not everything goes smoothly the first time—and that’s okay! Here are some common hot chocolate bomb hiccups and how to fix them:
- Shells Cracking or Breaking: Likely from removing them too soon or using thin layers of chocolate. Always double coat and chill fully before popping them out.
- Bombs Not Melting Well: The milk might not be hot enough. Make sure it’s steaming (not boiling), around 160°F, to melt the shell properly.
- Chocolate Looks Dull or Streaky: This can happen if the chocolate wasn’t tempered. Use the microwave method mentioned earlier to keep it shiny and snappy.
- Won’t Seal Properly: Make sure both halves are warm enough to fuse, or use melted chocolate as glue. Holding them together for a few seconds helps create a tight seal.
Each batch gets better, so don’t stress over a few imperfect bombs!
Tips for Beginners
If this is your first time making hot chocolate bombs, don’t worry—we’ve got you. Here are some beginner-friendly tips:
- Use Silicone Molds: They’re more forgiving and easier to handle.
- Start Small: Don’t try to make a dozen at once. Start with 2–4 bombs while you get the hang of it.
- Work in a Cool Kitchen: Warm hands and warm air = melty mess. Cool rooms make cleaner work.
- Wear Gloves: Optional, but it helps avoid fingerprints on your shiny chocolate shells.
- Keep Extras on Hand: Extra chocolate, extra shells—just in case one breaks or you want to test a new flavor.
With practice, your bombs will start looking like something out of a gourmet chocolate shop.
Making It a Fun Family Activity
Want to turn this into a weekend project or holiday tradition? Making hot chocolate bombs is a great activity for kids, teens, and families.
- Kids can decorate: Give them bowls of toppings and let them drizzle and sprinkle away.
- Set up a station: One area for melting, another for filling, another for sealing and decorating.
- Create a hot cocoa bomb bar: Let everyone make their own with a variety of cocoa flavors and fillings.
It’s hands-on, creative, and ends with a warm, sweet drink. What’s not to love?
Vegan and Dairy-Free Hot Chocolate Bomb Options
Got dietary restrictions? No problem—hot chocolate bombs can easily be adapted to fit vegan or dairy-free diets.
Dairy-Free Substitutes:
- Use dairy-free chocolate: Look for brands like Enjoy Life or Hu.
- Choose plant-based milk: Almond, oat, coconut, or soy milk all work great.
- Find vegan hot cocoa mix: Or make your own with unsweetened cocoa powder, coconut sugar, and a pinch of salt.
- Top with vegan marshmallows: Try brands like Dandies.
With these swaps, you can still enjoy rich, creamy hot chocolate with no dairy in sight.
Scaling Up: Making Hot Chocolate Bombs for Events or Sales
Thinking about turning your hobby into a hustle? Selling hot chocolate bombs at markets, online, or during the holidays is a sweet side gig.
What You’ll Need:
- Bulk ingredients: Buy chocolate, cocoa, and marshmallows in wholesale quantities.
- Packaging supplies: Clear boxes, labels, and ribbon.
- Food-safe gloves and workspaces: To keep things sanitary.
- Nutritional labels (if required in your region)
Tips for Selling:
- Offer themed sets (Valentine’s Day, Christmas, birthday party favors)
- Include flavor options and allergen info
- Make custom gift sets with mugs, cocoa bombs, and stir spoons
You can make dozens of these in a day once you’re efficient—perfect for turning your cocoa obsession into a creative business.
FAQs about Hot Chocolate Bombs Recipe
1. How long do hot chocolate bombs last?
Hot chocolate bombs last 2–3 weeks at room temperature if stored in an airtight container. For longer shelf life, keep them in the fridge and consume within a month.
2. Can I use candy melts instead of chocolate?
Yes, but the taste won’t be as rich. Candy melts are great for colorful decorations but don’t have the same smooth, chocolatey flavor. Use them for drizzle instead of the whole shell if possible.
3. Do I need to temper the chocolate?
Tempering is optional but gives a professional look and snap. It also helps the bombs keep their shape and resist melting in warm rooms.
4. Can I freeze hot chocolate bombs?
It’s not recommended, as moisture from freezing can affect texture and appearance. Stick with cool, dry storage instead.
5. What’s the best mold to use?
Silicone molds are best for beginners—they’re easy to use and clean. Acrylic molds offer a shinier finish but are a bit trickier to work with.
Conclusion
Hot chocolate bombs aren’t just a trend—they’re an experience. From the moment that glossy chocolate sphere hits the milk and bursts open, you’re in for a cozy, delicious ride. With a few tools, some quality chocolate, and a bit of patience, you can craft your own dreamy cocoa creations at home.
Whether you’re making a few for a snowy night in or batch-prepping gifts for friends, these little treats pack a whole lot of joy into a tiny package. So roll up your sleeves, grab your favorite fillings, and get ready to melt some hearts—one mug at a time.