Hard Tack Candy Recipe: Hard tack candy is a classic homemade sweet treat that’s been around for generations. You might remember seeing brightly colored, sugar-dusted glass-like candies in jars around the holidays—yep, that’s hard tack. It’s essentially boiled sugar with added flavoring and coloring, then broken into bite-sized pieces. This nostalgic candy is known for its brittle texture and intense burst of flavor in each bite.
Traditionally made around Christmas, hard tack candy has made its way into modern kitchens thanks to its simplicity and versatility. You can make it in almost any flavor, from fruity favorites like cherry and watermelon to cool options like peppermint or cinnamon. And with just a few ingredients, you can create a whole batch in under an hour.
What’s great is that you don’t need to be a candy expert or have fancy gear. All it takes is some sugar, water, corn syrup, and a little patience. Whether you’re planning to enjoy it yourself, give it as a gift, or use it as decoration, hard tack candy delivers on taste and visual appeal every time.
Why Make Hard Tack Candy at Home?
There are tons of reasons to whip up a batch of hard tack candy in your own kitchen. For starters, it’s way more cost-effective than buying pre-packaged candy, especially if you’re making it in bulk for events or holidays. Plus, you get to control the flavors, colors, and even the size of the pieces. Want a fiery cinnamon red candy or a soothing peppermint green one? Go for it.
Another big reason? No preservatives or mystery ingredients. Store-bought candy often comes packed with additives that many people prefer to avoid. When you make it yourself, you know exactly what’s going in. That’s a big win, especially if you have food sensitivities or are making treats for kids.
Making hard tack candy is also just plain fun. It’s a family-friendly activity that can turn into a new holiday tradition. Kids love watching the mixture bubble and change, and helping to break the hardened candy is oddly satisfying (like edible glass-breaking therapy). And when it’s done? You’ve got a colorful, glossy, flavor-packed candy you can be proud of.
List of Ingredients You’ll Need
Basic Ingredients
Here’s your must-have list for a basic batch of hard tack candy:
- 2 cups granulated sugar – The base of your candy.
- 3/4 cup water – Helps dissolve the sugar before boiling.
- 2/3 cup light corn syrup – Adds that glossy, smooth texture.
- 1/2 to 1 teaspoon flavoring oil – Choose from peppermint, cinnamon, cherry, or others.
- Liquid food coloring (optional) – Makes your candy pop with color.
- Powdered sugar (optional) – Prevents pieces from sticking once broken.
Optional Flavorings and Colorings
Want to get creative? Here are some fun combos:
- Red + cinnamon oil = Fireball candy
- Green + peppermint oil = Holiday mint
- Blue + blueberry flavor = Sweet and tangy
- Yellow + lemon oil = Zesty sunshine treat
Always use flavoring oils, not extracts. Extracts contain water, which can mess up the boiling sugar stage.
Essential Kitchen Tools and Equipment
Let’s be real: candy-making is easier with the right tools. Here’s what you’ll need:
- Heavy saucepan (3-quart works best)
- Candy thermometer – Crucial for hitting the “hard crack” stage.
- Wooden spoon or silicone spatula – For safe stirring.
- Baking sheet or jelly roll pan – To pour and cool your candy.
- Aluminum foil or parchment paper – For lining the pan.
- Sharp knife or kitchen shears – For cutting or breaking the hardened candy.
- Measuring cups and spoons – Precision matters here.
Having these on hand will make the process smoother and prevent sticky mishaps.
Safety Tips Before You Begin
Boiling sugar is no joke—it gets extremely hot and sticky. One wrong move, and you could end up with a nasty burn. So before you dive in, here are a few safety musts:
- Wear long sleeves and use oven mitts while handling hot syrup.
- Keep kids and pets away from the stove during boiling and pouring.
- Don’t touch the candy until it cools completely.
- Use a deep saucepan to avoid boil-overs.
- Clean up spills immediately—sugar hardens fast and can be a slip hazard.
Think of it like handling lava—you need to respect the heat.
Step-by-Step Guide to Making Hard Tack Candy
Step 1: Prepare Your Workspace
Line a baking sheet with parchment paper or a silicone mat. Lightly dust it with powdered sugar to prevent sticking. Set out a candy thermometer and have your flavoring and food coloring ready, as timing is important once the candy reaches temperature.
Step 2: Combine the Ingredients
In a heavy-bottom saucepan, combine sugar, corn syrup, and water. Stir gently just until the sugar is evenly moistened. Avoid splashing sugar on the sides of the pan, as this can cause crystallization.
Step 3: Heat the Mixture to the Right Temperature
Place the saucepan over medium heat and bring the mixture to a boil without stirring. Attach the candy thermometer and cook until it reaches the hard-crack stage, about 150°C (300°F). This ensures the candy will set hard and brittle.
Step 4: Add Flavor and Color
Remove the pan from heat immediately. Carefully stir in flavoring oil and a few drops of food coloring. Mix gently and quickly, as the candy will begin to thicken.
Step 5: Pour and Cool
Pour the hot candy onto the prepared baking sheet. Spread slightly if needed, then allow it to cool completely at room temperature. Do not touch while hot.
Step 6: Break Into Pieces
Once fully hardened, break the candy into small pieces using your hands or the back of a spoon.
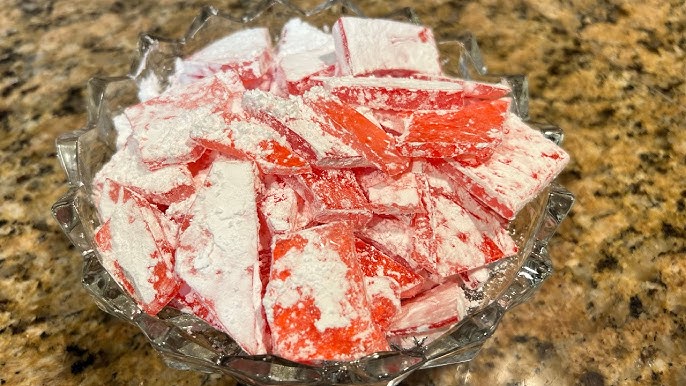
Step 7: Coat with Powdered Sugar
Toss the candy pieces lightly in powdered sugar to prevent sticking. Store in an airtight container until ready to enjoy.
Tips for Perfect Hard Tack Candy Every Time
- Don’t rush the heating process. Gradual heat ensures even cooking and prevents scorching.
- Avoid stirring once the mixture starts boiling. This prevents sugar crystals from forming.
- Use pure flavoring oils. Extracts can cause seizing due to their water content.
- Always use a candy thermometer. Accuracy makes or breaks this recipe.
- Work fast once the syrup is off the heat. Timing is crucial when adding color and flavor.
Consistency comes with practice. If your first batch isn’t perfect, don’t sweat it—next time, you’ll know what to adjust.
How to Customize Flavors and Colors
Hard tack candy is like a blank canvas. You can customize it in so many fun and creative ways:
- Mix flavors (lemon + raspberry = pink lemonade!)
- Layer colors (pour two batches side by side and swirl gently)
- Use edible glitter or gold dust for a fancy finish
- Add essential oils like eucalyptus or lavender (make sure they’re food-grade)
Want a theme? Try red and green peppermint for Christmas, pastel fruit flavors for Easter, or blue raspberry for a summer party. The combinations are endless, and experimenting is half the fun.
Storing and Packaging Hard Tack Candy
Proper storage is the secret to keeping your hard tack candy fresh, shiny, and non-sticky. If stored incorrectly, it can turn into a sticky mess, especially in humid climates.
Here’s how to store it like a pro:
- Airtight containers are your best friend. Mason jars, Tupperware, or zip-lock bags all work great.
- Cool, dry place – Avoid leaving your candy near a window or stove. Moisture is your enemy.
- Separate layers with parchment paper if storing large quantities. This prevents sticking and clumping.
- Avoid the fridge unless it’s absolutely necessary—refrigerators tend to be moist, which makes candy sticky faster.
Hard tack candy can last 2 to 3 months if properly stored. Always check for stickiness or discoloration before serving older batches.
For packaging (especially for gifting or selling), try:
- Clear cellophane bags tied with ribbon
- Glass jars with homemade labels
- Metal tins lined with parchment
- Holiday-themed boxes or containers
Add your own branding, flavors, or personal note to elevate the presentation—people love handcrafted goodies, and the look plays a big part in the experience.
Creative Ways to Gift Hard Tack Candy
Gifting hard tack candy is not only thoughtful—it’s budget-friendly and customizable. Whether it’s for the holidays, birthdays, baby showers, or party favors, there are endless creative ways to present it.
Here are a few ideas:
- Holiday jars: Fill a mason jar with red and green candies and attach a festive label or ornament.
- Themed favor bags: Match candy colors to a party’s theme (e.g., pink and gold for a bridal shower).
- Mini tins for coworkers or teachers: Add a “Thank You” tag or short message.
- Personalized labels: Include the flavor, ingredients, or a fun name for your candy.
- Build-a-flavor gift sets: Package different flavors separately so recipients can taste-test them all.
The more personal the touch, the more memorable the gift becomes. Bonus: It’s shelf-stable and won’t melt like chocolate—perfect for mailing or storing in bulk.
Troubleshooting Common Issues
Even with a perfect recipe, things can go wrong. Here’s how to fix (or avoid) the most common hard tack candy issues:
| Problem | Cause | Fix |
|---|---|---|
| Candy turns out sticky | Humidity or undercooked syrup | Cook to 300°F and coat pieces with powdered sugar |
| Candy is cloudy or grainy | Stirring after boiling starts | Avoid stirring once sugar dissolves |
| Flavor is too strong | Too much flavoring oil | Use 1/2 teaspoon per batch and taste-test next time |
| Candy burns | Heat too high or didn’t watch thermometer | Stay close and monitor the temp carefully |
| Candy is too soft | Didn’t reach hard crack stage | Ensure it reaches at least 300°F |
Messed up a batch? Don’t toss it yet—crushed sticky candy can still be used in drinks, hot tea, or as a sweet decoration on desserts.
Hard Tack Candy Variations You Can Try
Once you master the basic version, it’s time to level up. These hard tack candy variations add an exciting twist to your homemade treats:
- Sour hard candy: Add citric acid after removing the syrup from heat for a sour punch.
- Layered candy: Pour half of one color, let it set slightly, then pour another flavor on top.
- Swirled candy: Gently swirl two colors together right before pouring.
- Spicy hard candy: Add cayenne pepper or chili oil for a hot twist on traditional cinnamon.
- Candy cane bits: Crush peppermint hard tack for use in baking or cocoa topping.
Don’t be afraid to get wild with combinations. Hard tack is a flexible candy base—you can personalize every batch to fit your mood or event.
Is Hard Tack Candy Vegan or Gluten-Free?
Good news for most dietary needs—yes, hard tack candy can easily be vegan and gluten-free.
Here’s the breakdown:
- No animal products: The basic ingredients (sugar, corn syrup, water, flavoring oils) are vegan.
- No gluten: It doesn’t contain wheat or flour-based ingredients.
- Dye caution: Some food colorings may not be vegan (e.g., carmine), so check the label.
- Flavoring oils: Ensure your oils are labeled gluten-free and made without animal-derived ingredients.
If you’re making it for someone with dietary restrictions, it’s always a good idea to use certified vegan or gluten-free labels just to be safe.
Nutritional Information
Here’s a general idea of the nutrition for a small serving (about 3–4 pieces or 15 grams):
| Nutrient | Amount |
|---|---|
| Calories | 60–70 |
| Total Carbohydrates | 17g |
| Sugars | 17g |
| Fat | 0g |
| Protein | 0g |
| Sodium | 0mg |
Keep in mind: Hard tack is pure sugar with flavoring. It’s a treat, not a health food—but that’s totally okay when enjoyed in moderation!
FAQs about Hard Tack Candy Recipe
1. What’s the best way to break hard tack candy?
Use a spoon, mallet, or the back of a knife. If you want neat pieces, lightly score the candy before it cools completely, then snap along the lines.
2. Can I make this recipe without a thermometer?
Yes, but it’s riskier. Use the cold water test: drop some syrup into a glass of ice water. If it forms brittle threads that snap easily, it’s ready.
3. How long does hard tack candy last?
Up to 3 months when stored in an airtight container in a cool, dry place. Humidity is its worst enemy, so avoid moisture exposure.
4. Why is my candy sticky?
It may not have reached the proper temperature, or it’s been exposed to humid air. Coat the pieces in powdered sugar to help reduce stickiness.
5. Can I use natural flavorings?
Yes! Just make sure they’re food-grade oils, not extracts, which contain water and can ruin your candy’s texture.
Conclusion
Hard tack candy is more than just a pretty treat—it’s a piece of sweet nostalgia, a DIY gift from the heart, and a perfect project for candy lovers of all ages. With just a few pantry staples and a bit of patience, you can whip up a batch of bright, flavorful candies that look like edible jewels.
Whether you’re reliving childhood memories or starting a new tradition, hard tack candy is a great way to add color and cheer to any season. It’s simple to make, endlessly customizable, and always a crowd-pleaser.
So what are you waiting for? Grab your sugar, pick a flavor, and let’s get boiling!


