Hamachi Kama Recipe: Love Japanese cuisine? Then you’re going to adore Hamachi Kama, a hidden gem found on sushi menus that’s surprisingly easy to make at home.
Also known as the yellowtail collar, Hamachi Kama is that tender, fatty, and rich cut of fish located just behind the gills. It’s packed with flavor and when grilled just right, the skin crisps up perfectly while the meat remains buttery-soft.
This guide will walk you through everything you need to know—from sourcing the ingredients to serving it like a pro. Ready? Let’s dive in.
What is Hamachi Kama?
Hamachi Kama refers to the collar of the yellowtail fish (Hamachi in Japanese). It’s a popular item in Japanese izakayas and sushi restaurants. The collar is the part of the fish between the head and the body—arguably the most tender and juicy cut because it gets the least amount of use, which keeps the muscle fibers soft.
What makes Hamachi Kama so special is its high fat content, which allows it to stay moist even when cooked under high heat. Whether grilled or broiled, the skin turns crisp while the inside stays rich and luscious, similar to the experience of eating toro (fatty tuna). It’s no wonder this dish is gaining traction among home cooks and foodies alike.
Why You’ll Love This Dish
There are so many reasons to fall in love with this humble yet exquisite dish:
- Insanely flavorful: Thanks to its natural fat, Hamachi Kama doesn’t need heavy seasoning.
- Simple ingredients: You only need a few pantry staples.
- Restaurant-quality at home: Impress your friends and family with a sushi bar favorite made in your own kitchen.
- Customizable cooking methods: Whether you have a grill, oven, or air fryer—you’re covered.
- Protein-packed and keto-friendly: Ideal for those watching carbs but craving something indulgent.
If you’ve never tried making fish collars at home, this is your sign. You’ll never look at fish the same way again.
Where to Buy Hamachi Kama
Hamachi Kama isn’t something you’ll usually find at your local grocery store, but don’t worry—you still have options:
- Japanese or Asian grocery stores (like Mitsuwa or H Mart)
- Online seafood retailers that specialize in sushi-grade products
- Fish markets—sometimes they have collars available, or you can ask them to reserve some when they fillet the fish
- Ask your local sushi chef—they often discard the collars and may be willing to sell them for cheap or give them away
Make sure to look for fresh or flash-frozen Hamachi Kama with firm, glossy skin and no off odors.
List of Ingredients You’ll Need
Before we get into the cooking steps, let’s go over the ingredients you’ll need.
Main Ingredient:
- 2–4 pieces of Hamachi Kama (Yellowtail collar) – fresh or thawed if frozen
For the Marinade (Optional):
- 1 tablespoon soy sauce
- 1 tablespoon sake
- 1 tablespoon mirin
- 1 teaspoon sesame oil
- 1 teaspoon freshly grated ginger
- 1 teaspoon sugar (optional)
For Serving:
- Lemon or lime wedges
- Daikon oroshi (grated daikon radish)
- Ponzu sauce or soy sauce
- Cooked white rice (short grain, Japanese-style)
The ingredient list is simple, but each component adds to the overall harmony of the dish. The marinade is optional but highly recommended if you want to enhance the flavor profile.
Essential Tools & Equipment
You won’t need anything fancy for this recipe, but having the right tools can make a big difference:
- Grill or oven (broiler function)
- Wire rack or baking sheet
- Tongs or fish spatula
- Paper towels
- Sharp knife (for trimming any excess fin or bones)
- Mixing bowl (for marinade)
These tools will help you get that perfect sear while preserving the fish’s delicate texture.
How to Prepare Hamachi Kama
Cleaning and Prepping the Fish
Start by patting the Hamachi Kama dry with paper towels. This helps remove any residual moisture and improves the sear. If there are any visible scales or fin bones sticking out, gently trim them off. You don’t need to remove the skin—it crisps up beautifully during cooking.
Score the thickest part of the flesh lightly with a knife. This helps heat penetrate evenly and prevents curling during cooking.
Marinating (Optional but Recommended)
If you choose to marinate your Hamachi Kama, combine soy sauce, sake, mirin, sesame oil, grated ginger, and sugar in a bowl. Place the collars in a zip-top bag or container and pour the marinade over them. Let them soak for 20–30 minutes in the fridge. Don’t go too long—the delicate fish doesn’t need hours of marination.
Cooking Methods Explained
There are several ways to cook Hamachi Kama, and the best method really depends on what tools you have and your personal taste.
Grilling Hamachi Kama
Grilling is the most traditional method and delivers the best flavor. The smoky char enhances the fatty flesh.
How to grill:
- Preheat your grill to high heat.
- Oil the grates to prevent sticking.
- Grill each side for 4–5 minutes, or until the skin is golden brown and crispy.
Broiling Hamachi Kama in the Oven
If you don’t have a grill, broiling is the next best thing.
How to broil:
- Preheat your oven to broil on high.
- Place the Hamachi Kama on a foil-lined baking sheet with a rack.
- Broil for 5–7 minutes per side. Keep an eye on it to avoid burning.
Air Fryer Hamachi Kama Option
Yes, even your air fryer can handle this dish.
How to air fry:
- Preheat to 400°F (200°C).
- Lightly oil the fish and air fry for 10–12 minutes, flipping halfway through.
No matter which method you choose, the result is a flavorful, crispy-skinned delicacy that melts in your mouth.
Step-by-Step Guide to Cooking Hamachi Kama
Now that we’ve covered everything, let’s walk through the actual cooking process.
Step 1: Prepare the Hamachi Kama
Rinse the hamachi kama (yellowtail collar) under cold water and pat it completely dry with paper towels. Check for excess scales and remove them if needed. Drying the fish well helps the skin crisp and prevents sticking during cooking. Lightly score the thickest parts to ensure even cooking.
Step 2: Season Simply but Well
Hamachi kama is naturally rich and flavorful, so keep seasoning minimal. Sprinkle generously with salt on both sides. You can also add a light brush of neutral oil. Optional seasonings include cracked black pepper or a touch of garlic powder, but avoid overpowering the fish.
Step 3: Preheat Your Cooking Surface
Preheat your broiler or grill to medium-high heat. If using a grill, oil the grates lightly. For broiling, line a tray with foil and place the fish skin-side down. Proper preheating ensures even cooking and beautiful browning.
Step 4: Cook Until Crisp and Juicy
Cook the hamachi kama for 8–10 minutes per side, depending on thickness. Flip carefully once the skin is crisp and releases easily. The fish is done when the flesh turns opaque, flakes easily, and the skin is lightly charred. Avoid overcooking to keep it juicy.
Step 5: Rest, Garnish, and Serve
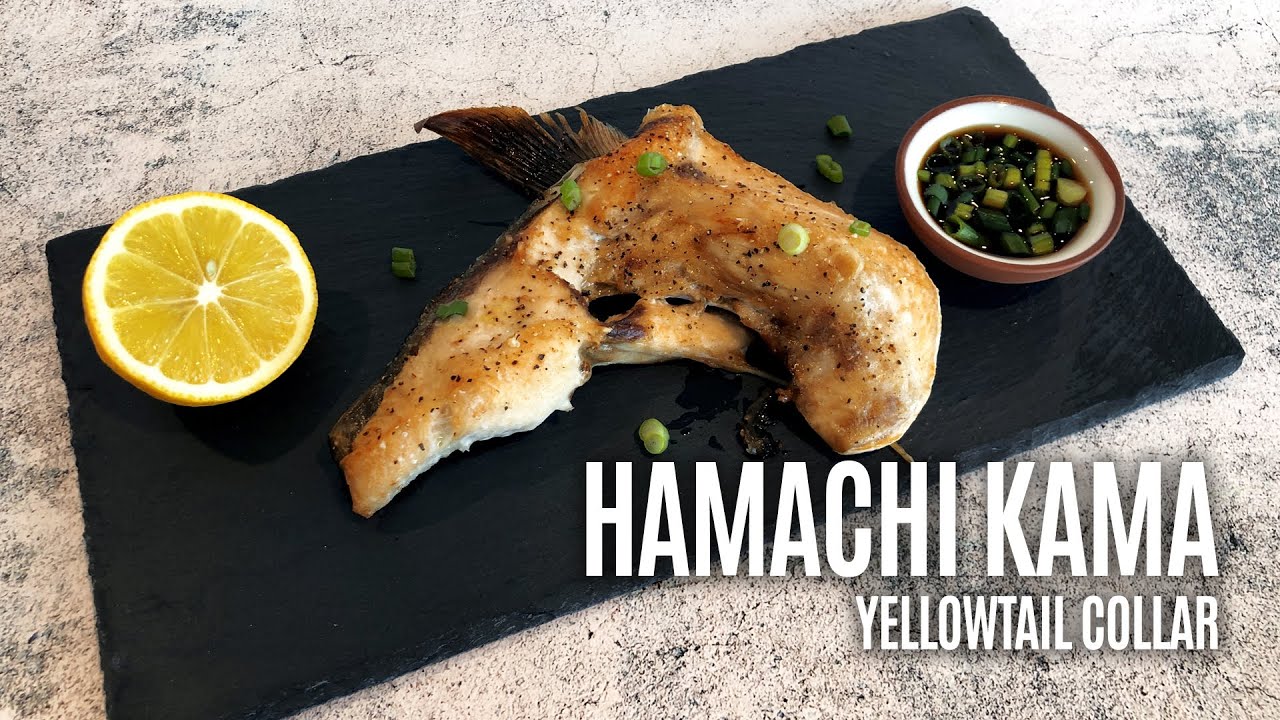
Remove from heat and let it rest for 2 minutes. Finish with a squeeze of fresh lemon juice. Serve with grated daikon, steamed rice, or a simple salad. Enjoy immediately while hot and crispy for the best texture and flavor.
How to Know When Hamachi Kama is Cooked Perfectly
Cooking fish can be tricky, but Hamachi Kama makes it a bit easier thanks to its fattiness. Still, there are a few signs to help you know it’s done just right.
Visual Cues:
- Golden brown skin: Crispy and slightly charred edges are a good sign.
- Opaque flesh: The flesh should no longer look raw or translucent.
- Juices run clear: If you press lightly with a fork or knife, the juices should run clear, not milky or pink.
Texture Check:
- The meat should flake easily with a fork but still retain moisture.
- Avoid overcooking, as this will dry out the natural oils that make this cut so rich and buttery.
Temperature Guide (Optional):
If you’re using a thermometer, aim for an internal temperature of 135°F–140°F (57°C–60°C) in the thickest part. This is safe yet ensures the meat is still juicy and tender.
Serving Suggestions
Now comes the fun part—plating and pairing! Hamachi Kama is a showstopper all on its own, but pairing it right makes a great dish even better.
What to Serve With Hamachi Kama:
- Steamed Japanese rice: Fluffy, slightly sticky rice balances the rich flavor of the fish.
- Miso soup: A light broth-based soup adds warmth and umami.
- Pickled vegetables: Japanese pickles (tsukemono) add crunch and acidity.
- Seaweed salad: A refreshing, slightly tangy side that cuts through the richness.
- Edamame or sautéed spinach: For a pop of green and extra nutrients.
Dipping Sauces That Pair Well:
- Ponzu sauce: A citrusy soy-based sauce that complements the fatty fish perfectly.
- Soy sauce with grated daikon and lemon: Classic and clean.
- Spicy mayo: For those who want a little kick.
- Yuzu kosho: A zesty, fermented chili paste made with yuzu peel and green chilies.
Presentation tip: Place the collar on a clean plate, garnish with lemon wedges and daikon oroshi, and place a small dipping bowl on the side. It’ll feel like dining in a Japanese izakaya.
Hamachi Kama Nutritional Facts
Hamachi Kama is not just delicious—it’s also nutritious. While it’s rich in fat, most of that fat is heart-healthy omega-3s, which are great for your brain, heart, and skin.
Here’s a quick breakdown per 100g (approximate):
| Nutrient | Amount |
|---|---|
| Calories | 190–220 kcal |
| Protein | 20g–24g |
| Fat | 12g–16g |
| Omega-3 Fatty Acids | 1.5g+ |
| Carbohydrates | 0g |
| Sodium | Varies (based on marinade) |
It’s keto-friendly, gluten-free (if using GF soy sauce), and fits into most low-carb meal plans. Just be mindful of the sodium if you’re watching your salt intake.
Tips for the Perfect Hamachi Kama
Want to take your Hamachi Kama from good to amazing? Here are some chef-approved tips:
- Dry the fish well: Moisture is the enemy of crispy skin.
- Don’t skip scoring: A couple of shallow cuts in the thickest part of the meat help it cook evenly.
- Use high heat: This is a fatty cut—it needs heat to render the fat and crisp the skin.
- Rest after cooking: Like steak, resting helps the juices redistribute for better flavor.
- Balance the flavors: Serve with citrus or something acidic to balance out the richness.
And here’s a bonus tip: if you’re making more than one collar, cook them all and store extras. Leftover Hamachi Kama makes a great rice bowl the next day!
Common Mistakes to Avoid
Cooking Hamachi Kama is easy, but a few common missteps can ruin the texture or flavor. Here’s what to avoid:
- Overcooking the fish – It becomes dry and chewy.
- Skipping the marinade or seasoning – While optional, a simple marinade can elevate flavor.
- Not drying the skin – Moisture prevents browning and crispiness.
- Crowding the cooking surface – This leads to steaming instead of searing.
- Forgetting to rest the fish – Rushing into serving can make it lose its juiciness.
Avoid these, and you’re on your way to restaurant-quality results every single time.
Storage and Reheating Instructions
Got leftovers? No problem. Here’s how to store and reheat Hamachi Kama while keeping it delicious.
Storage:
- Store cooked Hamachi Kama in an airtight container in the fridge for up to 3 days.
- For longer storage, wrap tightly in plastic wrap and freeze for up to 2 months.
Reheating:
- Oven: Reheat at 350°F (175°C) for 8–10 minutes.
- Air Fryer: 5–6 minutes at 375°F for crispy results.
- Microwave (Not recommended): Can dry out the fish, but okay in a pinch.
To freshen up the flavors, squeeze a little lemon or drizzle some ponzu after reheating.
FAQs about Hamachi Kama Recipe
1. What is the difference between Hamachi and Hamachi Kama?
Hamachi refers to the whole yellowtail fish, while Hamachi Kama is the collar portion—the area near the gills. It’s fattier and more tender than other parts of the fish.
2. Can I use other fish collars instead of Hamachi?
Absolutely! Fish like salmon, tuna, or even black cod collars can be cooked the same way. Each offers a slightly different texture and flavor profile.
3. How long should I marinate Hamachi Kama?
About 20–30 minutes is perfect. Because the flesh is tender and fatty, it absorbs flavors quickly. Avoid marinating overnight to prevent overpowering the natural taste.
4. Can I cook Hamachi Kama from frozen?
It’s best to thaw it first for even cooking, but if you’re short on time, cook it from frozen at a slightly lower heat and for a bit longer, checking doneness carefully.
5. What is the best dipping sauce for Hamachi Kama?
Ponzu sauce is the most traditional and complements the fatty fish well. Soy sauce with lemon juice, or a light yuzu kosho mayo, also pairs wonderfully.
Conclusion
Hamachi Kama is one of those underrated dishes that, once discovered, becomes a staple in your cooking rotation. It’s flavorful, nutritious, and surprisingly easy to prepare. Whether you grill it, broil it, or toss it in the air fryer, the buttery flesh and crispy skin are guaranteed to impress. Plus, with simple ingredients and minimal prep, it’s a no-fuss way to bring authentic Japanese flavor into your home kitchen.
Next time you’re in the mood for something new—or want to show off your culinary chops—try making Hamachi Kama. One bite, and you’ll understand why it’s a sushi chef’s secret weapon.