Cookies and Cream Cake Recipe: Few desserts combine comfort and indulgence quite like a cookies and cream cake. Whether you’re celebrating a birthday, surprising a loved one, or simply craving a rich and creamy treat, this cake delivers every time. We’re talking layers of moist vanilla cake loaded with crunchy cookie bits, slathered in a velvety cookies and cream frosting, and topped with more Oreo goodness than you ever thought possible. Sounds like a dream? Let’s turn it into a reality.
This detailed guide will walk you through every step—from ingredients to baking, frosting, and decorating—to create the perfect cookies and cream cake that looks as good as it tastes.
Why You’ll Love This Cake
This cake isn’t just a treat for the taste buds—it’s a full-on sensory experience. It’s rich, yet not too sweet. Fluffy, but with the crunch of cookie bits. It’s the kind of dessert that gets compliments long after the last slice is gone. You’ll love it because:
- It’s packed with real Oreo cookie pieces.
- The frosting is light, creamy, and super spreadable.
- It’s easy enough for beginners but impressive enough for celebrations.
- You can tweak the flavor and texture to make it uniquely yours.
Whether you’re new to baking or a seasoned pro, this cake hits the sweet spot (literally and figuratively) every time.
Tools & Equipment You’ll Need
Before we dive into the ingredients, make sure your kitchen is stocked with these essentials:
- Stand mixer or hand mixer: To cream the butter, whip the frosting, and mix the batter thoroughly.
- Two or three 8-inch round cake pans: Even-sized layers help with stacking.
- Parchment paper: For easy removal of cake layers.
- Mixing bowls: At least one large and one medium.
- Rubber spatula and whisk: For folding and mixing.
- Sifter: To aerate the dry ingredients.
- Offset spatula or bench scraper: For frosting and smoothing the cake.
These tools make the process smoother and help ensure your cake turns out bakery-quality.
List of Ingredients You’ll Need
Let’s get to the good stuff. Here’s what you’ll need to make this cookies and cream cake from scratch.
For the Cake Layers:
- 2 ½ cups (310g) all-purpose flour
- 1 tablespoon baking powder
- ½ teaspoon baking soda
- ½ teaspoon salt
- ¾ cup (170g) unsalted butter, room temperature
- 1 ¾ cups (350g) granulated sugar
- 4 large eggs, room temperature
- 1 tablespoon pure vanilla extract
- 1 cup (240ml) buttermilk
- 1 cup (80g) crushed Oreo cookies (about 10-12 cookies)
For the Cookies and Cream Frosting:
- 1 cup (225g) unsalted butter, room temperature
- 4 cups (480g) powdered sugar
- ¼ cup (60ml) heavy cream (plus more if needed)
- 1 teaspoon vanilla extract
- Pinch of salt
- ¾ cup (60g) finely crushed Oreos
Optional Garnishes:
- Whole Oreo cookies
- Oreo crumbs
- Chocolate drizzle or ganache
Want to make it extra fancy? You can add a chocolate ganache drip or even an extra Oreo crumble between layers.
Ingredient Substitutions and Tips
No buttermilk? No problem. Just add 1 tablespoon of lemon juice or white vinegar to 1 cup of milk and let it sit for 5 minutes.
Not a fan of super sweet frosting? Reduce the powdered sugar by ½ cup or add a pinch of salt to balance the sweetness.
Prefer chocolate cake instead of vanilla? Swap ½ cup of flour with cocoa powder for a cookies and cream + chocolate twist.
Gluten-free version? Use a 1:1 gluten-free flour blend. Most Oreos are gluten-free these days, too!
Preparing for the Bake: Preheat and Prep
This might seem basic, but it’s crucial.
- Preheat your oven to 350°F (175°C).
- Grease and line your cake pans with parchment paper to prevent sticking.
- Let your butter, eggs, and buttermilk come to room temperature for better blending.
Pro tip: Use a kitchen scale to divide your batter evenly into each pan for perfectly even cake layers.
Step-by-Step Guide to Making the Cake Batter
Step 1: Mixing the Dry Ingredients
In a medium bowl, whisk together flour, baking powder, baking soda, and a pinch of salt. Mixing the dry ingredients first ensures even distribution of leavening, which helps the cake rise evenly.
Step 2: Creaming Butter and Sugar
In a large bowl, beat softened butter and sugar until light and fluffy. This step incorporates air into the batter, giving the cake a soft, tender crumb. Scrape down the sides of the bowl to ensure everything mixes evenly.
Step 3: Adding Eggs and Vanilla
Add the eggs one at a time, mixing well after each addition. Stir in vanilla extract. Mixing gradually helps maintain a smooth, stable batter without curdling.
Step 4: Combining Wet and Dry
Gradually add the dry ingredients to the wet mixture. Mix gently until just combined. Overmixing can make the cake dense, so stop as soon as no dry flour remains.
Step 5: Folding in Crushed Cookies
Gently fold in crushed cookies using a spatula. Fold carefully to keep the batter light while evenly distributing the cookie pieces.
Smooth, rich, and ready to bake—this cake batter is the perfect foundation for a delicious dessert 🍰✨
Baking the Cake Layers
Once your batter is mixed and ready, it’s time to bring the magic to life. This stage is crucial because even the best batter can fall flat if not baked correctly.
Grease and Line Your Pans
- Lightly grease the sides and bottoms of your cake pans with butter or non-stick spray.
- Cut a round of parchment paper to fit the bottom of each pan and place it inside. This ensures your cake releases perfectly after baking—no sticking, no tearing.
Divide and Spread the Batter
- Evenly divide the batter between your prepared pans.
- Use a spatula to level out the tops—this helps the cakes bake evenly and prevents doming.
Bake It Right
- Place the pans in the center of your preheated oven at 350°F (175°C).
- Bake for 25 to 30 minutes, depending on your oven and pan size.
- To check for doneness, insert a toothpick into the center of the cake. If it comes out clean or with a few crumbs, you’re good to go.
Cool Completely
- Let the cakes cool in the pans for 10–15 minutes.
- Then, gently turn them out onto a wire rack and allow them to cool completely.
- Don’t rush this step. If you try to frost a warm cake, you’ll end up with a melty, sliding mess!
Making the Cookies and Cream Frosting
The real star of this cake is the luscious, fluffy cookies and cream frosting. It’s silky, sweet, and loaded with crushed Oreo bits. Let’s get to it.
Start with the Butter
- Beat the softened butter on medium-high speed until pale and fluffy, about 3–4 minutes.
- This base is what gives the frosting its creamy texture.
Add Powdered Sugar Gradually
- Turn your mixer to low and slowly add in the powdered sugar, 1 cup at a time.
- Once incorporated, increase the speed and beat until smooth.
- Repeat until all sugar is added.
Add Vanilla and Cream
- Pour in the heavy cream and vanilla extract.
- Continue mixing for 2–3 minutes until light and spreadable. Add a touch more cream if it’s too thick.
Fold in Crushed Oreos
- Switch to a spatula and gently fold in the finely crushed Oreos.
- Make sure they’re finely crushed so they don’t clog your piping tip if you decide to decorate!
Want it extra smooth? Blend the Oreos in a food processor until fine crumbs before folding them into the frosting.
Leveling and Assembling the Cake
Now for the fun part—building your masterpiece.
Level Your Cake Layers
- If your cakes have domed tops, use a serrated knife to gently level them.
- A flat surface is key for stable stacking and a professional look.
Layer with Frosting
- Place your first cake layer on a cake board or plate.
- Spread a generous layer of cookies and cream frosting over the top.
- Add your second (and third, if using) layer on top, repeating the process.
Crumb Coat and Chill
- Apply a thin layer of frosting around the cake to seal in crumbs.
- Chill the cake for 20–30 minutes to set the crumb coat before final frosting.
This step might seem like a hassle, but it gives your cake that clean, bakery finish.
Decorating Tips and Finishing Touches
Ready to take it from homemade to showstopper?
Frost the Outside
- Apply a thick, even layer of frosting over the entire cake using an offset spatula.
- Smooth the sides with a bench scraper or the edge of a large spatula.
Add Oreo Crumbs
- Press crushed Oreo crumbs gently around the base of the cake for texture and contrast.
- Or, press the crumbs all over for a “dirt cake” style finish.
Top It Off
- Pipe frosting swirls on top using a piping bag fitted with a large star tip.
- Add whole Oreos to the top of each swirl for that iconic look.
- Want a little extra flair? Drizzle with chocolate ganache or sprinkle with mini chocolate chips.
Storing Your Cookies and Cream Cake
Short-Term Storage
- Store your finished cake in the fridge if you’re not serving it right away.
- Cover it with plastic wrap or keep it in a cake dome to prevent it from drying out.
- Let it come to room temperature for about 30–45 minutes before serving for the best flavor and texture.
Freezing Instructions
- Want to make the cake ahead of time? Freeze the cake layers (unfrosted) tightly wrapped in plastic wrap and aluminum foil for up to 2 months.
- You can also freeze the fully assembled cake, but for best results, wrap it tightly and use within a month.
Serving Suggestions
Cookies and cream cake goes well with just about everything. But if you want to make your dessert even more special, try these ideas:
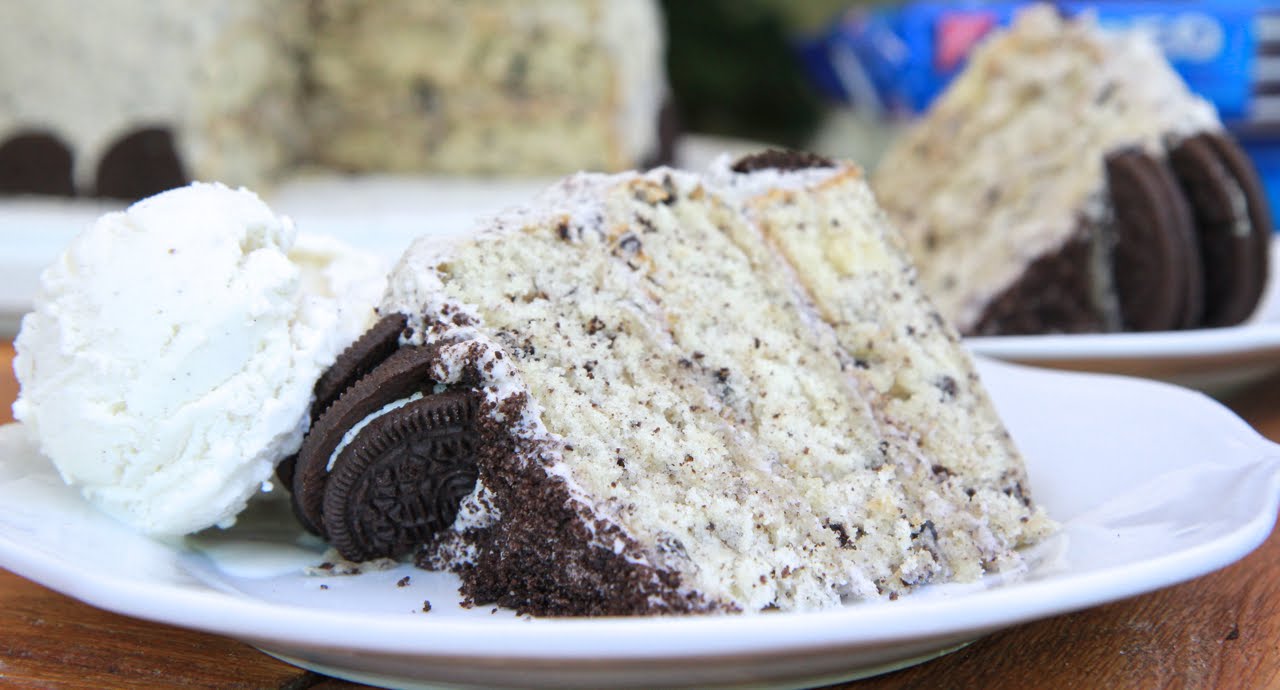
- Serve with a scoop of vanilla or cookies & cream ice cream.
- Pair it with a tall glass of cold milk.
- Add a drizzle of hot fudge for an extra decadent slice.
- Serve with coffee or hot chocolate for a cozy winter dessert.
No matter how you serve it, don’t expect leftovers. This cake disappears fast.
Common Mistakes to Avoid
Even great bakers slip up sometimes. Here’s how to dodge the most common cake mishaps:
- Overmixing the batter: Mix just until combined to avoid a tough, dense cake.
- Skipping room temperature ingredients: Cold butter or eggs can cause curdling or uneven batter.
- Not greasing pans properly: Always grease and line with parchment to ensure easy removal.
- Frosting a warm cake: Always cool cake layers completely or your frosting will melt off.
- Not measuring ingredients properly: Use a kitchen scale for accuracy, especially with flour and sugar.
FAQs about Cookies and Cream Cake Recipe
1. Can I use a cake mix instead of making it from scratch?
Absolutely! If you’re in a rush, you can use a boxed vanilla cake mix and fold in crushed Oreos before baking. The frosting is still best homemade for that fresh, creamy flavor.
2. How long does the cake stay fresh?
Stored properly in the fridge, your cookies and cream cake will stay fresh for 3 to 4 days. Bring it to room temperature before serving.
3. Can I make this cake gluten-free?
Yes! Use a 1:1 gluten-free flour blend and gluten-free chocolate sandwich cookies. Check your other ingredients (like vanilla and powdered sugar) to ensure they’re gluten-free, too.
4. What kind of cookies work best?
Classic Oreos are the go-to, but feel free to use your favorite chocolate sandwich cookie. Double Stuf, Golden Oreos, or even flavored varieties can give your cake a twist.
5. Is this cake suitable for layering?
Definitely. This recipe is perfect for two or three layers. The frosting holds its shape well and the cake is sturdy enough to support extra tiers.
Conclusion
Cookies and cream cake is one of those classic crowd-pleasers that never goes out of style. It’s simple, satisfying, and just indulgent enough to feel like a real treat. Whether it’s your first cake or your fiftieth, this step-by-step guide ensures success every time. From the tender crumb of the cake to the rich, Oreo-packed frosting—every bite is pure joy.
So preheat that oven, grab a pack of Oreos, and get baking. You’re about to make a cake that’s just as fun to create as it is to eat.


