Coco Bread Recipe: If you’ve ever visited the Caribbean—or simply love Jamaican food—then you know how irresistible Coco Bread is. It’s warm, soft, buttery, and slightly sweet, often paired with savory fillings like Jamaican patties or eaten on its own as a snack.
Today, we’re diving into a full, human-friendly, step-by-step guide on how to make authentic coco bread at home. Get ready to fill your kitchen with the warm scent of coconut and nostalgia!
What is Coco Bread?
Coco bread is a rich, soft, and fluffy Jamaican bread that gets its name from one key ingredient: coconut milk. But don’t be fooled—it’s not a sweet coconut dessert. Instead, it’s subtly sweet, slightly savory, and beautifully layered to create a pillowy texture. Its signature folded shape makes it perfect for stuffing with fillings, especially Jamaican beef patties, which is a popular combo throughout the Caribbean.
Think of coco bread as the Jamaican cousin of dinner rolls or sandwich bread—only with more depth and flavor, thanks to the coconut. It’s brushed with melted butter, folded over itself, and baked until golden. Once you try it, regular sandwich bread just won’t cut it anymore.
The Origin and Cultural Significance
Coco bread has deep roots in Jamaican cuisine, often served in bakeries and street food stalls. It’s especially popular as a side to Jamaican patties—so much so that it’s become a classic combo, like burgers and buns or PB&J.
This bread reflects the ingenuity of Jamaican baking, merging simple ingredients with tropical flavors to create something universally loved. Whether you grew up eating it or just discovered it, coco bread has a way of sticking in your memory (and your cravings).
Why You’ll Love This Recipe
- Simple Ingredients: You probably already have most of the ingredients at home.
- Fluffy and Buttery: The texture is unbelievably soft, perfect for any sandwich or on its own.
- Perfect for Meal Prep: Make a batch, freeze, and reheat anytime.
- Versatile: Eat with patties, jerk chicken, cheese, or just plain butter.
Whether you’re an experienced baker or trying something new, this recipe is foolproof and rewarding.
Ingredients You’ll Need
Let’s break down exactly what you’ll need to bring this delicious bread to life.
Main Ingredients:
- 3 ½ cups all-purpose flour – Gives the bread structure and softness.
- 1 packet (2 ¼ tsp) active dry yeast – The rising star of the show.
- 1 tsp salt – Balances the flavor.
- 2 tbsp sugar – Adds a light sweetness.
- ¾ cup coconut milk (unsweetened) – Brings the signature flavor and richness.
- ¼ cup warm water (110°F/43°C) – Activates the yeast.
- 2 tbsp unsalted butter (melted) – For brushing and adding richness.
- 1 egg (optional) – Adds softness and color (can skip for vegan version).
Optional Add-Ins:
- 1 tbsp honey or brown sugar – For a deeper sweetness.
- 1 tsp vanilla extract – To add more depth.
- 1 tbsp dry milk powder – Helps with tenderness (used in bakery-style bread).
These are optional, but they’ll take your coco bread to the next level!
Tools and Equipment
- Large mixing bowl
- Measuring cups and spoons
- Wooden spoon or dough hook
- Rolling pin
- Baking sheet
- Parchment paper or silicone baking mat
- Clean kitchen towel or plastic wrap
- Oven
You don’t need anything fancy—just a few kitchen basics.
Tips Before You Start
- Use warm, not hot, water to activate your yeast.
- Canned coconut milk works best for rich flavor—shake it well before using.
- Let all your ingredients reach room temperature before mixing.
- Don’t skip the rising times—it gives the bread its texture.
- If using instant yeast, you can skip the proofing step.
Alright, let’s get baking!
Step-by-Step Guide to Making Coco Bread
Step 1: Activate the Yeast
In a small bowl, mix warm water or milk with yeast and a pinch of sugar. Stir gently and let it sit for 5–10 minutes until foamy. This confirms the yeast is active and ready to rise the dough.
Step 2: Make the Dough
In a large bowl, combine flour, sugar, salt, and melted butter. Add the activated yeast mixture and mix until a soft dough forms. The dough should be slightly sticky but manageable.
Step 3: Knead Until Smooth
Transfer the dough to a lightly floured surface and knead for about 8–10 minutes until smooth, elastic, and no longer sticky. Proper kneading gives coco bread its soft, fluffy texture.
Step 4: Let It Rise
Place the dough in a lightly greased bowl, cover with a clean cloth, and let it rise in a warm place until doubled in size, about 1–1½ hours.
Step 5: Divide and Shape the Dough
Punch down the risen dough and divide it into equal portions. Roll each portion into a smooth ball, then flatten slightly into small circles.
Step 6: Add the Coconut Layer
Brush one side of each dough circle with softened butter, then sprinkle generously with sweetened shredded coconut. This creates the signature coconut filling.
Step 7: Fold and Flatten
Fold each dough circle in half to enclose the coconut. Gently flatten with a rolling pin to seal and shape without pressing out the filling.
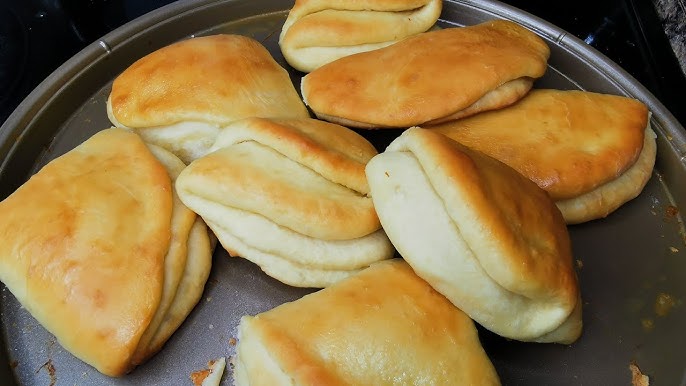
Step 8: Bake to Perfection
Place the shaped dough on a lined baking tray and bake in a preheated oven until lightly golden and cooked through. Let cool slightly before serving.
Soft, lightly sweet, and filled with coconut goodness—homemade coco bread is a true Caribbean classic 🥥🍞✨
How to Know When It’s Done
Coco bread should be light golden on the outside and super soft and fluffy inside. Tap the top—if it sounds slightly hollow and the surface is golden, it’s ready!
You’ll also notice a delicious coconut scent filling the kitchen. That’s a great indicator that your bread is ready to wow your taste buds.
Serving Suggestions
Coco bread is incredibly versatile. Here are some of the best ways to enjoy it:
- With Jamaican beef patties: The classic combo! Just slip a patty inside the folded bread.
- As a sandwich base: Fill with jerk chicken, BBQ tofu, fried plantains, or spicy shrimp.
- With butter and honey: Keep it simple and sweet for breakfast or a snack.
- With soups and stews: Perfect for dipping into rich Caribbean dishes like oxtail or curry goat.
You really can’t go wrong—this bread pairs well with just about anything.
Storing and Reheating
Want to enjoy coco bread later? No problem.
To store:
- Keep in an airtight container at room temperature for up to 3 days.
- For longer storage, place in a zip-top freezer bag and freeze for up to 2 months.
To reheat:
- Microwave for 15–20 seconds wrapped in a paper towel.
- Or pop in a 300°F (150°C) oven for 5–7 minutes.
Just don’t overheat, or you risk drying it out.
Common Mistakes to Avoid
- Water too hot for yeast: Always check that it’s warm (not boiling!) or you’ll kill the yeast.
- Skipping the rise: Don’t rush the proofing stage—it’s essential for that soft texture.
- Using sweetened coconut milk: This can make the bread overly sweet. Stick with unsweetened canned coconut milk.
- Not kneading enough: Under-kneaded dough won’t rise properly or get that airy bite.
- Over-baking: This dries the bread out. Keep an eye on them after 15 minutes.
Being mindful of these can make or break your coco bread results!
How to Make Vegan Coco Bread
It’s super easy to make this recipe vegan-friendly:
- Skip the egg – The dough will still be soft and fluffy.
- Use plant-based butter instead of regular.
- Make sure your coconut milk is dairy-free (most are).
That’s it! Everything else is naturally plant-based, making this a great vegan bread option.
Gluten-Free Alternatives
Going gluten-free? Try using a 1:1 gluten-free flour blend (with xanthan gum) instead of regular flour. While the texture might be slightly different—less chewy and more dense—it still tastes amazing.
You may need to reduce the coconut milk slightly or increase the flour if the dough seems too sticky. Let it rest longer to help with structure before shaping and baking.
FAQs about Coco Bread Recipe
1. What makes coco bread different from regular bread?
Coco bread uses coconut milk for a richer, softer texture and subtle tropical flavor, unlike typical sandwich bread.
2. Can I use coconut oil instead of butter?
Yes! Coconut oil works well as a vegan substitute for brushing the bread. It enhances the coconut flavor too.
3. Why is my coco bread tough or dry?
Over-kneading, not enough rising time, or over-baking can make the bread dense or dry. Stick to the steps and watch your baking time.
4. Can I stuff coco bread before baking?
You can! Add cooked fillings like seasoned veggies or cheese before folding. Just make sure they aren’t too wet to avoid soggy bread.
5. Can I make mini versions for sliders or party snacks?
Absolutely. Just divide the dough into smaller portions and reduce baking time by 2–3 minutes. Great for parties and appetizers!
Final Thoughts
Homemade Jamaican coco bread is more than just a side dish—it’s a piece of culture, warmth, and comfort. Whether you’re using it to sandwich a spicy patty, dipping it in curry, or just eating it warm with butter, this bread is a must-have in your kitchen rotation.
And the best part? It’s simple, affordable, and crazy delicious. Now that you know the step-by-step process, there’s no reason not to bake up a batch of your own.
Give it a try this weekend—your taste buds will thank you.


