Chuck Roast Beef Recipe: Let’s be honest—there’s nothing quite like the smell of a juicy, slow-cooked chuck roast beef filling your home. It’s the kind of meal that feels like a warm hug on a cold day. Whether you’re prepping a hearty family dinner or planning a comforting Sunday meal, chuck roast is the go-to choice for flavor, tenderness, and simplicity. And the best part? It doesn’t require you to be a top chef to get it right. Just the right ingredients, a bit of patience, and a few insider tricks will get you there.
In this guide, we’ll walk through everything from selecting the best cut of meat to mastering the art of slow-cooking it to perfection. You’ll get a detailed ingredient list, cooking methods, and plenty of tips to avoid common mistakes. Ready to make the best chuck roast of your life? Let’s dive in!
What Is Chuck Roast Beef?
Chuck roast beef comes from the shoulder area of the cow, making it a budget-friendly and flavorful cut. It’s known for its rich marbling, which means more intramuscular fat—and that’s a good thing. Why? Because that fat breaks down slowly as it cooks, making the meat juicy and tender.
Unlike leaner cuts like sirloin or round roast, chuck roast isn’t meant to be grilled or cooked quickly. It thrives on slow, moist-heat cooking methods like braising or slow roasting. That’s why you’ll often find chuck roast recipes that use a Dutch oven, Crockpot, or Instant Pot.
This cut is incredibly versatile too. You can use it to make classic pot roast, shredded beef for tacos, or even beef stew. But when cooked right, chuck roast on its own—braised with herbs, garlic, onions, and broth—is pure comfort food magic.
Why Chuck Roast Is Perfect for Slow Cooking
You might wonder, “Why not use a leaner cut for roast beef?” The answer is simple: chuck roast was born to be slow-cooked. Its connective tissue and marbling turn into tender, flavorful bites when simmered for hours. Other cuts dry out or toughen up when overcooked, but chuck roast only gets better.
Think of it like this—low and slow is the name of the game. By giving it time, the collagen breaks down into gelatin, which adds an unbeatable mouthfeel and flavor to the meat. Plus, it absorbs the taste of whatever you cook it with, whether it’s herbs, garlic, or red wine.
If you’re planning to feed a crowd or want leftovers that taste even better the next day, chuck roast is your best friend. It’s forgiving, affordable, and just plain delicious.
List of Ingredients You’ll Need
Here’s everything you’ll need for a classic chuck roast beef that’s rich in flavor and fall-apart tender:
Meat Selection Tips
- Chuck roast (3–4 lbs) – Look for well-marbled pieces with visible fat streaks. Bone-in or boneless works.
- Salt & pepper – Generous seasoning helps create that crave-worthy crust when seared.
Vegetables and Herbs
- Yellow onions (2, sliced) – Adds sweetness and aroma.
- Carrots (3–4, cut into chunks) – For earthy sweetness.
- Celery stalks (2, chopped) – Adds depth and savoriness.
- Garlic cloves (4–5, minced) – Essential for flavor.
- Fresh rosemary & thyme (a few sprigs each) – Fragrant and savory herbs.
Liquids and Seasonings
- Beef broth (2 cups) – Adds moisture and flavor.
- Red wine (optional – 1 cup) – Adds richness and acidity.
- Tomato paste (1 tablespoon) – For a deeper, richer base.
- Worcestershire sauce (2 teaspoons) – Umami booster.
- Olive oil (2 tablespoons) – For searing the meat.
Want to elevate it? Throw in some mushrooms or baby potatoes!
Essential Tools for Cooking Chuck Roast
You don’t need fancy gadgets, but these tools will make your life easier:
- Dutch oven or heavy oven-safe pot – Ideal for searing and braising.
- Crockpot/Slow Cooker – A set-it-and-forget-it option.
- Instant Pot – Speeds up the cooking process with great results.
- Meat thermometer – For checking doneness (target 195°F–205°F for fall-apart tenderness).
- Cutting board & sharp knife – For prepping ingredients.
- Tongs – To flip the roast while searing.
A roasting rack isn’t necessary, but it helps with even heat distribution in oven roasting.
How to Choose the Best Chuck Roast at the Store
Not all chuck roasts are created equal. Here’s how to pick the best:
- Look for marbling – Those white fat lines mean flavor.
- Firmness – The roast should be firm to the touch, not squishy.
- Color – Bright red meat with no grey spots is ideal.
- Thickness – A thicker cut (at least 2 inches) holds up better to slow cooking.
Don’t hesitate to ask your butcher for help. Sometimes they’ll have better cuts in the back or can custom-cut for you.
Prepping the Ingredients: Do’s and Don’ts
Let’s talk prep. Many people rush this part, but it’s crucial for flavor.
Do’s
- Pat the roast dry before seasoning—moisture is the enemy of a good sear.
- Let the meat come to room temperature before cooking.
- Use coarse salt and freshly ground black pepper.
- Roughly chop the veggies to help them hold up during cooking.
Don’ts
- Don’t skip the searing—it locks in flavor.
- Don’t over-peel your carrots or potatoes—those skins have nutrients and flavor.
- Don’t overcrowd the pot while searing—work in batches if needed.
A little prep goes a long way in making the final dish taste restaurant-quality.
Step-by-Step Guide to Cooking Chuck Roast
Step 1: Season the Meat Generously
Pat the chuck roast dry with paper towels. Season all sides generously with salt, black pepper, and optional spices like garlic powder or paprika. Proper seasoning helps build deep flavor from the very start.
Step 2: Sear the Chuck Roast for Maximum Flavor
Heat oil in a heavy pot or Dutch oven over medium-high heat. Sear the chuck roast on all sides until deeply browned. This step locks in juices and creates rich, savory flavor through caramelization.
Step 3: Add Vegetables and Aromatics
Remove the roast briefly and add chopped onions, carrots, and celery to the pot. Sauté until slightly softened, then add garlic and herbs like thyme or rosemary. These aromatics create a flavorful base for the braise.
Step 4: Add Broth and Braising Liquid
Return the roast to the pot. Pour in beef broth, wine, or a mix of both until the liquid comes about halfway up the meat. Scrape up any browned bits from the bottom—they add incredible flavor.
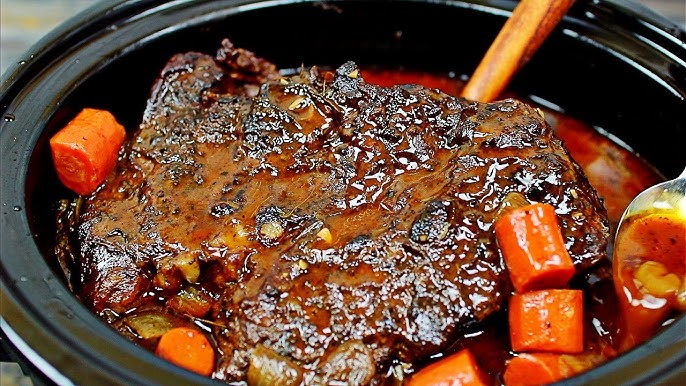
Step 5: Cover and Slow Cook to Perfection
Cover the pot and cook on low heat, either on the stovetop or in the oven, until the meat is fork-tender. Slow cooking allows the tough connective tissue to break down, making the roast juicy and tender.
Step 6: Let It Rest Before Serving
Once cooked, remove the roast and let it rest for 10–15 minutes before slicing or shredding. Resting allows the juices to redistribute, keeping the meat moist and flavorful.
Tender, hearty, and comforting—chuck roast done right is a timeless classic 🍖✨
Oven vs. Crockpot vs. Instant Pot: Which Method is Best?
All three methods work great, but they come with their own pros and cons:
| Method | Pros | Cons |
|---|---|---|
| Oven | Even heat, best for texture & browning | Longer cook time, uses more energy |
| Crockpot | Set-it-and-forget-it, great for busy days | No searing unless done separately |
| Instant Pot | Super fast, great flavor, convenient | Can’t check progress as easily |
If you’re all about convenience, go with the Crockpot. If you’re in a rush, Instant Pot is your best friend. But for that deep, old-school flavor and texture? Oven braising wins.
How to Make the Perfect Gravy from the Drippings
Here’s how to turn that leftover braising liquid into a rich, silky gravy:
- Strain the liquid to remove herbs and veggie chunks (optional).
- Skim off excess fat.
- In a separate pan, melt 2 tablespoons of butter and whisk in 2 tablespoons of flour.
- Slowly add 1½ to 2 cups of your strained drippings, whisking constantly.
- Let it simmer until thickened, about 5 minutes.
- Season with salt, pepper, and a splash of Worcestershire or soy sauce for extra depth.
Now drizzle that golden gravy over your roast—and everything else on the plate.
Serving Suggestions and Side Dish Ideas
Your chuck roast is a showstopper on its own, but the right sides make it unforgettable. Here are some of our favorite pairings:
- Mashed potatoes – Classic and creamy.
- Buttered egg noodles – Perfect for soaking up that gravy.
- Roasted Brussels sprouts – Add a little crunch and color.
- Yorkshire pudding – Traditional and delicious.
- Crusty bread – For sopping up every last drop of juice.
Want to keep it light? Serve with a fresh green salad or steamed green beans.
Storage and Reheating Tips
Chuck roast stores and reheats beautifully—sometimes it tastes even better the next day!
Storage
- Fridge: Store leftovers in an airtight container for up to 4 days.
- Freezer: Freeze in portioned containers with some of the gravy for up to 3 months.
Reheating
- Gently reheat on the stovetop with a bit of broth or gravy to keep it moist.
- Microwave works too, but cover it with a damp paper towel and reheat in intervals.
Pro tip: Reheat low and slow to keep that tenderness intact.
Common Mistakes to Avoid with Chuck Roast
Even with a simple recipe like chuck roast, there are a few traps that can ruin your dish. Let’s go over the biggest ones and how to dodge them like a pro.
1. Not Searing the Meat
Skipping the sear means skipping flavor. The brown crust adds depth and texture. Always take the extra few minutes to brown the roast on all sides before slow-cooking.
2. Using Too Little Liquid
Chuck roast needs moisture to stay juicy. Whether it’s broth, wine, or a mix, make sure the liquid comes halfway up the meat. Too little liquid and you’ll risk a dry roast.
3. Cooking at Too High a Temperature
High heat makes the meat tough. Slow and low is the way to go. Whether you’re using the oven or a Crockpot, stick to lower temperatures for a longer time.
4. Cutting the Roast Too Soon
Letting your roast rest is not optional. It helps the juices settle back into the meat so every bite is moist and flavorful.
5. Not Deglazing the Pan
Those browned bits stuck to the bottom of the pot after searing? That’s flavor gold. Deglazing with broth or wine unlocks that richness and adds it right back into the dish.
Avoid these, and you’re already ahead of the game.
Nutritional Information
Want to know what’s going into your body? Here’s a general breakdown of what one serving (approx. 6 oz. of chuck roast + veggies + light gravy) might contain:
| Nutrient | Amount (approx.) |
|---|---|
| Calories | 400–500 kcal |
| Protein | 35–40g |
| Total Fat | 25–30g |
| Saturated Fat | 10–12g |
| Carbohydrates | 10–15g (from veggies) |
| Fiber | 2–3g |
| Sugar | 4g |
| Sodium | 500–800mg |
Note: These numbers can vary depending on the size of the roast, the amount of fat, and the ingredients used (like wine, broth, or potatoes).
This meal is protein-rich and hearty, perfect for refueling after a long day.
FAQs about Chuck Roast Beef Recipe
1. What cut of beef is best for a roast?
Chuck roast is one of the best cuts for roasting because it has rich marbling and connective tissue that breaks down during slow cooking, resulting in a tender, flavorful roast. Other good options include brisket, round roast, and rump roast.
2. Can I use red wine instead of broth?
Absolutely! Red wine adds depth and a slightly acidic note that balances the richness of the meat. You can replace part or all of the broth with wine, but make sure it’s something you’d drink (dry red wines like cabernet sauvignon or merlot work great).
3. How long should I cook a 3-pound chuck roast?
Plan on 3 to 3½ hours at 300°F in the oven, or 8 hours on LOW in a Crockpot. If using an Instant Pot, 60–70 minutes on high pressure with natural release is usually perfect. Always check if it’s fork-tender—if not, give it more time.
4. Why is my chuck roast tough?
If your roast is still tough, it likely needs more cooking time. Chuck roast gets tender through long, slow cooking. Also, be sure you’re cooking at a low enough temperature and with enough liquid.
5. What are some good side dishes to serve with chuck roast?
Great side dishes include mashed potatoes, buttered noodles, roasted vegetables, Yorkshire pudding, and crusty bread. For lighter options, go with a crisp green salad or steamed green beans.
Conclusion
And there you have it—your complete, step-by-step guide to making the ultimate chuck roast beef. Whether you’re a first-timer or a seasoned home cook, this recipe is built to deliver incredible results with minimal fuss.
From choosing the right cut to nailing that tender, juicy bite, chuck roast is a meal that satisfies every single time. And the best part? It’s forgiving, budget-friendly, and full of comfort. Serve it with your favorite sides, whip up some rich gravy, and enjoy every last bite.
Take your time, follow the steps, and make it your own. Add some mushrooms, use red wine, try different herbs—there are so many ways to customize this classic.
Ready to impress your guests—or just treat yourself to an unforgettable meal? Then roll up your sleeves, grab that chuck roast, and get cooking. You won’t regret it.