Cherry Syrup Recipe: There’s something incredibly satisfying about making your own homemade cherry syrup. Whether you’re drizzling it over pancakes, swirling it into cocktails, or using it to flavor sodas and desserts, this ruby-red syrup packs a punch of real fruit flavor. In this guide, we’re going to walk through everything—from the ingredients and tools to the exact steps—so you can craft the perfect cherry syrup from scratch.
Forget the artificial stuff and mystery ingredients. This cherry syrup recipe is made with fresh or frozen cherries, simple pantry ingredients, and zero preservatives. Ready to bring a bit of summer sweetness to your kitchen? Let’s dive in!
Why Make Your Own Cherry Syrup?
Store-bought syrups might be convenient, but they often contain high-fructose corn syrup, preservatives, and artificial coloring. Homemade cherry syrup, on the other hand, is fresh, flavorful, and customizable. You control the sweetness, thickness, and flavor profile. Plus, making syrup from scratch is surprisingly easy and cost-effective—especially when cherries are in season.
Aside from quality control, homemade syrup is also a fantastic way to use up cherries that are overripe or frozen. It’s a kitchen win-win.
Health Benefits of Cherries
Cherries aren’t just delicious—they’re good for you too! They’re rich in antioxidants like anthocyanins, which can help reduce inflammation and support heart health. They’re also a great source of:
- Vitamin C
- Potassium
- Fiber
- Melatonin (especially tart cherries)
So when you make cherry syrup at home, you’re capturing some of these benefits—especially if you skip the refined sugar or reduce it with healthy alternatives.
Best Types of Cherries to Use
Sweet vs. Tart Cherries
Both work great, but they offer different flavor profiles:
- Sweet Cherries (like Bing or Rainier): Naturally sweeter and result in a rich, smooth syrup.
- Tart Cherries (like Montmorency): Bright and tangy, great for desserts or drinks that need a bit of zing.
Fresh vs. Frozen
- Fresh Cherries: Ideal during peak season (late spring to mid-summer).
- Frozen Cherries: Just as good when fresh isn’t available. Make sure they’re unsweetened.
Pro Tip: Don’t use canned cherries—they often come in syrup or brine and will mess with the flavor.
What Can You Use Cherry Syrup For?
Oh, the possibilities! Here are just a few tasty ways to use your homemade cherry syrup:
- Over pancakes, waffles, or French toast
- As a mix-in for yogurt or oatmeal
- In cocktails like cherry mojitos or whiskey sours
- As a soda base (hello, cherry cola!)
- Drizzled over vanilla ice cream
- Swirled into cheesecake or brownies
- Glazed over roasted meats or BBQ sauce
- Mixed into lemonade or iced tea
- As a cake soak or frosting enhancer
- In smoothies or protein shakes
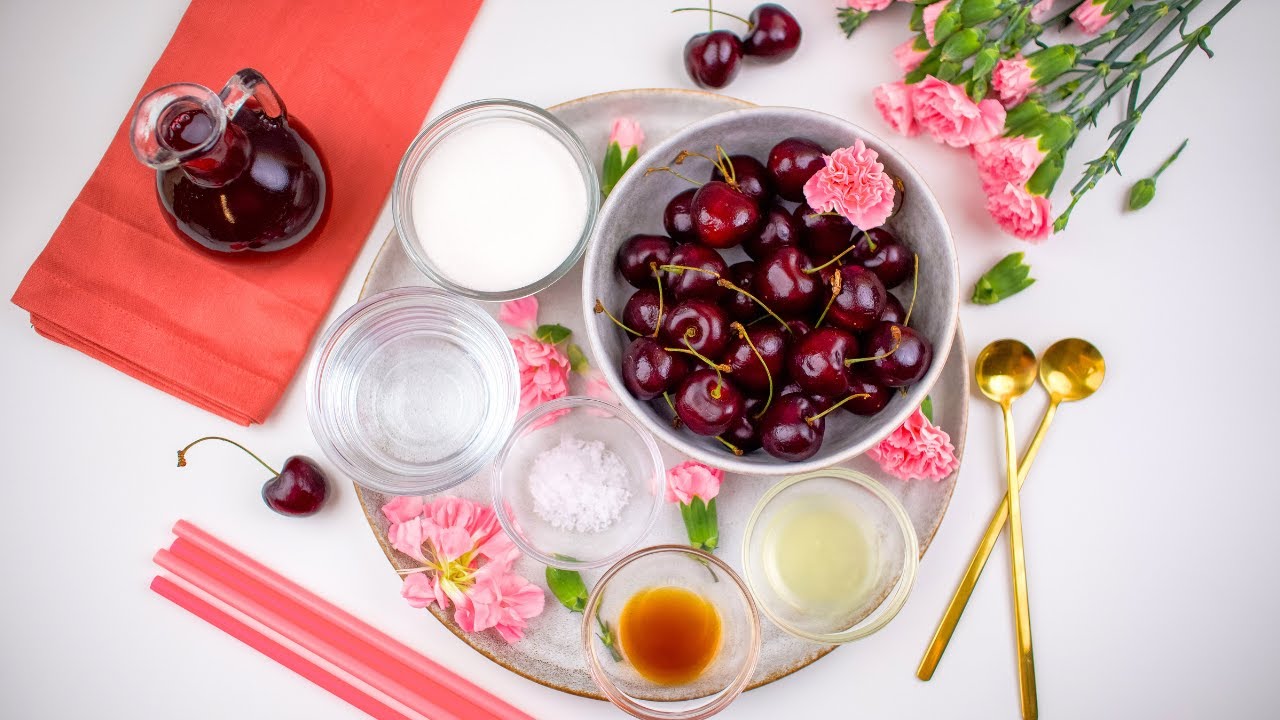
List of Ingredients You’ll Need
Basic Ingredients
- 4 cups of cherries (fresh or frozen, pitted)
- 1 to 1 ½ cups of sugar (adjust to taste)
- 1 cup of water
- 1 tablespoon of lemon juice (for balance and preservation)
Optional Flavor Enhancers
- 1 tsp vanilla extract (adds a dessert-like depth)
- 1 small cinnamon stick or star anise (for warmth)
- Pinch of salt (brings out the cherry flavor)
- Fresh herbs like mint or basil (for unique twists)
All ingredients are easily available in any local grocery store, and you probably already have most of them in your kitchen.
Equipment You’ll Need
Before you get started, make sure you have these tools ready:
- Medium or large saucepan
- Fine mesh strainer or cheesecloth
- Wooden spoon or spatula
- Measuring cups and spoons
- Jar or bottle for storage (sterilized)
- Ladle or funnel for easy pouring
Optional but helpful:
- Cherry pitter (if using fresh cherries)
- Food thermometer (if canning)
Step-by-Step Guide to Making Cherry Syrup
Let’s break this down step by step to make things super clear and easy to follow.
Step 1: Preparing the Cherries
If you’re using fresh cherries, wash and pit them. It’s a bit tedious but worth the effort. A cherry pitter speeds this up a lot. If you’re using frozen cherries, let them thaw completely.
Tip: Don’t discard the juice from frozen cherries—pour it right into the pot for extra flavor.
Step 2: Cooking the Cherries
Place the cherries, water, and lemon juice in a saucepan. Bring to a boil over medium heat, then reduce to a simmer. Let the mixture simmer for about 20–25 minutes, stirring occasionally. The cherries will break down and release their juice.
Optional: Add flavor enhancers like cinnamon, vanilla, or herbs at this stage.
Step 3: Straining the Mixture
Once the cherries are soft and broken down, remove the saucepan from heat. Let it cool slightly, then pour the mixture through a fine mesh strainer or cheesecloth into another clean saucepan or bowl.
Use the back of a spoon to press as much liquid as you can from the solids.
Want a crystal-clear syrup? Strain twice.
Step 4: Sweetening the Syrup
Return the strained cherry juice to the saucepan. Add your sugar and stir over medium heat until fully dissolved. You can adjust the amount of sugar based on how sweet you want the syrup.
Taste as you go!
Simmer the sweetened syrup for another 10–15 minutes, letting it reduce slightly to intensify the flavor.
Step 5: Thickening (Optional)
If you like a thicker syrup (great for dessert toppings), you can let it simmer longer or add a thickener:
- Cornstarch slurry: Mix 1 tablespoon of cornstarch with 2 tablespoons of cold water. Whisk it into the syrup and simmer until thickened.
- Pectin or gelatin: These can also be used for a thicker, jelly-like consistency.
Step 6: Bottling and Storing
Once the syrup is the texture and flavor you like, remove it from the heat and let it cool slightly. Pour it into sterilized bottles or jars using a funnel.
Seal tightly and refrigerate. It will continue to thicken slightly as it cools.
Storage Tips for Cherry Syrup
Once you’ve crafted your delicious cherry syrup, storage is key to maintaining its freshness and flavor. The great thing about homemade syrup is that with just a few steps, you can keep it tasty for weeks—or even months.
Here’s how to store your syrup like a pro:
- Refrigerator Storage: Pour the cooled syrup into sterilized glass jars or bottles with tight-fitting lids. Store in the refrigerator for up to 3–4 weeks. Always use a clean spoon when scooping to avoid contamination.
- Freezer Storage: Want to keep it even longer? Cherry syrup freezes beautifully. Use freezer-safe containers or ice cube trays for portion-sized servings. It can last up to 6 months in the freezer.
- Label & Date: Always label the jars with the date of preparation, especially if you’re making multiple batches or variations.
Pro Tip: If your syrup smells off, changes color, or develops mold, it’s time to toss it.
How Long Does Homemade Cherry Syrup Last?
Freshly made cherry syrup, when stored properly in the refrigerator, typically lasts between 3 to 4 weeks. However, its shelf life can vary based on how you make and store it.
Let’s break it down:
| Storage Method | Shelf Life | Notes |
|---|---|---|
| Refrigerated | 3–4 weeks | Use sterilized jars; keep airtight |
| Frozen | Up to 6 months | Use freezer-safe containers |
| Canned (Water Bath) | 6–12 months | Requires proper canning technique |
If you’re serious about long-term storage, consider canning the syrup.
How to Can Cherry Syrup for Long-Term Storage
Canning is a brilliant way to preserve cherry syrup for a full year or more without refrigeration. It’s especially helpful when you’re making a large batch.
Here’s a simplified canning method:
- Sterilize Jars: Wash glass canning jars and boil them for 10 minutes.
- Heat Syrup: Ensure your cherry syrup is hot when pouring it into jars.
- Fill Jars: Use a funnel to fill jars, leaving ½ inch of headspace.
- Wipe & Seal: Clean rims, then add lids and screw on rings until finger-tight.
- Water Bath: Process in a boiling water canner for 10–15 minutes.
- Cool & Check Seals: Remove jars and let them cool. Lids should pop down—this means they’re sealed.
Always label your jars with the date and store them in a cool, dark place.
Variations of Cherry Syrup
Want to put a twist on the classic cherry syrup? Here are a few creative and tasty variations you can try:
1. Spiced Cherry Syrup
Add warm spices like:
- 1 cinnamon stick
- 2 cloves
- 1 star anise
Simmer these with the cherries for a comforting, holiday-inspired version. Great for winter cocktails or drizzling on roasted meats.
2. Cherry Vanilla Syrup
Vanilla adds a mellow sweetness that balances the cherry’s tang.
- Add 1–2 teaspoons of pure vanilla extract after cooking and straining.
Use it in coffee, milkshakes, or desserts for a flavor boost.
3. Low-Sugar or Sugar-Free Version
If you’re cutting back on sugar:
- Use ½ cup honey or maple syrup instead of sugar.
- For sugar-free, try natural alternatives like erythritol, monk fruit, or stevia.
Note: You may need to adjust the cooking time since some alternatives don’t thicken like sugar.
Top 10 Ways to Use Cherry Syrup
Looking for inspiration? Here are 10 mouthwatering ways to use your homemade cherry syrup:
- Over Pancakes or Waffles: A colorful, fruity upgrade from maple syrup.
- Mixed in Sparkling Water: DIY cherry soda—no chemicals!
- Cocktail Mixer: Cherry mojitos, whiskey sours, or margaritas.
- Ice Cream Topping: Drizzle over vanilla or chocolate for a sundae dream.
- In Lemonade or Iced Tea: Brightens up any cold beverage.
- Yogurt or Oatmeal Add-In: Swirl it into your breakfast for a fruity kick.
- Dessert Glaze: Brush over cakes, brownies, or cheesecakes.
- Meat Marinade/Glaze: Especially good on pork chops or grilled chicken.
- Smoothie Booster: Adds both color and flavor to any blend.
- Cheesecake Swirl: Marbled into the batter for a beautiful presentation.
Tips for the Perfect Syrup Every Time
Want to avoid common issues like runny texture or overpowering sweetness? Follow these expert tips:
- Taste as you go. Adjust sugar and lemon juice to your liking.
- Don’t overcook. Boiling too long can caramelize the sugars and dull the flavor.
- Strain twice. For ultra-smooth syrup, go through a fine mesh sieve or cheesecloth two times.
- Use quality cherries. Overripe cherries are fine, but avoid bruised or moldy ones.
- Add a pinch of salt. It enhances the flavor without making the syrup salty.
Common Mistakes to Avoid
Even simple recipes can go sideways. Here are common pitfalls to dodge:
- Using unripe cherries: Leads to weak flavor and low juice yield.
- Skipping the lemon juice: It helps preserve and balance the sweetness.
- Not sterilizing jars: Can lead to spoilage even in the fridge.
- Over-thickening: Syrup continues to thicken as it cools—don’t go too far.
- Overpowering with flavorings: Less is more when adding extras like cinnamon or vanilla.
FAQs about Cherry Syrup Recipe
1. Can I use canned cherries for syrup?
It’s not recommended. Canned cherries usually come in syrup or brine, which can alter the flavor and texture of your final syrup.
2. Is it possible to make cherry syrup without sugar?
Yes! You can use alternatives like honey, maple syrup, stevia, or monk fruit. Just be aware it may affect the consistency and shelf life.
3. Can I use cherry syrup in baking?
Absolutely! It’s great in muffins, cakes, or as a swirl in cheesecake. Just reduce other sweeteners to balance.
4. What’s the best way to pit cherries quickly?
A cherry pitter is the fastest method. If you don’t have one, use a metal straw or chopstick to push the pit out through the stem end.
5. Can I double or triple the recipe?
Yes—just make sure your pot is large enough, and scale your ingredients accordingly. Cooking time might increase slightly.
Conclusion
Homemade cherry syrup is one of those magical recipes that brings fresh, vibrant flavor into your kitchen with minimal effort. Whether you’re using it for breakfast, drinks, desserts, or dinner glazes, it’s incredibly versatile and a fun way to make the most of cherry season—or your frozen stash. With the tips, variations, and step-by-step instructions we’ve covered, you’re all set to create a batch of syrup that will have everyone asking, “Where did you get this?!”
So grab those cherries, prep your jars, and start stirring up something delicious!


