Caramel Rolls Recipe: If you’re looking to impress your friends or treat yourself to something incredibly comforting, caramel rolls are the answer. These golden, gooey, soft, and sticky rolls are like cinnamon rolls’ luxurious cousin. Made with a buttery dough, filled with cinnamon sugar, and smothered in a rich caramel sauce, they’re basically heaven in every bite.
Let’s dive into everything you need to know to make these from scratch—don’t worry, it’s easier than you think, and I’ll walk you through every single step.
What Are Caramel Rolls?
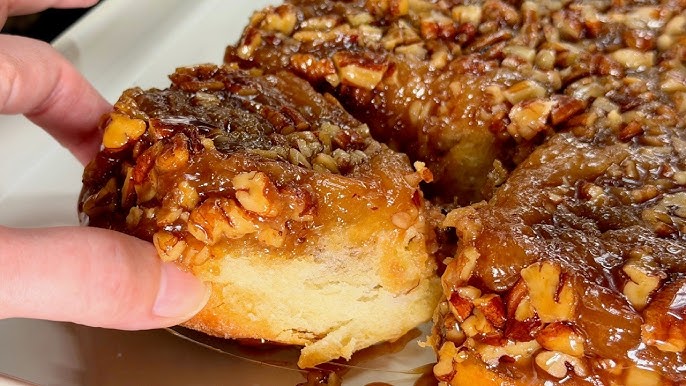
Caramel rolls are soft, yeasted sweet rolls topped with a homemade caramel sauce that becomes gooey and golden as they bake. Some recipes include chopped nuts like pecans, adding a delightful crunch to balance out the softness and sweetness.
Unlike cinnamon rolls that are typically topped with icing or cream cheese frosting, caramel rolls flip the script—literally. They’re baked with the caramel on the bottom of the pan, and after baking, you invert the whole dish so that the gooey, golden caramel ends up on top. Pure magic.
Why You’ll Love This Recipe
Still wondering if you should make these? Here’s why these caramel rolls will become a weekend favorite:
- Super soft, fluffy dough that melts in your mouth.
- Rich homemade caramel sauce that’s better than anything you can buy.
- Perfect for breakfast, brunch, or dessert.
- Make-ahead friendly—great for holidays or slow Sunday mornings.
- You can customize them with nuts, spices, or even a splash of bourbon.
List of Ingredients You’ll Need
Let’s get to the heart of any great recipe: the ingredients. Here’s what you’ll need to make homemade caramel rolls from scratch.
For the Dough:
- 1 cup warm milk (110°F)
- 2 ¼ teaspoons active dry yeast (1 packet)
- ⅓ cup granulated sugar
- 2 large eggs
- ½ cup unsalted butter, melted
- 1 teaspoon salt
- 4 cups all-purpose flour (plus more for dusting)
For the Filling:
- ½ cup unsalted butter, softened
- ¾ cup brown sugar (light or dark)
- 2 tablespoons ground cinnamon
- Optional: ½ cup chopped pecans or walnuts
For the Caramel Sauce:
- 1 cup brown sugar (light or dark)
- ½ cup unsalted butter
- ¼ cup heavy cream
- ¼ teaspoon salt
- 1 teaspoon vanilla extract
- Optional: Extra chopped pecans for the bottom of the pan
Kitchen Tools and Equipment Required
Before you begin, make sure you have these kitchen essentials ready:
- Large mixing bowls
- Measuring cups and spoons
- Rolling pin
- 9×13 inch baking dish
- Stand mixer with dough hook (optional but helpful)
- Saucepan (for caramel)
- Whisk and spatula
- Clean towel or plastic wrap
Having everything prepped and within reach makes the process smoother and more fun.
Tips Before You Start
Here are a few pro tips to get you set up for caramel roll success:
- Use room-temperature ingredients—especially eggs and butter—for the best dough texture.
- If your yeast doesn’t foam in warm milk with sugar, it’s likely dead. Don’t move forward with inactive yeast.
- Don’t rush the dough rising process. The more time it takes, the softer and fluffier your rolls will be.
- Use real butter for the richest flavor, especially in the caramel.
Ready to roll? Let’s get started.
Step-by-Step Guide to Making Caramel Rolls
1. Preparing the Dough
In a large bowl, combine warm milk, yeast, and a little sugar. Let it sit for 5–10 minutes until foamy. Add melted butter, eggs, remaining sugar, salt, and flour. Mix until a soft dough forms, then knead for 8–10 minutes until smooth and elastic.
2. Letting the Dough Rise
Place the dough in a lightly greased bowl, cover, and let it rise in a warm spot for 1–1½ hours, or until doubled in size. This rise gives the rolls their fluffy texture.
3. Making the Caramel Sauce
In a saucepan, melt butter with brown sugar and a splash of cream over medium heat. Stir until smooth and slightly thickened. Pour the caramel sauce evenly into the bottom of a greased baking pan.
4. Preparing the Filling
Mix softened butter with brown sugar and cinnamon. This sweet filling melts into the dough as it bakes, creating that classic roll flavor.
5. Rolling Out and Filling the Dough
Punch down the risen dough and roll it into a large rectangle on a floured surface. Spread the filling evenly over the dough, reaching all edges.
6. Cutting and Arranging Rolls
Roll the dough tightly into a log. Slice into equal rolls using a sharp knife or dental floss. Place the rolls cut-side up over the caramel sauce in the pan.
7. Final Rise
Cover the pan and let the rolls rise again for 30–45 minutes, until puffy. This second rise ensures soft, tender rolls.
8. Baking the Rolls
Bake in a preheated oven at 350°F (175°C) for 25–30 minutes, until golden brown and fully cooked.
9. Flipping the Rolls for the Caramel Top
Let the rolls rest for 5 minutes, then carefully invert the pan onto a serving plate. The warm caramel will flow over the rolls, creating a rich, sticky topping.
Serve warm and enjoy every gooey, buttery bite. 🍯🥐
Troubleshooting Common Issues
Even with step-by-step guidance, things don’t always go perfectly the first time. Here’s how to troubleshoot some common caramel roll challenges:
- Dough didn’t rise: Check your yeast’s expiration date. Also, make sure your milk isn’t too hot—it can kill the yeast.
- Caramel is too runny or hard: Boil it a little longer for a thicker sauce. If it’s rock hard, it was overcooked.
- Rolls are dense: Usually due to under-proofed dough. Let your dough rise fully each time.
- Bottom stuck to the pan: Make sure you greased the pan well, and don’t let the rolls cool too long before flipping.
Expert Tips for the Best Caramel Rolls
- Use bread flour instead of all-purpose for chewier rolls with better structure.
- Chill the dough overnight after the first rise for deeper flavor and easier handling.
- Add a splash of bourbon or maple extract to the caramel for a gourmet twist.
- Brush the tops of the rolls with melted butter before baking for extra golden color.
- Serve with a scoop of vanilla ice cream or a drizzle of heavy cream for the ultimate dessert.
Variations and Add-ins to Try
You can make caramel rolls your own in so many delicious ways:
- Apple caramel rolls: Add thin apple slices inside the filling.
- Pumpkin spice version: Mix a tablespoon of pumpkin purée into the filling and use pumpkin spice instead of cinnamon.
- Salted caramel pecan rolls: Add sea salt flakes on top after baking for contrast.
- Chocolate chip rolls: Sprinkle mini chocolate chips with the filling for an extra treat.
How to Store and Reheat
Caramel rolls can be stored in an airtight container at room temperature for up to 2 days, or in the refrigerator for up to 5 days.
To reheat, pop one in the microwave for 15–20 seconds or warm in a 300°F oven for about 10 minutes. If needed, add a bit of extra caramel or a pat of butter to keep them moist.
Make-Ahead and Freezer Tips
Want to make these ahead for a holiday morning or brunch?
- Make Ahead: Assemble the rolls up to the second rise. Cover and refrigerate overnight. The next morning, let them sit at room temp for 30–60 minutes before baking.
- Freeze Before Baking: After cutting the rolls and placing them in the pan (without the caramel), freeze. When ready, thaw overnight in the fridge, add caramel, and bake.
- Freeze After Baking: Let them cool completely, then freeze in a sealed container for up to 2 months. Reheat before serving.
Caramel Rolls vs Cinnamon Rolls
While caramel rolls and cinnamon rolls share a similar base, the biggest difference lies in the topping.
- Cinnamon Rolls: Typically topped with cream cheese frosting or a glaze.
- Caramel Rolls: Inverted after baking to reveal a gooey, buttery caramel layer on top.
Caramel rolls tend to be richer and more decadent. Think of them as the dessert version of the breakfast classic.
Tips and Tricks for Perfect Caramel Rolls
If you want your caramel rolls to turn out bakery-perfect every single time, here are some game-changing tips:
1. Use Room Temperature Ingredients
Make sure your butter, eggs, and milk aren’t cold straight from the fridge. Room temperature ingredients mix more evenly and help the dough rise better. Cold ingredients can shock the yeast, slowing or stopping fermentation.
2. Don’t Over-Flour the Dough
It’s tempting to keep adding flour if the dough feels sticky, but too much can make your rolls dense and dry. Aim for a slightly tacky dough that doesn’t stick to your hands or bowl. Knead well, but don’t overwork it.
3. Let It Rise Fully
Rushing the proofing process leads to dense, heavy rolls. Be patient and let the dough double in size during both rises. A warm, draft-free environment (like an oven with just the light on) works wonders.
4. Cut with Floss, Not a Knife
Using unflavored dental floss makes slicing cleaner and keeps the spiral intact. A knife tends to squish the rolls, especially if the dough is very soft.
5. Flip While Warm
The caramel will harden if it cools too long in the pan. Flip the rolls while they’re still warm (about 5–10 minutes after baking), so the caramel flows beautifully over the top.
6. Want to Prep Ahead?
Make the rolls up to the second rise, then cover and refrigerate overnight. Let them sit at room temp for 30–45 minutes in the morning before baking. This is perfect for fresh-baked caramel rolls without the early wake-up call!
Variations to Try
Want to mix things up? Try one of these mouthwatering variations:
1. Pecan Caramel Rolls
Add ¾ to 1 cup of chopped pecans to the caramel sauce before pouring it into the pan. Toast the nuts first for extra flavor and crunch.
2. Salted Caramel Rolls
Sprinkle flaky sea salt over the caramel right before or after baking. This creates a sweet and salty balance that’s out of this world.
3. Apple Caramel Rolls
Dice one peeled apple and toss it into the cinnamon-sugar filling before rolling. It’s like a sticky bun meets apple pie—perfect for fall!
4. Pumpkin Spice Rolls
Add 2 teaspoons of pumpkin pie spice to the filling and mix ½ cup of pumpkin puree into the dough. Add a dash of nutmeg to the caramel topping for a warm, seasonal flavor.
5. Chocolate Caramel Rolls
Sprinkle mini chocolate chips over the filling before rolling. The combination of chocolate and caramel creates a decadent twist.
Nutritional Information
Here’s an approximate nutritional breakdown for one caramel roll (based on 12 servings):
| Nutrient | Amount |
|---|---|
| Calories | 400–450 kcal |
| Carbohydrates | 60–65g |
| Sugars | 30–35g |
| Protein | 6–8g |
| Fat | 18–20g |
| Saturated Fat | 10–12g |
| Fiber | 1–2g |
| Sodium | 150–200mg |
Note: These values will vary depending on substitutions, added nuts, or size of rolls. Use a nutrition calculator for precise data if needed.
Storage and Shelf Life
Fresh caramel rolls are best enjoyed warm, but they’re still delicious after a few days with the right storage.
At Room Temperature:
Store in an airtight container for up to 2 days. Reheat before serving to re-soften the caramel.
In the Fridge:
They’ll stay fresh for 4–5 days in the fridge. Let them come to room temp or warm them in the microwave or oven before eating.
Freezing:
You can freeze unbaked rolls (after shaping) or fully baked ones. For unbaked, freeze on a tray, then transfer to a bag or container. Thaw in the fridge overnight, let them rise, then bake.
For baked rolls, wrap each one tightly in plastic and foil. Freeze for up to 3 months. Thaw and reheat before serving.
FAQs about Caramel Rolls Recipe
1. Can I make these without a stand mixer?
Absolutely! You can knead the dough by hand. It might take a little more time and elbow grease, but you’ll get the same delicious results.
2. Why didn’t my rolls rise properly?
Most likely, your yeast was old or your dough was in a cold spot. Make sure your yeast is fresh and your rising area is warm (but not too hot).
3. How do I make these caramel rolls overnight?
After placing the sliced rolls into the caramel-lined pan, cover tightly and refrigerate overnight. In the morning, let them sit at room temp for 30–45 minutes before baking.
4. Can I use store-bought dough to save time?
Yes! If you’re short on time, you can use pre-made bread or cinnamon roll dough, but homemade always tastes better.
5. Can I reduce the sugar in the recipe?
You can, but it will slightly affect texture and sweetness. Try cutting the sugar by ¼ cup in the dough and caramel to start and adjust to your taste.
Conclusion
Making homemade caramel rolls might seem like a big project, but once you try it, you’ll realize it’s totally worth the effort. The fluffy, buttery dough, the sweet cinnamon filling, and that glorious caramel topping—it’s a showstopper every single time. Whether you’re baking for a special occasion or just because, these rolls will steal the spotlight (and probably the last one on the tray).
So grab your apron, crank up your favorite playlist, and get baking. These caramel rolls are waiting to become your new favorite tradition.


