Canned Pinto Beans Recipe: Canned pinto beans are one of the easiest, most budget-friendly, and versatile pantry staples you can cook with.
Whether you’re a busy student, home cook, or just someone looking for a quick dinner fix, canned pinto beans can be turned into a satisfying, flavorful dish in minutes.
This step-by-step guide will walk you through everything—from picking the right ingredients to making your beans taste like they’ve been slow-cooked all day.
Why Canned Pinto Beans Are a Pantry Hero
Let’s be real—life gets busy, and sometimes you need a shortcut that doesn’t sacrifice flavor or nutrition. Enter: canned pinto beans. These humble legumes are already cooked, which saves hours you’d typically spend soaking and boiling dry beans. Not only are they packed with plant-based protein and fiber, but they’re also incredibly versatile. Think soups, stews, tacos, burritos, or even a simple side dish. The best part? They’re super affordable and have a long shelf life, so you can always keep a can or two on hand for those “what’s for dinner?” moments.
Health Benefits of Pinto Beans
High in Protein and Fiber
One of the biggest advantages of eating pinto beans is their nutritional punch. Just one cup of pinto beans delivers about 15 grams of protein and 15 grams of dietary fiber. That’s a big win if you’re trying to eat more plant-based or balance your meals with healthy carbs and protein. The fiber also helps regulate digestion and keeps you full for longer, making them a great food for weight management.
Packed with Essential Nutrients
Pinto beans are rich in essential vitamins and minerals like folate, magnesium, potassium, and iron. Folate is crucial for cell growth and DNA formation, which makes these beans especially great for growing teens, pregnant women, and anyone who wants to support their overall health. Potassium helps balance blood pressure, and magnesium plays a role in over 300 biochemical reactions in your body.
List of Ingredients You’ll Need
You don’t need much to turn a can of pinto beans into something mouthwatering. Here’s a list of everything you might need.
Main Ingredients:
- 1-2 cans of pinto beans (15 oz each)
- 1 tablespoon olive oil or butter
- 1 small onion, diced
- 2-3 cloves garlic, minced
- Salt and pepper to taste
- ½ cup vegetable or chicken broth (optional but recommended)
Optional Add-ins for Flavor:
- ½ teaspoon ground cumin
- ½ teaspoon smoked paprika
- A pinch of chili powder
- A splash of hot sauce or vinegar
- Chopped fresh cilantro or parsley
- Lime juice for brightness
These ingredients are just the starting point. You can build on them based on your taste preferences or what you’ve got in your kitchen.
Kitchen Tools You’ll Need
You don’t need any fancy equipment for this recipe, just a few basic kitchen tools:
- Medium saucepan or skillet
- Wooden spoon or spatula
- Can opener
- Strainer or colander
- Measuring spoons (optional but helpful)
- Knife and cutting board
That’s it! If you can open a can and sauté an onion, you’re already halfway there.
How to Choose the Right Canned Pinto Beans
When shopping, look for low-sodium or no-salt-added canned pinto beans. This gives you more control over the salt in your final dish. Always check the label—some brands add preservatives or flavorings that can affect the taste. Organic options are great if you’re looking to avoid synthetic additives.
Also, avoid cans that are dented or damaged. A dent can mean bacteria have made their way into the can, which is a no-go for food safety.
Step-by-Step Guide to Cooking Canned Pinto Beans
Step 1: Drain and Rinse the Beans
Start by opening the can and pouring the beans into a strainer. Rinse them under cold water for about 30 seconds. This step removes excess sodium and the thick, starchy liquid they were packed in. While it’s safe to eat that liquid, rinsing gives you a cleaner flavor and smoother texture.
Step 2: Sauté Aromatics (Optional but Recommended)
In a saucepan over medium heat, add olive oil or butter. Toss in your diced onion and cook until translucent—about 3-5 minutes. Add in the garlic and cook for another 30 seconds until fragrant. These aromatics build the foundation of your flavor.
Step 3: Add the Beans and Liquid
Now, add your rinsed pinto beans to the pan. If you want a saucier result, pour in about ½ cup of broth or water. This helps the beans simmer and soak up all the delicious flavors from the aromatics.
Step 4: Simmer and Season
Add your seasonings—salt, pepper, cumin, paprika, chili powder—whatever you’re in the mood for. Reduce the heat and let everything simmer for 10–15 minutes. Stir occasionally so nothing sticks to the bottom.
Step 5: Taste and Adjust
Once your beans are tender and well-seasoned, give them a taste. Add a squeeze of lime juice for acidity or a bit more salt or spice as needed. When they taste just right, they’re ready to serve!
Best Seasonings for Canned Pinto Beans
If you want your canned pinto beans to taste anything but canned, the right seasonings make all the difference. Pinto beans are like little flavor sponges—they absorb whatever you cook them with. This means you’ve got tons of room to play with flavor.
Here are some of the best seasonings to use:
- Cumin: Brings an earthy, warm taste that pairs beautifully with beans.
- Smoked paprika: Adds a subtle smokiness and color.
- Garlic powder or fresh garlic: A classic aromatic that brings out depth.
- Onion powder: A simple way to add flavor if you’re skipping fresh onions.
- Chili powder: For a mild kick and Tex-Mex vibes.
- Oregano: Especially good for a southwestern flavor.
- Bay leaf: Toss one in while simmering for a subtle herbal note.
- Black pepper & crushed red pepper flakes: To balance heat and complexity.
- Lime juice or vinegar: A splash at the end brightens the whole dish.
Don’t be afraid to experiment. Taste as you go and layer flavors gradually. Remember, it’s easier to add than to subtract.
How to Make Them Taste Homemade
Canned pinto beans are fully cooked, but let’s be honest—straight from the can, they’re a little bland. Luckily, you can level them up with a few easy tricks to make them taste like you simmered them all day.
- Use broth instead of water: Adding chicken or vegetable broth adds rich flavor and helps create a tasty sauce.
- Simmer slowly: Even 10–15 minutes of simmering helps the beans soak up your seasonings and develop a deeper taste.
- Mash some beans: Lightly mashing ¼ of the beans and stirring them back in creates a thicker, creamier texture—perfect for refried-style beans or hearty sides.
- Sauté with aromatics: A base of onion, garlic, and even bell peppers adds dimension to your dish.
- Finish with freshness: A handful of chopped cilantro or a squeeze of lime adds brightness that makes the flavors pop.
These small steps go a long way in making canned pinto beans taste homemade.
Flavor Variations You Can Try
One of the best things about pinto beans is how well they adapt to different flavor profiles. Whether you’re into spicy, savory, or herbaceous dishes, there’s a version for you.
Tex-Mex Style
Love bold, zesty flavors? Go Tex-Mex. Add:
- Chili powder
- Cumin
- Jalapeños
- Corn kernels
- Diced tomatoes
- A sprinkle of shredded cheese on top before serving
This version is perfect in burrito bowls, tacos, or as a filling for quesadillas.
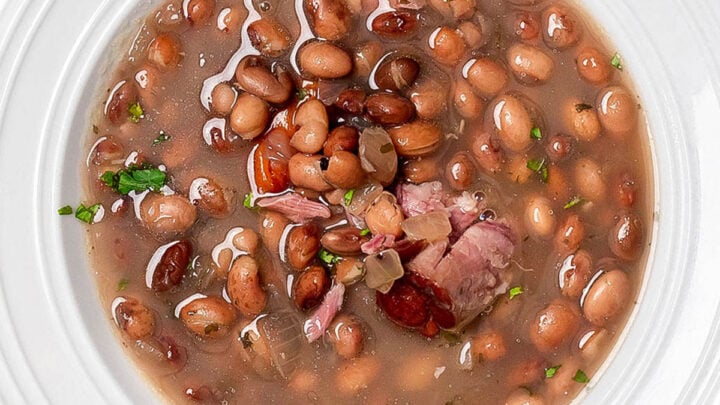
Southern-Style
For something hearty and comforting, Southern-style beans are a go-to. Try this combo:
- Bacon or ham for smoky flavor
- Onion and garlic
- A splash of apple cider vinegar
- A dash of hot sauce
- Optional: collard greens or mustard greens stirred in
Serve with cornbread, and you’ve got a soul-warming classic.
Garlic & Herb
Looking for something lighter or more Mediterranean? Go for garlic and herbs:
- Olive oil
- Fresh garlic
- Thyme, rosemary, or parsley
- Lemon zest or juice
- A little sea salt and cracked pepper
This is amazing on toast, with grilled veggies, or over rice.
Tips for Serving Canned Pinto Beans
Okay, your beans are done—now what? You can serve them in a bunch of different ways depending on your mood, appetite, and what’s in your fridge.
As a Main Dish
- Serve over rice for a quick, filling bowl.
- Mash them up for easy homemade refried beans.
- Add a fried egg on top for a protein-packed meal.
- Turn them into chili by adding ground beef and tomatoes.
As a Side Dish
- Pair with grilled chicken or steak.
- Serve with tacos, enchiladas, or burritos.
- Put them on the side of a breakfast plate with eggs and toast.
In Other Recipes
- Add to soups and stews for bulk and nutrition.
- Toss them into salads for protein.
- Use them in wraps, quesadillas, or nachos.
There are no rules—just tasty possibilities.
Common Mistakes to Avoid
Making canned beans taste amazing is easy, but a few slip-ups can leave your dish falling flat. Avoid these common mistakes:
- Skipping the rinse: Always rinse canned beans to remove excess sodium and that thick can liquid.
- Under-seasoning: Beans need seasoning to shine. Don’t be shy with the salt, acid, and spices.
- Overcooking: While simmering helps, cooking too long can make beans mushy. Keep an eye on texture.
- Using only water: Broth adds richness and depth. If you have it, use it.
- Forgetting acid: Lime juice, vinegar, or tomatoes balance the earthy bean flavor and bring the dish to life.
Avoiding these mistakes takes your pinto bean game from meh to mouthwatering.
How to Store and Reheat Leftover Beans
Cooked too many beans? No problem. Leftovers store well and taste even better the next day.
Storing:
- Let beans cool before storing.
- Store in an airtight container.
- Refrigerate for up to 4–5 days.
Freezing:
- Portion into freezer-safe containers or bags.
- Freeze for up to 2 months.
- Label with date for easy tracking.
Reheating:
- Reheat in a saucepan over medium heat with a splash of water or broth to loosen.
- Microwave in 1-minute bursts, stirring in between.
- Taste and re-season if needed.
Make It a Meal: What to Serve With Pinto Beans
Pinto beans are hearty on their own, but pairing them with the right foods turns them into a complete, satisfying meal.
Here are some ideas:
- Rice: A classic base—white, brown, or Spanish rice.
- Tortillas: Scoop up beans with warm tortillas for a quick wrap.
- Cornbread: For Southern-style comfort food.
- Roasted veggies: Like bell peppers, zucchini, or sweet potatoes.
- Eggs: Great for breakfast burritos or huevos rancheros.
- Grilled meat or tofu: Makes the beans part of a balanced plate.
Balance the beans’ creamy texture with some crunch or freshness on the side—like a slaw or salad.
FAQs about Canned Pinto Beans Recipe
1. Can I eat canned pinto beans straight from the can?
Yes, canned pinto beans are fully cooked and safe to eat straight from the can. But for the best flavor, rinse them and heat them up with some seasonings.
2. How long do cooked canned pinto beans last?
Once cooked, they’ll last about 4–5 days in the fridge in an airtight container. Just make sure to cool them fully before storing.
3. Can I freeze leftovers?
Absolutely! Portion them into freezer-safe bags or containers and freeze for up to 2 months. Thaw in the fridge overnight or microwave from frozen.
4. Are canned pinto beans already cooked?
Yes, canned pinto beans are pre-cooked. That’s what makes them so convenient—they just need seasoning and reheating.
5. How can I make canned beans less salty?
Rinse them well under cold water before cooking. You can also buy low-sodium or no-salt-added varieties for more control.
Conclusion
Canned pinto beans might just be the MVP of your pantry. They’re quick, affordable, nutritious, and—best of all—completely customizable. With the right seasonings and a little care, you can transform a humble can of beans into a flavorful, comforting dish that tastes anything but basic. Whether you’re going Tex-Mex, Southern-style, or keeping it simple with garlic and herbs, you’ve got endless options. Keep experimenting, trust your taste buds, and don’t be afraid to make the recipe your own.


