Buckwheat Bread Recipe: If you’re looking for a hearty, wholesome, and nutritious bread that’s easy on the stomach and free from gluten, buckwheat bread might just become your new go-to. Don’t let the name fool you—buckwheat isn’t actually wheat. It’s a gluten-free seed that’s packed with nutrients, making it an ideal ingredient for those with gluten sensitivity or anyone aiming to eat cleaner.
In this step-by-step guide, we’ll walk you through exactly how to make delicious homemade buckwheat bread from scratch. You’ll get a detailed ingredient list, preparation tips, baking instructions, and even ideas for variations. Whether you’re a seasoned baker or just starting out, this guide is written to ensure your loaf turns out perfect every time.
Ready to dive into this nutrient-packed baking adventure? Let’s go!
What is Buckwheat Bread?
Buckwheat bread is a type of bread made using buckwheat flour as a key ingredient, either on its own or in combination with other gluten-free flours. Despite its name, buckwheat is not related to wheat and is naturally gluten-free, making it a fantastic alternative for people with celiac disease or gluten intolerance.
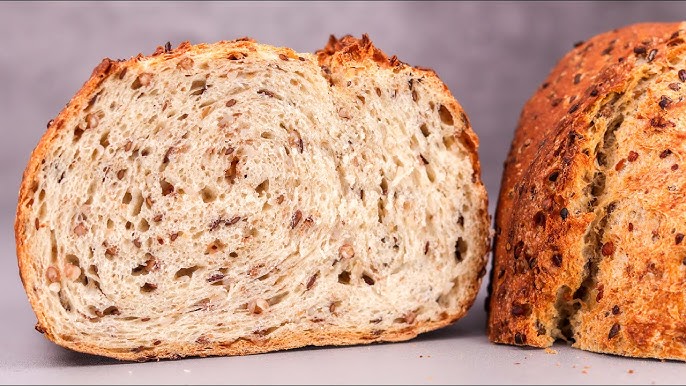
The bread has a dense, moist texture and a nutty, earthy flavor that sets it apart from traditional wheat bread. Unlike airy white loaves, buckwheat bread is more rustic—think wholesome, chewy, and flavorful. It’s perfect for slicing thick and toasting or serving alongside soups and stews.
In many cultures, especially in Eastern Europe and parts of Asia, buckwheat is a staple ingredient, valued for both its nutrition and versatility. Using buckwheat flour in bread not only brings health benefits but also adds depth of flavor that’s hard to match.
Why Choose Buckwheat Bread?
There are plenty of reasons to love buckwheat bread, and here are some of the top benefits:
- Gluten-Free: Perfect for those with gluten intolerance or sensitivity.
- Nutritious: Packed with fiber, protein, and essential minerals like magnesium, iron, and zinc.
- Digestive Health: Buckwheat is rich in resistant starch, which supports healthy gut bacteria.
- Blood Sugar Friendly: It has a low glycemic index, making it a better choice for blood sugar control.
- Allergy-Friendly: Free from many common allergens when made simply.
On top of all that, buckwheat bread is incredibly versatile. You can enjoy it plain, or dress it up with seeds, nuts, or herbs to suit your taste. Whether you’re looking for a healthier everyday bread or an alternative to store-bought gluten-free options (which can often be dry and expensive), homemade buckwheat bread is a fantastic solution.
Health Benefits of Buckwheat
Buckwheat is a powerhouse ingredient that brings a lot to the table—literally.
Here are just a few of its standout health benefits:
- High in Antioxidants: Buckwheat contains rutin, a plant antioxidant that may help reduce inflammation and lower blood pressure.
- Rich in Fiber: One of the top benefits for digestion—helps with satiety and promotes regularity.
- Heart-Healthy Nutrients: Magnesium and other minerals in buckwheat support cardiovascular health.
- Plant-Based Protein: Unlike most grains, buckwheat is a complete protein source, containing all nine essential amino acids.
- Supports Weight Management: Thanks to its fiber and protein content, it helps keep you full longer, reducing the urge to snack.
If you’re looking to improve your overall diet with more whole food ingredients, buckwheat is an excellent place to start.
Buckwheat vs Regular Flour: What’s the Difference?
Understanding the difference between buckwheat flour and traditional wheat flour is important before diving into baking.
| Feature | Buckwheat Flour | Regular Wheat Flour |
|---|---|---|
| Gluten Content | 0% (Gluten-Free) | Contains Gluten |
| Texture | Dense, grainy | Light, fluffy |
| Flavor | Nutty, earthy | Mild, neutral |
| Nutrition | Higher in fiber, protein, and minerals | Lower in protein (for white flour) |
| Common Uses | Pancakes, bread, crepes, muffins | Breads, pastries, pasta |
Buckwheat flour behaves differently when baking. It doesn’t rise the same way wheat flour does because it lacks gluten—the key protein that gives traditional bread its airy structure. This means recipes need to be adjusted to account for this, often using other binders like eggs, flaxseed, or xanthan gum.
List of Ingredients You’ll Need
To make classic buckwheat bread, you’ll need a few simple ingredients. Here’s a basic list, along with suggestions for optional add-ins.
Dry Ingredients:
- 2 cups buckwheat flour
- 1 cup almond flour (or oat flour for a nut-free version)
- 1 tablespoon baking powder
- ½ teaspoon baking soda
- ½ teaspoon sea salt
Wet Ingredients:
- 3 large eggs (or flax eggs for vegan option)
- 1 cup plain yogurt or plant-based milk
- 2 tablespoons olive oil
- 1 tablespoon apple cider vinegar
- 1 tablespoon honey or maple syrup (optional for mild sweetness)
Optional Add-Ins:
- ¼ cup chopped nuts (walnuts, almonds)
- 2 tablespoons sunflower or pumpkin seeds
- Chopped herbs like rosemary or thyme
- A sprinkle of sesame or flaxseeds on top
Substitutions:
- Vegan? Use flax eggs (1 tbsp flaxseed + 3 tbsp water = 1 egg)
- No yogurt? Use any plant-based milk + 1 tsp lemon juice or vinegar
Keep your ingredients at room temperature before mixing to ensure better blending and rising.
Tools and Equipment Required
You don’t need fancy gadgets to make buckwheat bread, but having the right tools on hand makes the process smoother.
- Mixing bowls (1 large, 1 medium)
- Measuring cups and spoons
- Silicone or metal loaf pan (8×4 or 9×5 inch)
- Whisk or electric hand mixer
- Spatula
- Parchment paper or non-stick spray
- Cooling rack
Pro tip: Using parchment paper not only prevents sticking but makes cleanup a breeze.
How to Prepare Your Ingredients
Before mixing anything, preparation is key. Here’s how to get everything ready for smooth baking:
- Measure Accurately: Use the spoon-and-level method for flour (scoop into the cup with a spoon, then level it off with a knife).
- Bring to Room Temperature: Cold eggs and milk can affect texture and rising. Let them sit out for 15-30 minutes.
- Mix Flax Eggs Early (if using): Let flax eggs sit for 10-15 minutes to thicken before use.
- Line or Grease Your Pan: Don’t wait until the last minute. Prep your loaf pan before mixing the batter.
- Preheat the Oven: Always start with a hot oven—350°F (175°C) is standard for this recipe.
Once everything is prepped, it’s time to mix and bake!
Step-by-Step Guide to Make Buckwheat Bread
Here comes the heart of the recipe—the step-by-step process to bake your delicious, wholesome buckwheat bread. Stick to each step carefully, and you’ll have a fresh, warm loaf ready in no time.
Step 1: Preheat the Oven and Prepare the Pan
Start by preheating your oven to 350°F (175°C). This is crucial because bread needs an even and steady heat from the start to rise properly. While the oven is heating, line a standard loaf pan with parchment paper, leaving a little overhang on the sides so you can lift the loaf out easily. Alternatively, you can grease the pan with a bit of olive oil or non-stick spray if you prefer.
Step 2: Mix the Dry Ingredients
In a large mixing bowl, combine the following:
- 2 cups buckwheat flour
- 1 cup almond or oat flour
- 1 tbsp baking powder
- ½ tsp baking soda
- ½ tsp sea salt
Use a whisk or spoon to mix everything thoroughly, making sure there are no clumps. Properly mixing dry ingredients ensures an even rise and consistent texture throughout the bread.
Step 3: Combine the Wet Ingredients
In a separate bowl, whisk together:
- 3 large eggs (or flax eggs)
- 1 cup plain yogurt or plant milk
- 2 tbsp olive oil
- 1 tbsp apple cider vinegar
- 1 tbsp honey or maple syrup
Make sure everything is at room temperature—this helps the ingredients blend smoothly. If using flax eggs, they should be thick and gel-like by now. Mix until fully combined and slightly frothy.
Step 4: Blend Wet and Dry Ingredients
Slowly pour the wet mixture into the bowl with your dry ingredients. Use a spatula or hand mixer on low speed to combine the two mixtures. Stir just until no dry flour remains—don’t overmix, as that can make the bread dense.
The batter should be thick but pourable. If it’s too dry, add 1–2 tablespoons of water or plant milk to loosen it up. If it’s too runny, add a spoonful more of buckwheat flour.
Step 5: Add Optional Ingredients
This is your chance to get creative! Gently fold in:
- Chopped nuts
- Seeds
- Fresh herbs
- Dried cranberries or raisins (for a sweet twist)
You can also sprinkle some seeds on top for a crunchy crust. Don’t overload the batter—about ¼ to ½ cup of add-ins total is a good balance.
Step 6: Pour into the Loaf Pan and Smooth the Top
Transfer the batter into your prepared loaf pan. Use a spatula to spread it out evenly and smooth the top. If you’ve reserved seeds or herbs, now’s the time to sprinkle them on for a picture-perfect finish.
Give the pan a gentle tap on the counter to release any trapped air bubbles.
Step 7: Bake to Perfection
Slide the pan into the preheated oven and bake for 45 to 55 minutes, depending on your oven and pan size. The top should turn golden brown, and a toothpick inserted in the center should come out clean or with a few moist crumbs—no wet batter.
Pro Tip: If the top is browning too quickly, loosely cover it with foil during the last 10-15 minutes of baking.
Step 8: Cool and Serve
Once baked, remove the pan from the oven and let it sit on a wire rack for 10 minutes. Then, lift the loaf out using the parchment paper and allow it to cool completely on the rack.
Don’t slice while hot! Buckwheat bread needs to set up as it cools—cutting too early can make it gummy or fall apart. Once cool, slice and enjoy!
Common Mistakes to Avoid
Even experienced bakers can hit a few snags. Here are some common pitfalls when making buckwheat bread—and how to avoid them:
- Overmixing the Batter: This can lead to dense, rubbery bread. Mix just until combined.
- Wrong Flour Substitutions: Not all gluten-free flours behave the same. Stick to tested combinations unless you’re confident experimenting.
- Skipping Vinegar or Acid: It helps activate the baking soda and creates a better rise. Don’t skip it!
- Cutting the Bread Too Soon: Let the bread cool completely before slicing, or you risk a gummy texture.
- Old Baking Powder or Soda: These leavening agents lose potency over time. Always use fresh for best results.
Tips for the Perfect Buckwheat Bread
Want your bread to turn out amazing every time? Here are a few pro tips:
- Use Fresh Flour: Buckwheat flour can go rancid quickly. Store it in the fridge and check for freshness before use.
- Add Moisture with Veggies: Grated zucchini or carrot can be folded in for extra softness.
- Use a Metal Pan: Glass can result in uneven baking—metal pans distribute heat better.
- Toasting Makes It Better: Slightly dense or day-old slices toast beautifully and enhance the flavor.
- Don’t Be Afraid to Experiment: Once you’ve nailed the basic recipe, try variations with herbs, garlic, or even cocoa and banana for a sweet version.
Variations of Buckwheat Bread
There are endless ways to adapt this bread to your taste and dietary needs. Here are some fun variations:
- Savory Herb Buckwheat Bread: Add chopped rosemary, thyme, or chives. Perfect with soups or cheese.
- Seeded Multigrain Version: Add sunflower, sesame, chia, and flax seeds for extra crunch and nutrition.
- Banana Buckwheat Bread: Add mashed ripe bananas and cinnamon for a naturally sweet breakfast loaf.
- Nutty Delight: Fold in chopped walnuts, almonds, or pecans for texture.
- Chocolate Chip Buckwheat Bread: For a dessert twist, add dark chocolate chips and a touch of vanilla.
Play around with ingredients and flavors—you might discover a new favorite combo!
How to Store and Freeze Buckwheat Bread
To keep your buckwheat bread fresh and tasty, follow these simple storage tips:
Short-Term Storage:
- Let the loaf cool completely.
- Wrap it in a clean kitchen towel or parchment paper.
- Store at room temperature in an airtight container for up to 3 days.
Long-Term Storage:
- Slice the cooled bread.
- Wrap slices individually or layer with parchment between slices.
- Place in a freezer-safe bag and freeze for up to 3 months.
To Reheat:
- Toast straight from frozen, or let thaw and warm in the oven for 10 minutes at 300°F (150°C).
Avoid refrigerating—it tends to dry out gluten-free bread faster.
Serving Suggestions
Buckwheat bread is super versatile. Here are a few delicious ways to serve it:
- For Breakfast: Toast and spread with almond butter, jam, or avocado.
- As a Side: Serve with hearty soups, stews, or salads.
- Open-Faced Sandwiches: Top with hummus, sliced veggies, or eggs.
- Sweet Treat: Add a drizzle of honey, cinnamon, or fresh fruit.
- Croutons or Stuffing: Use day-old bread for homemade croutons or gluten-free stuffing.
This bread does it all—rustic, nourishing, and ready for anything!
FAQs about Buckwheat Bread Recipe
1. Can I use 100% buckwheat flour?
Yes, you can! Just be aware that the bread will be denser than if you combine it with other flours like almond or oat. You might need to adjust liquids and add an extra egg or binder for structure.
2. Is buckwheat bread keto-friendly?
Not entirely. Buckwheat has carbs, though it’s lower on the glycemic index than wheat. For a low-carb version, use more almond flour and avoid sweeteners.
3. Why is my buckwheat bread crumbly?
That usually happens if there’s not enough binder (like eggs or flax eggs). Also, measure your flours carefully to avoid a dry mix.
4. Can I make it without eggs?
Absolutely. Flax or chia eggs work great. Use 1 tbsp ground flaxseed + 3 tbsp water per egg. Let it sit to thicken before adding.
5. How long does buckwheat bread stay fresh?
It stays fresh at room temperature for 2–3 days. For longer storage, slice and freeze it. Toast slices as needed for the best texture.
Conclusion
Making buckwheat bread at home isn’t just healthier—it’s satisfying, flavorful, and endlessly customizable. Whether you’re avoiding gluten, experimenting with new flours, or just love homemade bread, this recipe is a winner. Once you try it, you’ll wonder why you ever bought store-bought loaves. So preheat your oven, gather your ingredients, and enjoy the aroma of fresh bread wafting through your kitchen. Happy baking!


